
How To Convert A 2D Model Into 3D
Converting a 2D model into a 3D model can be challenging, especially if you need the right tools and knowledge. However, you can easily turn your 2D design into a stunning 3D model with the right steps, tools, and tips. This blog will discuss the essential steps and techniques involved in transforming a 2D model into a 3D one. We will explore various software tools and applications that you can use to create your 3D models. Additionally, we will provide useful tips to enhance the overall quality and detail of your 3D models.
The Common Techniques Used to Turn a 2D Model into a 3D Model:
Several techniques can convert a 2D model into a 3D model. The choice of technique depends on the complexity of the design, the software or tool being used, and the desired outcome. Here are some of the common techniques used:
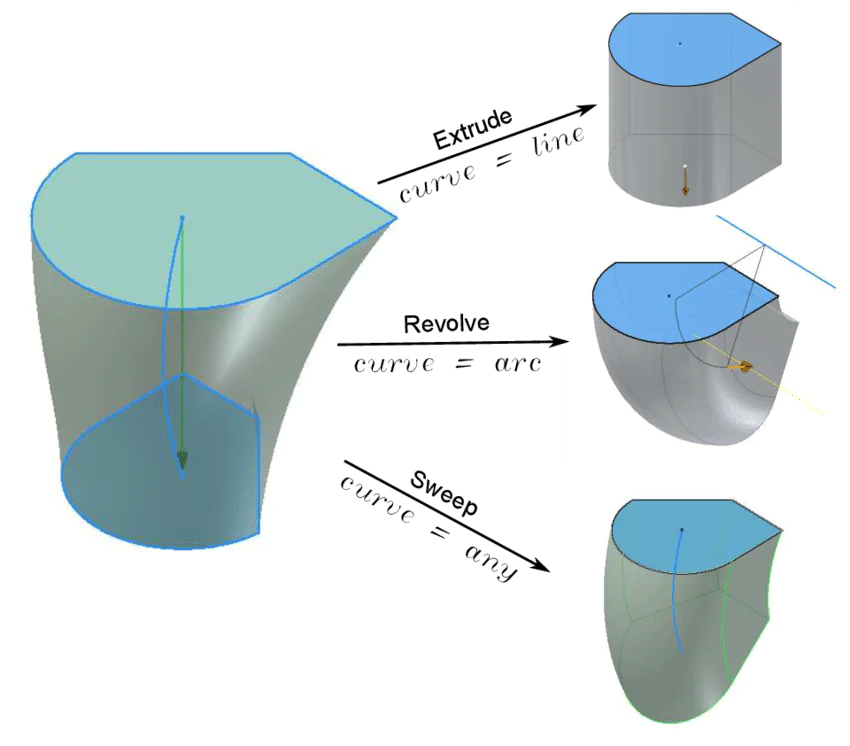
Extrusion:
Extrusion is one of the most straightforward techniques to make a 3D model from a 2D design. This technique takes a 2D shape and extends it straight to create a 3D object. It is done by selecting the shape in the software or tool used and then extruding it to create the desired thickness. This technique is commonly used for creating simple 3D models such as cylinders or rectangular boxes.
Revolve:
The revolve technique involves taking a 2D shape and revolving it around an axis to create a 3D object. This technique is commonly used for creating objects such as cups, bowls, and vases. Select the 2D shape in the software or tool for this technique and specify the axis around which it should be revolved.
Sweep:
The sweep technique involves taking a 2D shape and sweeping it along a path to create a 3D object. This technique is commonly used for creating objects such as pipes, rails, and moldings. To use this technique, select the 2D shape in the software or tool and specify the path along which it should be swept.
Loft:
The loft technique involves taking two or more 2D shapes and blending them to create a 3D object. This technique is commonly used for creating objects such as boats, cars, and airplanes. To use this technique, select the 2D shapes in the software or tool and specify how they should be blended.
Skin modeling:
Skin modeling is a technique that involves making a 3D model from various 2D curves or surfaces. This technique is common in the automotive and aerospace industries to create complex 3D models. To use this technique, you must create a series of 2D curves or surfaces in the software or tool and then use the skin modeling feature to create a 3D model.
Point cloud conversion:
Point cloud conversion is a technique that involves using a process called photogrammetry. This technique is commonly used in the gaming and film industries to create realistic 3D models from real-world objects or environments. To use this technique, you must capture 2D images of the object or environment from different angles and then use software or tool to convert the images into a 3D model.
The Software and Tools That Can Be Used While Making 2d Models into 3D:
Several software and tools can be used to convert a 2D model into a 3D model. Each software has its unique features, and the choice of software depends on the complexity of the design, the user’s skill level, and the desired outcome.
AutoCAD:
AutoCAD is a popular software used for creating 2D and 3D designs. It offers a variety of tools for converting 2D designs into 3D models, including extrusion, revolve, and sweep. AutoCAD is widely used in the architecture, engineering, and construction industries.
SolidWorks:
SolidWorks is a 3D modeling software that allows users to create detailed 3D models from 2D designs. It offers a variety of tools for converting 2D designs into 3D models, including loft, sweep, and skin modeling. SolidWorks is widely used in the manufacturing and product design industries.
SketchUp:
SketchUp is a user-friendly 3D modeling software that is ideal for beginners. It offers a variety of tools for converting 2D designs into 3D models, including extrusion, revolve, and loft. SketchUp is widely used in the architecture and interior design industries.
Blender:
Blender is a free, open-source 3D modeling software exhibiting a variety of tools for converting 2D designs into 3D models. It is ideal for creating complex 3D models and offers skin modeling and point cloud conversion features. Blender is widely used in the gaming and animation industries.
Autodesk Fusion 360:
Autodesk Fusion 360 is a cloud-based 3D modeling software that offers a variety of tools for converting 2D designs into 3D models. It offers extrusion, revolve, sweep, and loft features and is widely used in the manufacturing and product design industries.
Tips to keep in mind while converting a 2D design into a 3D model:
Choose the right software: Select a software program that is best suited for your skill level and the type of 3D Model you want to create.
Take measurements: Ensure you take accurate measurements of the 2D design, which will help you create a proportional and precise 3D model.
Break it down: Break the 2D design into smaller components, which will make it easier to create a 3D model.
Be patient: Converting a 2D design into a 3D model can be time-consuming, so be patient and take breaks when necessary.
Use reference images: Use reference images to ensure that the 3D Model is accurate and looks as close to the original design as possible.
Test your design: Test your 3D design regularly to ensure it is coming together as expected, and make adjustments as needed. Top of Form
Step By Step Procedure to Make 2D Models into 3D:
Here are the steps to follow to convert a 2D model into a 3D model while keeping in mind the above-mentioned techniques, software tools, and tips:
Step 1: Understand the Design and Choose the Appropriate Technique
The first step in converting a 2D into a 3D model is understanding the design and choosing the appropriate technique. Depending on the complexity of the design, different techniques may be required. For example, extrusion may be sufficient for simple designs, while loft or skin modeling may be necessary for more complex designs.
Step 2: Choose the Appropriate Software Tool
After understanding the design and choosing the appropriate technique, the next step is to choose the appropriate software tool. Several software tools are available, such as AutoCAD, SolidWorks, SketchUp, Blender, and Autodesk Fusion 360. Choose the software tool based on the complexity of the design, the user’s skill level, and the desired outcome.
Step 3: Import the 2D Model
After choosing the appropriate software tool, import the 2D Model into the software. Ensure that all measurements are accurate and that the design is feasible in 3D.
Step 4: Use Layers to Separate Different Parts of the Design
When working with 2D designs, using layers to separate different design parts is important. That will make it easier to convert the design into a 3D model. Use different layers for different design parts, such as walls, floors, and ceilings.
Step 5: Use the Appropriate Technique to Convert the Design into 3D
Use the appropriate technique to convert the 2D design into a 3D model. For example, if the design is simple, use extrusion to create the 3D Model. If the design is more complex, use loft or skin modeling techniques to create the 3D Model.
Step 6: Check for Errors and Inconsistencies
Check the Model for errors or inconsistencies throughout the conversion process. It is easier to fix errors in the 2D design before converting it into a 3D model. Use the software tools to identify and correct any errors or inconsistencies.
Step 7: Keep it Simple
When converting a 2D design into a 3D model, it is important to keep it simple. Avoid unnecessary details that may make the Model too complex. Focus on the design’s essential elements and ensure they are represented accurately in the 3D Model.
Step 8: Practice and Experiment
Converting a 2D design into a 3D model takes practice and experimentation. Try different techniques and software to find the best for your project, and practice using the software tools to become familiar with their capabilities and limitations.
Step 9: Refine the 3D Model
Once the 2D design has been successfully converted into a 3D model, refine the Model as necessary. It involves adding details, adjusting dimensions, or refining the texture and color. Use the software tools to refine the Model until it accurately represents the original design.
Step 10: Export the 3D Model
Finally, export the 3D Model from the software tool. The exported Model can be used for visualization, prototyping, or manufacturing. Choose the appropriate file format for the intended use of the 3D Model.
Conclusion
In conclusion, turning a 2D model into a 3D one can be challenging yet rewarding. Using the appropriate techniques, software tools, and tips makes it possible to create an accurate and realistic 3D model from a 2D design. Whether for visualization, prototyping, or manufacturing, converting a 2D model into a 3D model is a valuable skill for designers and engineers.
