
How To Apply Film Grain To Your Photos
Film grain has a special place in images, as it is overcoming technology and adding a feeling of nostalgia, realness, and creative quality. In the dominance of sharp, noise-free digital photos, the addition of film grain can stir up a distinct visual charm caused by imperfections and variation making images feel more organic and genuine. Including film grain’s imperfections and randomness can generate a sense of comfort, intimacy, and familiarity reminiscent of the analog film era. By triggering sentiments of nostalgia and desire for the past, film grain heightens the image’s evocative and emotionally resonant power. Thus it lets you achieve aesthetic impact while preserving the integrity of your images. When applying film grain to your photos, you must know the general steps required to follow to get the desired result. Having regard to these step-by-step guidelines and adhering to some additional tips to refine and customize your final image, you can perfectly apply film grain and infuse a vintage charm into your photos.
Step 1: Preparing Your Image
Open your digital image in your preferred photo editing software. That could be Adobe Photoshop, GIMP, Lightroom, or any other software that allows image editing and manipulation. Ensure you have a high-quality image file you want to enhance with the film grain effect.
If needed, make any necessary adjustments to the image before proceeding. That could include basic edits such as cropping, straightening, adjusting exposure, contrast, or color balance. It’s essential to start with a well-edited base image since the film grain effect will be applied on top of it.
You ensure a clean and visually appealing starting point by preparing your image and preparing for the film grain effect. This step sets the foundation for the subsequent steps, where you will add the film grain texture to create the desired aesthetic.
Step 2: Creating a New Layer
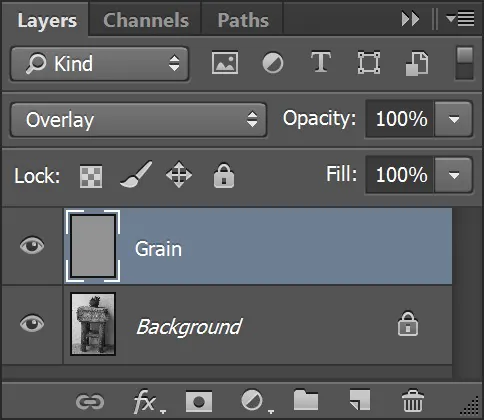
Once your image is prepared, the next step is to create a new layer in your photo editing software. This new layer will allow you to work on the film grain effect non-destructively, meaning that you can make adjustments and changes without altering the original image.
In most photo editing software, you can create a new layer using the “New Layer” option or a keyboard shortcut. Name the new layer like “Film Grain” or “Texture” to organize your layers.
After creating the new layer, you must ensure it is positioned above the original image layer. That allows the film grain effect to be applied on top of the image.
By working on a separate layer, you can easily toggle the film grain effect on and off to compare the results and adjust as needed. It also allows you to experiment with different settings and blending modes without altering the original image permanently.
Step 3: Adding Noise
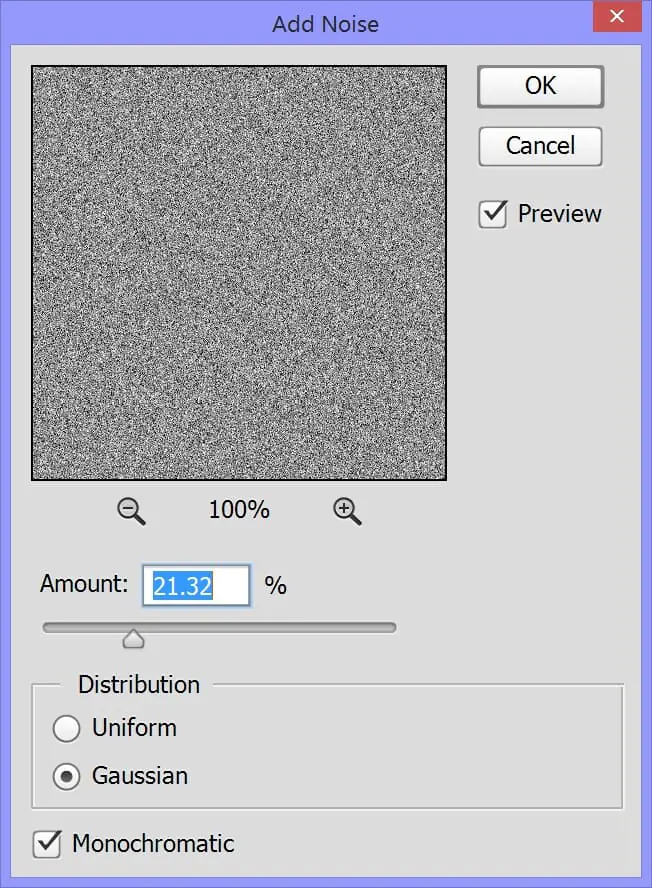
In this step, you’ll add the film grain effect to the new layer you created in Step 2. The film grain effect is achieved by introducing noise to the image, simulating the appearance of grain found in traditional film photography.
Select the new layer you created to add noise and navigate to your photo editing software’s noise or grain filter option. This filter is typically found in the Effects or Filter menu.
Adjust the noise filter’s settings to control the grain’s amount and size. Increase the intensity or strength to add a more prominent grain or decrease it for a subtler effect. Try different settings to achieve the desired feel.
Depending on your photo editing software, you may have additional options to customize the noise, such as adjusting the grain’s distribution, color, or contrast.
Step 4: Blending Modes
After adding the film grain effect to your new layer, it’s time to blend it with the original image to create a more seamless and natural look. Blending modes allow you to control how the film grain interacts with the underlying image.
Select the new layer with the film grain effect in your photo editing software and navigate to the blending mode options. Standard blending modes to consider are “Overlay,” “Soft Light,” or “Multiply.” Each blending mode produces a different result, so it’s essential to experiment and find the one that best suits your image and desired effect.
The blending mode determines how the film grain layer’s pixels interact with the underlying image’s pixels. Some blending modes enhance the contrast and intensity of the grain, while others blend it more subtly into the image.
As you try different blending modes, consider how the film grain affects the photo’s tones, colors, and details. You may need to adjust the opacity of the film grain layer to fine-tune the intensity of the effect.
Step 5: Fine-Tuning the Grain
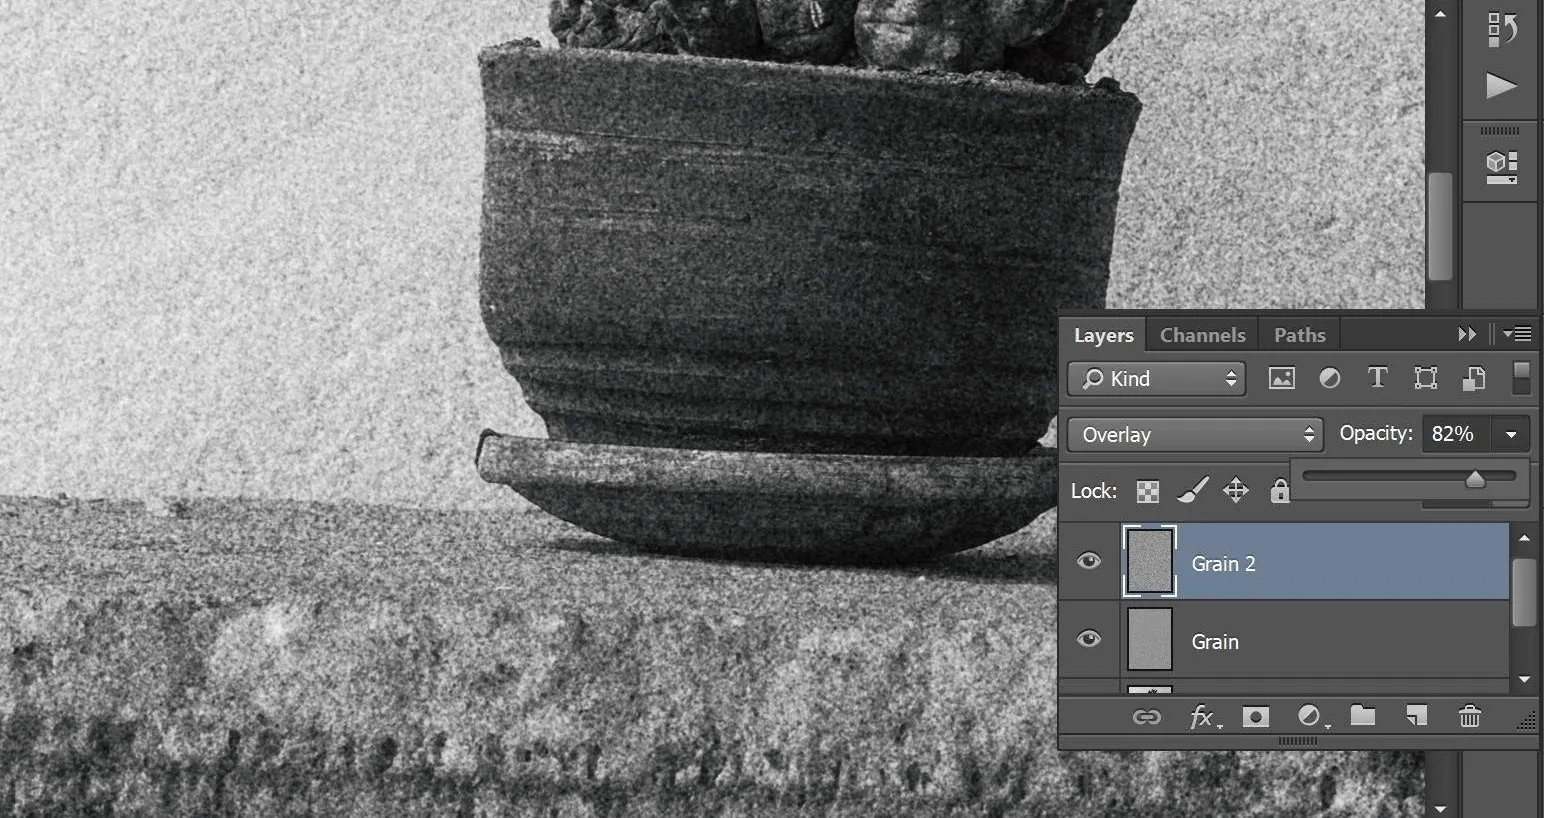
You can fine-tune the film grain effect applied to your photo in this step. By making adjustments, you can achieve the desired level of intensity, texture, and overall appearance.
One essential adjustment is controlling the opacity of the film grain layer. That allows you to increase or decrease the strength of the effect. By reducing the opacity, you can create a more subtle and nuanced grain, while increasing it adds a more pronounced texture.
Additionally, you can experiment with other adjustment tools available in your photo editing software, such as levels, curves, or contrast. These adjustments can refine the appearance of the film grain, allowing you better to match your image’s overall tonal and visual qualities.
Balancing the film’s grain effect and the original image is essential. Pay attention to how the grain complements the photo’s subject, mood, and overall aesthetic. Make adjustments until you achieve a cohesive and visually pleasing result.
Try different settings, blending modes, and adjustment combinations to find the perfect balance that enhances your photo while maintaining its visual integrity.
Step 6: Saving the Final Image
After you’re satisfied with the film grain effect and have fine-tuned it to your liking, it’s time to save the final image. Select the option to save the edited image in your preferred format, such as JPEG or PNG.
Consider saving a high-resolution version of the image to retain the quality and details of the photograph. That will allow you to use the image for various purposes, whether printing, sharing on social media, or displaying on a digital platform.
If you want to preserve the non-destructive editing capabilities of your photo editing software, you can also save the image in a format that supports layers, such as PSD or TIFF. This way, you can easily make further adjustments or modifications to the film grain effect in the future if needed.
Choose a file name and location you can easily remember and access. That will help you locate the edited image whenever you need it.
Some Additional Guidelines to Apply Film Grain to Your Photos:
Adjust the Grain Intensity: Depending on the desired effect and the style of your image, you may need to adjust the intensity of the film grain. Experiment with different grain levels to find the balance that enhances your photo without overpowering it. Subtle adjustments can make a significant difference in achieving the desired aesthetic.
Consider Grain Size: The size of the film grain particles can impact your image’s overall look and feel. Smaller grain particles tend to create a smoother and less pronounced effect, while larger grain particles can add a more prominent and textured appearance. Play around with different grain sizes to find the one that best complements your photo.
Customize the Grain Distribution: Some photo editing software allows you to customize the distribution pattern of the film grain. You can adjust parameters like grain density, randomness, or clustering to create a unique and personalized effect. Experimenting with these settings can help you achieve a more customized and tailored look for your images.
Apply Film Grain to Specific Areas: Some parts of your photo may require different amounts of film grain. Consider applying the effect selectively to specific areas of the image, such as the background or certain textures, to create a more controlled and intentional look. This technique can help draw attention to specific elements in the photo and make a more dynamic visual impact.
Blend Multiple Film Grain Layers: You can experiment with blending multiple film grain layers for more intricate and customizable effects. Each layer can have different settings, such as grain size, intensity, or distribution. By blending these layers with different blending modes and opacity levels, you can achieve a unique and nuanced film grain effect that adds depth and complexity to your image.
Maintain Image Quality: When adding film grain digitally, it’s vital to maintain the overall quality of your image. Be mindful of the resolution, sharpness, and details, ensuring they are preserved throughout the process. Avoid introducing artifacts or noise that might degrade the visual quality of the photo. Regularly zoom in and inspect your image at 100% to ensure the film grain effect enhances without compromising the image quality.
Conclusion:
Film grain brings irreplaceable charm to your photos by locking the magic of a bygone era. It creates a distinct atmosphere that transcends the digital realm and lends a timeless aspect to photos that captivate and engages audiences more profoundly. Note that the individual edits may vary, determined by the image editing software and your tastes, if you follow the above procedures and instructions. When applying film grain to your images, feel open to trying new things, overview different approaches, and establish your style so that you bestow your images with unique characters and textures that can tap others into reminiscence.
