
How to Apply CMYK Colours to Your Images Using Illustrator
CMYK colours represent four primary printing ink colours: cyan, magenta, yellow, and key(black), each with a specific percentage composition to produce the intended colour effects in your image printout. Unlike RGB colour settings suitable for digital content, CMYK colour swatches do not introduce unpredictable colours and colour shifts in printed images. When printing multi-colour images like brochures, magazines, flyers, business cards, etc., CMYK colour mode allows for colour control and precise registration of colours. Even for digital purposes, existing RGB colour mode images can be converted to the CMYK colour scheme to reduce the stripping effect due to limited colour data in the image alteration settings.to apply CMYK colours to images before printing, you can utilize Illustrator, a graphic design and illustration programme well known for its precision and accuracy. Using its intrinsic tools, you can terrifically convert your RGB-moded digital images into printable CMYK forms that expo real-life colours in printed materials like paper, fabric, cardboard and more.
Step 1: Getting Started: Importing Your Image into Adobe Illustrator
Launch the application from your computer’s programs or applications menu to apply CMYK colours to your images using Adobe Illustrator. Once Illustrator is up and running, click on the “File” menu at the screen’s top-left corner. From the dropdown menu, choose “Open” to import your image file into Illustrator. Alternatively, you can use the shortcut “Ctrl + O” (Windows) or “Cmd + O” (Mac) to access the file explorer and select your image. Upon clicking “Open” or pressing the appropriate shortcut, your image will appear within the Illustrator workspace, ready for your creative touch. Ensure that the image file is in a compatible format, such as JPEG, PNG, or TIFF, for a smooth import process.
Step 2: Color Mode Adjustment: Checking and Setting to RGB
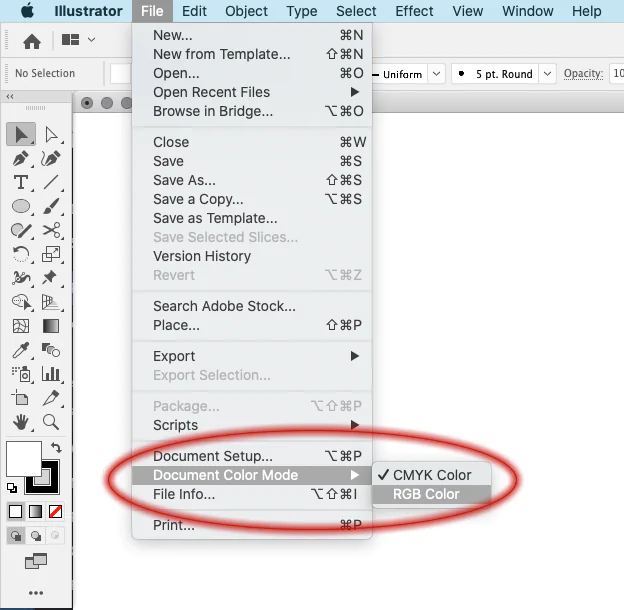
After importing your image into Adobe Illustrator, verifying and adjusting its colour mode to RGB for a seamless CMYK colour application is essential. To do this, go to the “File” menu at the top-left corner of the Illustrator interface. From the dropdown menu, select “Document Color Mode.” A sub-menu will appear, displaying the available colour mode options. If the current colour mode is already set to RGB, you can proceed to Step 3. However, if it’s in CMYK or any other mode, click “RGB Color” to switch to the RGB colour mode. Illustrator will prompt you to confirm the change; simply click “OK” to proceed. Now that your image is in RGB colour mode, you can confidently apply CMYK colours to create stunning and accurate print-ready designs.
Step 3: Access the CMYK Color Swatch Library
To access the CMYK colour swatch library in Adobe Illustrator, open the Swatches panel by going to the “Window” menu at the top of the Illustrator interface and selecting “Swatches.” The Swatches panel will appear, displaying a collection of predefined colour swatches. Next, click the small menu icon in the Swatches panel’s top-right corner. From the dropdown menu, choose “Open Swatch Library,” followed by “Color Books,” and finally, select “CMYK.” This action will open the CMYK colour swatch library, offering an array of cyan, magenta, yellow, and key (black) colours, each with various intensity levels. Now, you can access an extensive range of CMYK colours to apply to your image for precise and vivid colour effects. With the CMYK colour swatch library, you can infuse your designs with stunning print-ready colours.
Step 4: Select the Desired CMYK Color Swatch
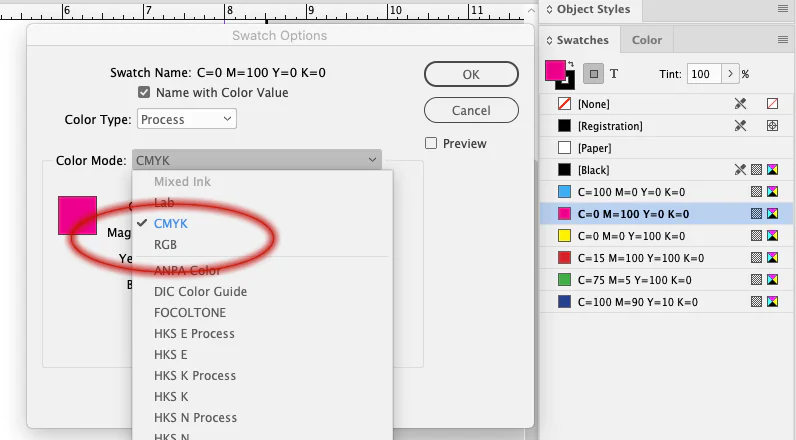
With the CMYK colour swatch library open in Adobe Illustrator, you can select the specific CMYK colour you want to apply to your image. Take a moment to explore the available swatches, representing a wide range of vibrant and captivating colours. Each swatch displays its CMYK values, indicating the exact composition of cyan, magenta, yellow, and key (black) in the colour mixture. Click the CMYK colour swatch in the library to choose your desired colour. The chosen swatch will become the active colour in Illustrator, ready for application. That empowers you with the freedom to experiment with different colour combinations, allowing you to achieve the perfect hue to bring your design to life. Selecting the precise CMYK colour swatch sets the foundation for accurate and consistent colour representation throughout your image. With Illustrator’s intuitive interface and the vast CMYK colour options, your creative possibilities are limitless.
Step 5: Precise Application: Applying CMYK Colors to Specific Areas
With the vast range of CMYK colour swatches in Adobe Illustrator, you can now precisely apply these captivating colours to specific areas of your image. Utilize the Selection Tool or any other appropriate tool to carefully select the areas or objects you wish to modify with the chosen CMYK colour. Once the target areas are selected, click on the CMYK colour swatch from the library that corresponds to your desired hue. Illustrator’s colour application process instantly transforms the selected areas with the new CMYK colour, infusing your design with vibrancy and visual appeal. Repeat this process to experiment with different CMYK colour combinations, creating a harmonious and captivating composition. With each precise application, your image comes alive with stunning and accurate CMYK colours, enhancing its overall visual impact.
Step 6: Fine-Tuning Your Design: Review and Refine
Reviewing and refining your design before finalizing your CMYK colour application in Adobe Illustrator secures a flawless outcome. Zoom to view your image holistically and evaluate the overall colour composition. Check for inconsistencies or unintended colour combinations that may have emerged during the process. Take this opportunity to refine to achieve a harmonious and visually appealing result. Double-check that all crucial elements in your image have been modified with the appropriate CMYK colours and that all areas have been noticed.
For finer adjustments, zoom in on specific areas of your design to ensure precise colour control. If you encounter any issues or wish to compare your progress, use the Undo or History panel to revert to the previous stages of your design process.
To get a realistic preview of how your image will appear when printed, use Illustrator’s Preview mode. This feature simulates the final printed output, helping you evaluate the colour representation accurately.
By thoroughly reviewing and refining your CMYK colour application, you can ensure that your design exhibits vibrant, true-to-life colours, making it visually captivating and print-ready.
Step 7: Print-Ready Preparation: Getting Your Image Ready for Printing
With your CMYK-enhanced image perfected in Adobe Illustrator, it’s time to prepare it for printing, ensuring that your hard work translates flawlessly onto physical media. Begin by ensuring that all necessary adjustments and colour modifications have been made, as changes after printing can be costly and time-consuming. Save your file with a descriptive and recognizable name, making it easy to identify and locate in the future.
To preserve the best possible print quality, export your image in a high-resolution format, such as TIFF or PDF. High-resolution files ensure your design’s sharpness and clarity when printed on various materials.
If you want your image professionally printed, consider discussing the printing specifications, such as paper type, finish, and printing method, with your print service provider. This collaboration ensures that your design aligns with the printing process and yields optimal results.
If you are printing the image yourself, calibrate your printer to match the CMYK colour profile of your design. Printer calibration ensures that the colours you see on-screen closely match those in your print, resulting in accurate colour representation.
Finally, by taking these steps, your CMYK-enhanced image will be ready to showcase its true colours and make a lasting impression in the physical world of print.
Pro Tips for Working with CMYK Colors in Illustrator
Use Color Swatches: Use Illustrator’s colour swatch libraries to explore and choose CMYK colours. Using predefined swatches ensures consistency in colour representation throughout your design.
Avoid RGB for Print: Always work in the CMYK colour mode when designing for print to ensure accurate colour reproduction. Converting RGB images to CMYK before printing prevents colour shifts and unwanted surprises in the final output.
Proof Colors: Use the “View” > “Proof Colors” option in Illustrator to simulate how your design will look when printed. This feature helps you identify any potential issues before sending your artwork for printing.
Mind Color Profiles: Ensure that your printer and print service provider uses the same CMYK colour profile to maintain consistency. Discuss colour profiles and proofing options with your print provider for the best results.
Check Image Resolution: Before printing, verify that your image has a sufficient resolution for the desired print size. Higher-resolution images result in better print quality and sharpness.
Design in CMYK from the Start: If you know your project will be printed, immediately start your design in CMYK colour mode. This way, you can work with CMYK colours from the outset and avoid potential colour conversions later.
Keep a Backup: Always save a copy of your original design file in native format (such as AI or PSD) before converting to CMYK or making any significant colour adjustments. This way, you can easily make changes or revert if needed.
Conclusions
The significance of Cmyk colours can always be appreciated in designing and printing. The CMYK mode is the backbone of the printing industry, providing a pinpointed way to represent colours in the four primary ink channels. It can provide accurate colour reproduction in print materials, ensuring that the final output closely matches the intended design. To apply CMYK colours to your images, pursue the guidelines presented in this blog and effectively work with CMYK colours in Illustrator to create stunning, print-ready designs with veracious colour representation.
