
How to Apply an Oil Painting Filter
The oil painting filter mimics the effect and texture of the same, like that of a traditional oil painting, with the help of a digital tool or software. The filter primarily uses brushwork, stroke settings, and particular oil painting techniques like light and shadow interaction to produce a picture with perspective and intensity. The oil painting filter also modifies the color palette to approximate the warm, rich tones associated with oil paintings. It can accentuate particular colors or create a slight yellowish tinge to simulate the natural fading and tarnish of oil paint over time. After a thorough understanding of the techniques involved in applying the oil painting filter and dedicating yourself to practicing the software settings related to the oil painting filter, you can masterfully transform your ordinary digital photographs into hypnotic traditional oil paintings. This blog highlights a step-by-step approach so that you can become proficient in creating oil painting-like evocative images.
Step 1: Getting Started – Launching the Image Editing Software and Loading Your Image
To begin using an oil painting filter, you need to start by launching your preferred image editing software. Locate the software icon on your computer and double-click to open it. Once the software is launched, look for the option to open or import an image. That can usually be found under the “File” menu or as a dedicated button in the toolbar.
Click on the “Open” or “Import” option, and a file explorer window will appear. Navigate to the location where your image is saved and select it. Finally, click “Open” to load the image into the software. Ensure you have a high-resolution image file available for the best results. Now you’re ready to move on to the next step and start applying the oil painting filter to your image.
Step 2: Creating a Duplicate – Safeguarding Your Original Image (Optional)
Before applying any filters or making changes to your image, creating a duplicate of the original is a good practice. This step ensures that you have a backup copy, preserving the integrity of your original photo.
To create a duplicate, locate the option for duplicating layers in your image editing software. That can be done by right-clicking on the image layer in the Layers panel or through a menu option.
Select the “Duplicate Layer” or similar option, and a new layer will be created that is an exact copy of the original image. You can now proceed with applying the oil painting filter to the duplicate layer, keeping the original untouched.
Having a duplicate layer allows you the freedom to experiment and make changes while preserving the integrity of your original image. It provides a safety net if you want to revert to the original or explore different filter settings without affecting the initial image.
Step 3: Accessing the Filter Menu or Toolbar – Navigating to the Oil Painting Filter
Once you have your image loaded into the editing software, the next step is to locate the filter menu or toolbar where the oil painting filter is available.
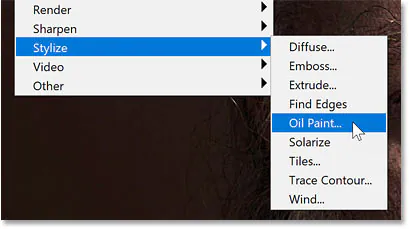
In most image editing software, you can find the filter menu at the top of the screen, usually under the “Filter” or “Effects” tab. Click on the respective menu option, and a dropdown list of available filters will appear.
If there is a dedicated toolbar, look for an icon or button that represents the filters or effects. Click on it to open the toolbar to access the various filters, including the oil painting filter.
Take your time to explore the options and familiarize yourself with the filter menu or toolbar. It will help you navigate and select the desired filter for applying the oil painting effect to your image.
Step 4: Selecting the Oil Painting Filter – Choosing the Desired Effect
After accessing the filter menu or toolbar, the next step is to locate and select the oil painting filter from the available options. Look for filter categories such as “Artistic,” “Painting,” or “Effects” where the oil painting filter might be located.
Click on the oil painting filter option to select it. This action will bring up the filter settings or properties dialog box, allowing you to customize the specific parameters of the oil painting effect.
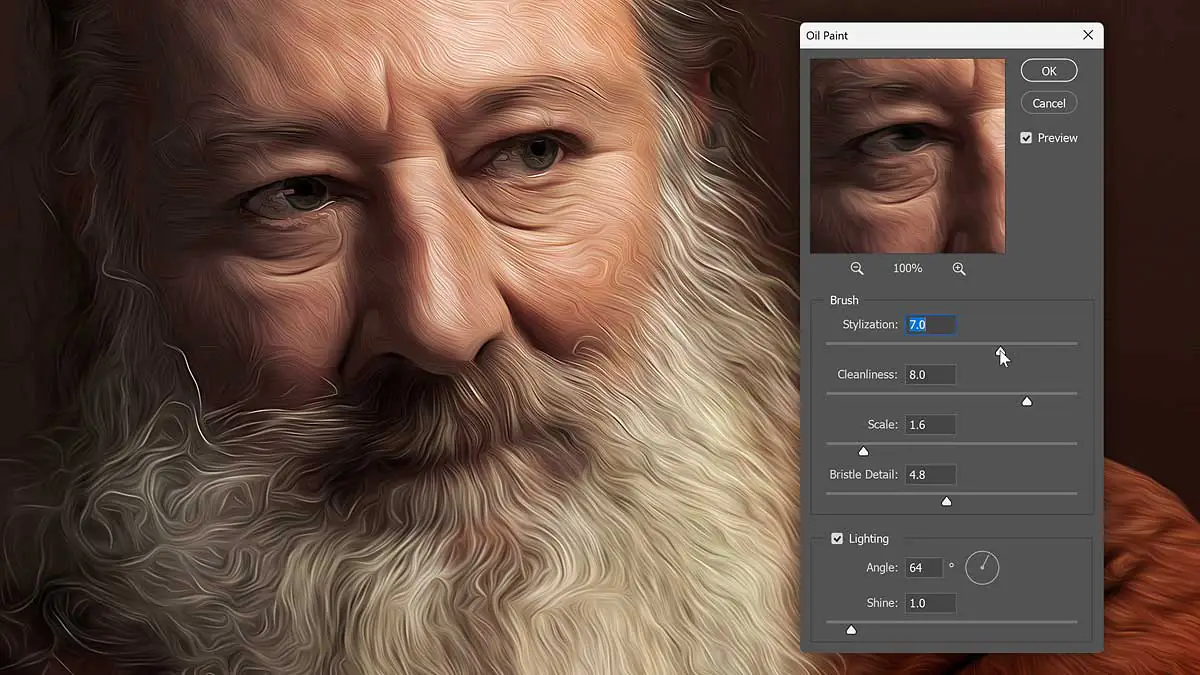
Take a moment to familiarize yourself with the available settings. These may include options such as brush size, stroke length, color intensity, or texture variation. Adjust these settings according to your desired artistic effect or the specific characteristics you want to emphasize in your image.
Once you have made your desired adjustments, you can proceed to the next step and apply the oil painting filter to your image.
Step 5: Fine-Tuning the Filter Settings – Customizing the Oil Painting Effect to Perfection
With the oil painting filter selected, it’s time to dive into the customization process and fine-tune the filter settings to achieve the perfect oil painting effect for your image. Take a closer look at the available parameter controls within the filter properties dialog box or panel.
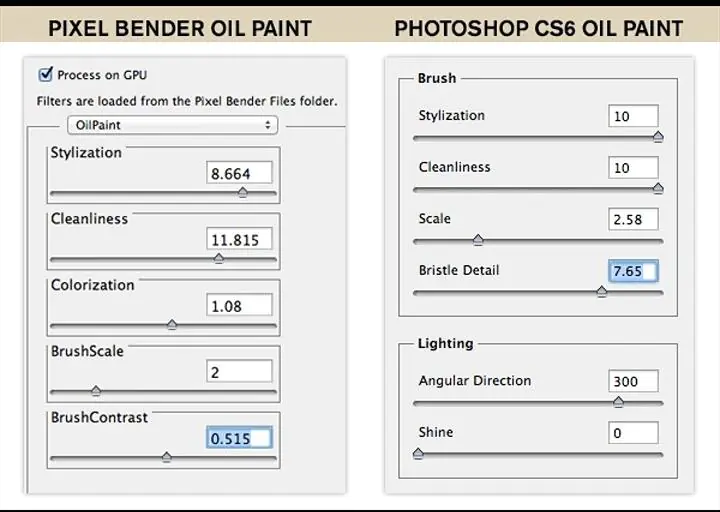
Inspect the range of options at your disposal, including brush size, stroke style, color blending, texture intensity, and more. Each parameter offers an opportunity to shape the characteristics of the oil painting effect.
Take a gradual approach to adjustments, starting with small changes and observing the impact on your image. Utilize the real-time preview, if available, to assess how each modification alters the appearance of your artwork.
Experiment with different values and combinations to strike the right balance. Pay attention to brushwork, color transitions, texture, and overall aesthetic. Aim to achieve a cohesive and harmonious result that brings out the desired qualities of an oil painting while staying true to the essence of your original image.
Remember to trust your artistic intuition and make iterative adjustments until you feel satisfied with the outcome. Take the time to explore various possibilities and find the settings that best showcase your vision for the oil painting transformation.
Step 6: Previewing the Filter Effect – Assessing the Oil Painting Transformation
After adjusting the filter settings, previewing the effect to assess the oil painting transformation before finalizing the changes is essential. Many image editing software provides a real-time preview feature that lets you see the result as you adjust.
Take a moment to observe the transformed image. Pay attention to the brushwork, color blending, texture, and overall aesthetic. Evaluate whether the oil painting filter has achieved the desired artistic effect or needs further adjustments.
If necessary, go back to the filter settings and make additional modifications until you achieve the desired outcome. Iterative previewing and refining will help you fine-tune the oil painting effect and ensure a visually pleasing result.
Remember to strike a balance between maintaining the original image’s essence and embracing the artistic qualities offered by the oil painting filter.
Step 7: Applying the Oil Painting Filter – Finalizing the Transformation
Once you are satisfied with the previewed oil painting effect, it’s time to apply the filter to your image and finalize the transformation. Locate the “Apply” or “OK” button within the filter properties dialog box or panel.
Click on the button to process the filter and apply it to your image. The software will generate the final result based on the selected settings and parameters of the oil painting filter.
After the filter is applied, take a moment to review the transformed image in its entirety. Assess the brushwork, color blending, texture, and overall artistic appearance. Ensure that it aligns with your creative vision and desired outcome.
If you are content with the result, proceed to save your edited image. However, if any further adjustments are desired, consider revisiting the filter settings or applying additional editing techniques to refine the transformation.
By applying the oil painting filter and finalizing the transformation, you complete the process of imbuing your image with the essence and aesthetics of an oil painting.
Step 8: Saving Your Edited Image – Preserving the Oil Painting Filtered Result
After applying the oil painting filter and finalizing the transformation, it’s crucial to save your edited image to preserve the oil painting filtered result. Navigate to your image editing software’s “File” menu or toolbar options.
Select the “Save As” or “Export” option to specify the file name, format, and location for saving your edited image. Choose a format that retains the quality and details of the image, such as JPEG or PNG.
Consider creating a separate folder to organize your edited images. That ensures easy access and prevents overwriting the original image or other versions.
Once saved, your oil painting-filtered image is ready to be shared, printed, or used for various purposes, showcasing the artistic transformation the oil painting filter achieves.
Conclusion
Finally, oil painting filters for photographs offer an exclusive chance to boost your work and endow it with a lasting and creative attraction. The ability to recreate the beauty and charm of classic oil paintings, along with configurable features and various uses such as adjusting brush size, intensity, and color palette, makes these filters an efficient tool for creative expression. However, oil painting filters must be used with caution and moderation, as inappropriate use can result in an excessively processed and artificial appearance.
