
How Can You Do Posterization Of Your Images
Image posterization simplifies them by reducing the number of colors or tones, resulting in limited, distinct, and flat-colored graphics. Though having the specification of limited colors, the posterization process expresses no smoother transitions between colors but rather abrupt changes between colors. The fewer the number of steps used to posterize an image, the fewer the number of colors displayed in the image, which absolutely executes more and more simplification. Posterization intends to provoke a simple yet creative effect in graphic design or art. Conversely, it can also happen unintentionally when color or tone reproduction limitations exist, such as when a picture is remolded to a lower color depth. Posterization’s primary virtue is to express a message through straightforward design, assisting in forming dramatic, conspicuous compositions. It maintains the delicate relationship between deliberate innovation and unanticipated aesthetic outputs, thereby providing appealing and open image modifications. Follow these steps for a specific set of methods and strategies for conducting posterization in your photographs to secure a successful application of this creative process.
Step 1: Image Selection and Preparation

Start by choosing an image that will benefit from posterization. Opt for images with clear shapes and distinct regions; this technique works best on subjects with defined boundaries.
Choose the Right Image: Look for subjects with well-defined shapes, distinct regions, and a good balance of colors. Avoid images with too much complexity, as posterization tends to simplify details.
Image Enhancement: Adjust the image’s contrast, brightness, and sharpness to enhance its visual appeal and ensure that important features stand out.
Crop and Resize: Use cropping and resizing tools to focus on the key elements of your image. This step helps eliminate unnecessary background and emphasizes the subject.
Save a Copy: Before you begin posterizing, save a copy of the original image preserving the unaltered version for future reference.
These mini-steps set the stage for effective posterization and achieving more impactful results in your final artwork.
Step 2: Defining Color Zones
Once you’ve selected your image, break it down into distinct color zones. Identify areas where you want to emphasize boundaries and create a bold visual impact.
Segment Identification: Analyze your image and mentally divide it into regions of similar color or tone. These segments will become the building blocks of your posterized composition.
Highlight Key Features: Identify your image’s main elements or focal points. Designate color zones around these features to draw attention and add a dynamic touch to your posterization.
Balancing Complexity: Aim for a balanced distribution of color zones across your image. Avoid overcrowding or leaving large areas untouched, affecting the overall aesthetic and harmony.
Sketch the Zones: Make a rough sketch or mark areas directly on the image to visualize the color zones before proceeding to the next step.
By effectively defining color zones, you’ll establish a foundation for the impactful transformation that posterization can bring to your image.
Step 3: Color Palette Selection
With your color zones established, it’s time to choose a suitable color palette that complements the mood and style you want to convey through your posterization.
Color Harmony: Decide on the overall mood you wish to achieve. Choose colors that harmonize well and evoke the desired emotions, whether vibrant, energetic, subdued, or tranquil.
Limited Palette: Opt for a limited number of colors to maintain the posterized effect. Select a small range of hues representing the different zones, ensuring a coherent and visually striking outcome.
Experimentation: Test different color combinations to see how they interact with each other and affect the overall composition. Adjust and fine-tune until you find a palette that enhances the impact of each zone.
Contrast and Emphasis: Consider using contrasting colors for adjacent zones to create a bold visual contrast and emphasize the boundaries between segments.
By thoughtfully selecting your color palette, you’ll add depth and character to your posterized image, transforming it into a captivating piece of visual art.
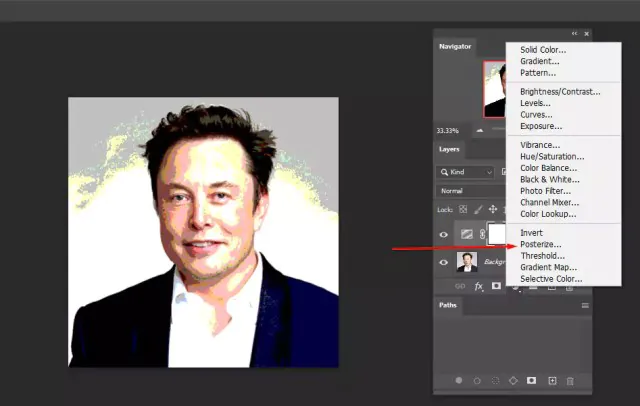
Step 4: Applying Posterization Filters
Now it’s time to apply posterization filters to your image using image editing software. These filters will help you achieve the distinct and stylized look you want.
Software Selection: Open your chosen image editing software and import your prepared image. Ensure you use a tool that supports posterization, such as Adobe Photoshop or GIMP.
Posterization Effect: Locate the posterization filter or adjustment layer in your software’s menu. Adjust the settings to control the number of color levels or tones in your image. A higher level will result in more defined zones, while a lower level will create a simpler graphic effect.
Threshold Control: Experiment with different threshold settings to find the right balance between retaining detail and simplifying the image. Preview the changes and fine-tune them until you’re satisfied with the outcome.
Applying the Filter: Once satisfied with the settings, apply the posterization filter to your image. Review the result and make any necessary adjustments to ensure your color zones are well-defined and visually appealing.
By carefully applying posterization filters, you’ll transform your image into a stylized artwork that captures attention with its distinctive, poster-like appearance.
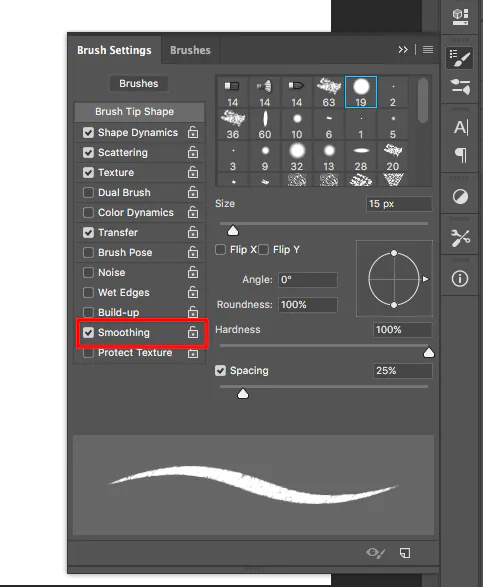
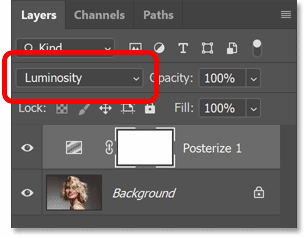
Step 5: Refining the Posterized Look
After applying the posterization filter, take the time to refine and enhance the impact of your posterized image. This step involves adjusting key elements to ensure a polished and cohesive final result.
Edge Smoothness: Evaluate the edges of your color zones. Use smoothing tools or techniques to soften jagged edges and create a smoother transition between adjacent areas, enhancing the overall aesthetics.
Contrast Enhancement: Adjust the contrast and brightness of individual color zones to make them stand out and contribute to the dynamic effect. Increase contrast between zones for a bolder separation.
Selective Detailing: If desired, selectively enhance or emphasize certain areas by applying additional adjustments, like sharpening or slight color adjustments, to draw the viewer’s attention.
Preview and Fine-Tune: Regularly zoom out and preview your image to ensure the posterized effect remains impactful even at smaller sizes. Make minor adjustments as needed to maintain a balanced and engaging composition.
By refining the posterized look of your image, you’ll elevate its visual appeal and ensure that the posterization process enhances the overall aesthetic of your artwork.
Step 6: Evaluating Posterized Impact
Now that you’ve refined the posterized image, it’s crucial to step back and evaluate the impact of your creative choices. Take a critical look at the composition and ensure it aligns with your artistic vision.
Zoom and Perspective: View your posterized image at different zoom levels to assess how it appears up close and from a distance. Confirm that the defined zones are visually clear and the overall effect is compelling.
Composition Balance: Examine the balance between color zones and their relationships. Ensure each zone contributes to the composition’s overall visual balance and harmony.
Focal Points: Check if your image’s designated focal points or main features are effectively emphasized through posterization. They should draw the viewer’s attention and convey the intended message.
Consistency Check: Verify that your color palette and posterization choices remain consistent with your original concept. Make adjustments if certain zones seem too overpowering or lack visual impact.
By critically evaluating the posterized impact, you’ll fine-tune your image to achieve a captivating and visually arresting result that aligns with your creative intentions.
Step 7: Creative Utilization of Posterization
Now that your posterized image is refined consider exploring different creative applications and techniques to make the most of this unique visual style.
Layering Effects: Experiment with layer blending modes to add depth and complexity to your posterized image. Overlay textures or patterns to create intriguing visual combinations.
Color Gradients: Apply gradients within color zones to add a gradient effect, creating a smoother transition between colors and enhancing the overall artistic appeal.
Selective Emphasis: Use additional adjustments to highlight specific details or zones further, guiding the viewer’s gaze and adding depth to the composition.
Mixed Media Fusion: Combine posterization with other artistic elements, such as hand-drawn lines or digital brushstrokes, to add an organic and textured feel to your digital artwork.
By creatively utilizing posterization, you can push the boundaries of this technique and create unique and captivating visuals that stand out and resonate with your audience.
Step 8: Sharing Your Posterized Artwork
With your posterized masterpiece complete, it’s time to share your artistic creation. Consider various platforms and techniques to showcase your work and engage your audience.
Online Platforms: Utilize social media, personal websites, or art-sharing platforms to display your posterized artwork. Include a compelling description that highlights the creative process and concept.
Print and Display: Explore printing options to bring your posterized image into the physical realm. Consider producing posters, canvas prints, or merchandise to showcase your art in tangible formats.
Art Communities: Participate in online art communities or forums to gain feedback, insights, and exposure. Engage in discussions about your posterization journey and learn from fellow artists.
Artist Statements: Craft an artist statement that explains the inspiration, techniques, and emotions behind your posterized creation. That can provide a deeper connection between your audience and your artwork.
Conclusion
To summarize, posterization is a compelling method that has the tendency to turn everyday photographs into noteworthy works of art. It reveals a universe of restricted yet distinct hues, generating visuals that emanate a feeling of bold simplicity and distinctive individuality via the purposeful limitation of colors and tones. While lacking in smooth color transitions on purpose, this style creates a strong impression through sudden shifts, resulting in imagery evocative of renowned poster art. Its innate attractiveness emerges from combining planned innovation with unexpected aesthetic expressions in graphic design and creative initiatives.
