How To Use The Healing Brush In Affinity Photo
If you are an avid user of Affinity Photo, you know that retouching your images is essential to achieving a professional finish. Affinity Photo is a highly regarded image editing software professionals like photographers, graphic designers, and digital artists use. Its comprehensive tools and features enable users to create stunning visuals and precisely adjust their photos. One of its productive and valuable tools is the Healing Brush, which allows users to retouch images seamlessly by removing unwanted blemishes, spots, and imperfections.
The Healing Brush tool works by sampling pixels from one area of an image and blending them into another area. It helps to cover up blemishes, wrinkles, dust spots, and other imperfections in your photos. The tool is similar to the Clone Stamp tool, but it’s designed to blend pixels more seamlessly, resulting in a more natural-looking retouch.
One of the key advantages of the Healing Brush tool in Affinity Photo is its flexibility. You can adjust the brush size, hardness, and opacity to suit the needs of your image, and you can choose to sample pixels from either the current layer or a source layer. Additionally, you can use the Healing Brush tool on different layers, such as a pixel or adjustment layers, to achieve the desired effect.
The Healing Brush tool also offers a variety of brush modes, allowing you to sample pixels from different layers or selections. You can also adjust the flow and hardness of the brush to achieve a softer or harder edge.
It’s essential to consider that the Healing Brush tool works best on areas with consistent texture and color. If the area you are retouching has a lot of variation in texture or color, you may need other tools, such as the Clone Stamp or Patch tool, to achieve a seamless blend.
Additionally, working on a duplicate layer of your image is a good idea when using the Healing Brush tool. That can make changes without affecting the original image, giving you more flexibility and control over retouching.
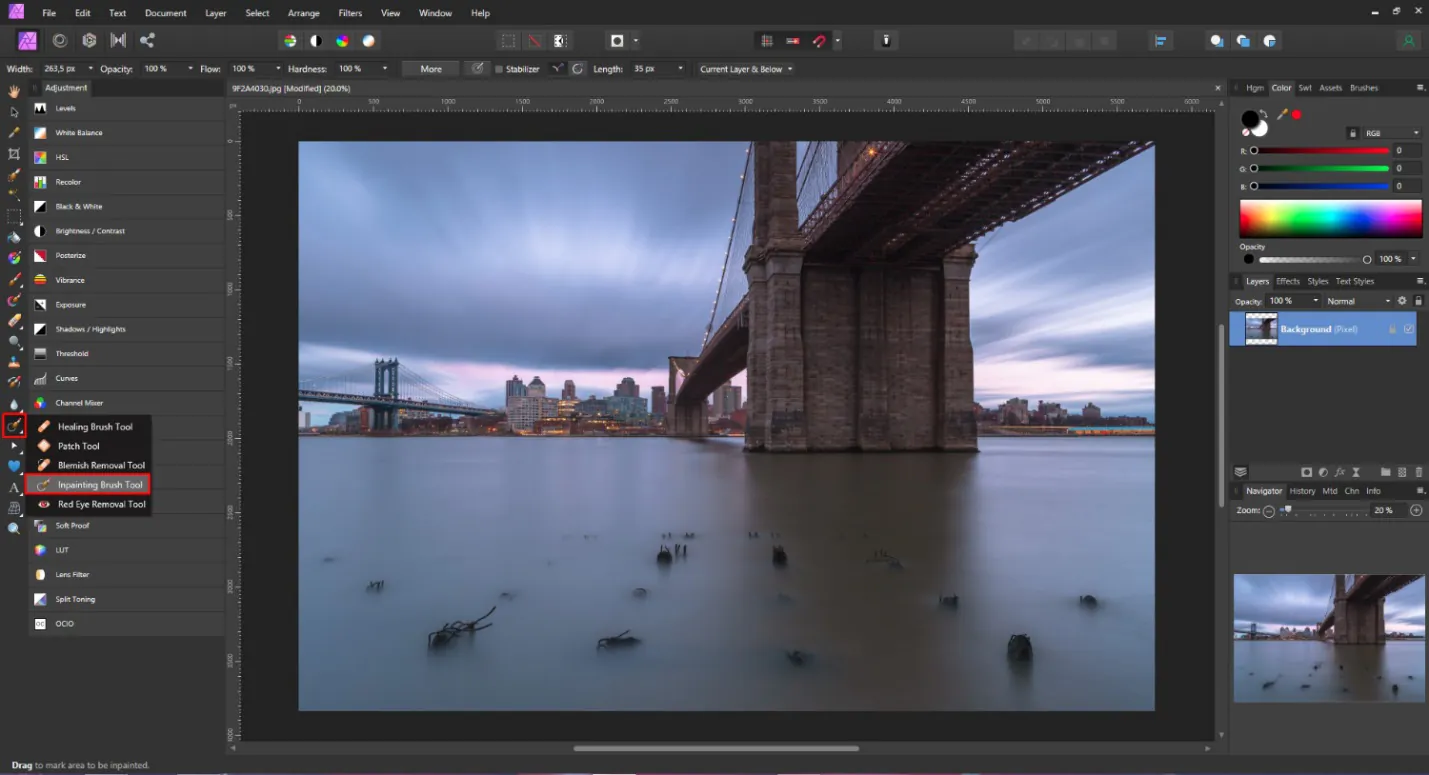
The Healing Brush in Affinity Photo is a versatile tool that analyzes the texture and color of the surrounding pixels and blends them into the area being retouched. It comes in two types: the regular Healing Brush and the Inpainting Brush. The regular Healing Brush is ideal for general retouching tasks, while the Inpainting Brush is suitable for removing larger objects or areas from your photos.
Selecting the right brush size and hardness is crucial to achieving the best results with the Healing Brush. A soft brush blends more seamlessly, while a harder brush creates more defined edges. Additionally, Affinity Photo offers advanced retouching tools such as the Frequency Separation filter and the Clone tool, which can be used with the Healing Brush for more complex retouching tasks.
Overall, the Healing Brush in Affinity Photo is a powerful tool to help users achieve professional-level retouching results. Users can quickly and easily remove imperfections from their photos by following basic techniques and experimenting with different brush sizes and hardness settings.
How to Use the Healing Brush in Affinity Photo: A Step-by-Step Guide
Step 1: Open your image in Affinity Photo
To get started, open your image in Affinity Photo. Select File > Open from the main menu or drag and drop your image onto the workspace.
Step 2: Select the Healing Brush tool
Once your image is open, select the Healing Brush tool from the toolbar on the left of the screen. The Healing Brush tool is represented by an icon resembling a bandage.
Step 3: Choose the brush size and hardness
Before you start retouching your image, select the appropriate brush size and hardness. It is done by adjusting the settings in the Context Toolbar at the top. A soft brush is best for blending, while a harder brush is ideal for more defined edges.
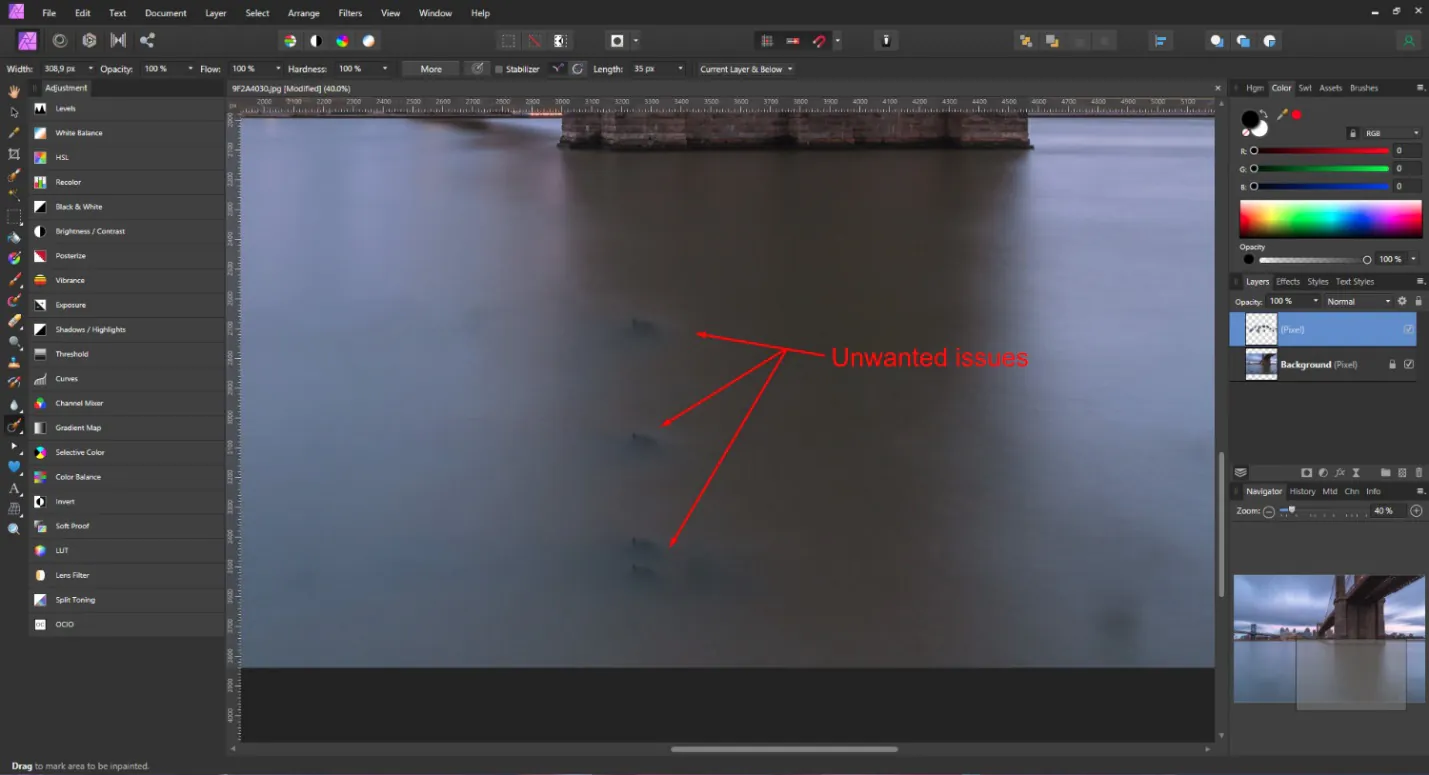
Step 4: Identify the area you want to retouch
Identify the area of the image that you want to retouch. That could be a blemish on a person’s face, a scratch on an object, or any other imperfection you want to remove. Zoom in on the area using the zoom tool or keyboard shortcut Ctrl + Spacebar (Windows) or Command + Spacebar (Mac). That will help you see the details more clearly.
Step 5: Choose the source for the retouching
Next, choose the source for the retouching. That is the area that Affinity Photo will use to replace the imperfection. Hold down the Alt key (Windows) or Option key (Mac) and click on an area of the image similar in texture and color to the area you want to retouch. That could be an adjacent area of skin, a clean section of a wall, or any other area that matches the texture and color of the imperfection.
Step 6: Start retouching
Once you have chosen the source, release the Alt or Option key and start retouching the area by painting over it with the Healing Brush tool. Affinity Photo will blend the surrounding pixels to create a seamless retouch. If you are retouching a blemish on a person’s face, it is vital to ensure that you maintain the natural texture and contours of the skin.
Step 7: Repeat the process
Repeat this process for other areas of the image that require retouching. In case you made a mistake or want to undo a retouch, use the Undo History panel on the right side of the screen or use the keyboard shortcut Ctrl + Z (Windows) or Command + Z (Mac).
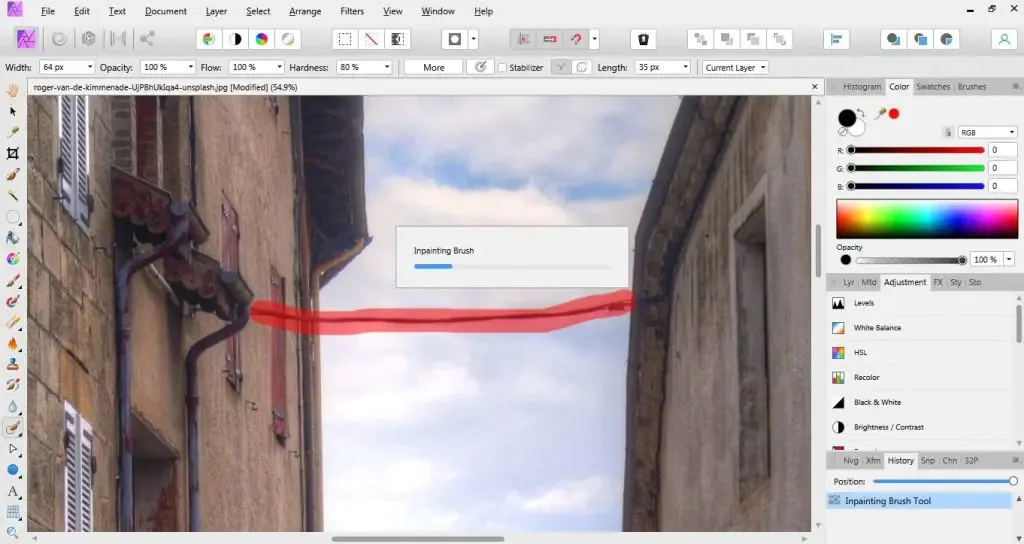
Step 8: Use the Inpainting Brush for larger areas
If you need to remove larger areas or objects from your image, use the Inpainting Brush. This tool works similarly to the Healing Brush but uses a larger source area to fill in the gap. You can access the Inpainting Brush by selecting it from the toolbar or pressing Shift + J on your keyboard.
Step 9: Use advanced retouching tools for more complex tasks
Affinity Photo offers a range of advanced retouching tools to perform more complex retouching tasks. The Frequency Separation filter is a valuable tool for smoothing out skin tones, while the Clone tool can be used to duplicate areas of the image. These tools are found in the toolbar on the left-hand side of the screen.
Step 10: Save your edited image
Once you have finished retouching your image, save it by selecting File > Save or File > Save As from the main menu. Choose a file format and title for your edited image and click Save. Your edited image is now ready to be shared or printed.
Step 11: Refine your retouching
After you have completed your initial retouching, it’s a good idea to zoom out and inspect the entire image to ensure that all imperfections have been removed. You may also want to make additional color, contrast, and brightness adjustments using Affinity Photo’s range of adjustment tools.
Image Retouching with Affinity Photo’s Healing Brush: Tips and Techniques
Use a light touch when using the Healing Brush to avoid creating noticeable retouching marks.
Use the Inpainting Brush tool for larger areas, as it is specifically designed to fill in larger areas and can produce excellent results with a bit of practice.
Sample multiple areas depending on the complexity of your image, and try to sample areas similar in texture and color to the area you want to retouch.
For more precise retouching, use the Clone Brush tool instead of the Healing Brush to clone a specific area of your image and apply it to another area, giving you more control over the retouching process.
Experiment with different blend modes to choose what works best for your image. Affinity Photo offers a range of blend modes that can serve to achieve different effects with the Healing Brush.
Consider investing in a graphics tablet such as a Wacom tablet if you do a lot of image retouching. That can give you more precise control over your brush strokes and make achieving the desired results easier.
Remember to zoom in on the area you’re retouching to get a better view of the details and make more precise edits.
Take breaks to avoid eye fatigue, especially if you spend a long time retouching an image.
Retouching takes practice, so don’t be discouraged if your initial attempts don’t turn out as expected. Take your time, experiment with different settings and techniques, and be patient with yourself.
Conclusion
In brief, the Healing Brush tool in Affinity Photo is essential for anyone who wants to achieve professional-level retouching results. Its ability to seamlessly blend pixels and cover up imperfections provides a quick and easy way to enhance your photos’ quality and visual impact. By adjusting the brush size, hardness, and opacity to suit the needs of your image, you can achieve a natural-looking retouch. Additionally, the flexibility of the Healing Brush tool allows you to work on various layers and choose from various brush modes. With some basic techniques and experimentation, you can quickly master the Healing Brush tool and take your retouching skills to the next level.
