How To Use Filters And Effects To Enhance Your Images
In today’s age of social media, sharing images has become an integral part of our daily lives. From personal moments captured on smartphones to professional photographs taken with high-end cameras, everyone wants their images to stand out and make an impact. But, with so many images being shared online, it can be challenging to make your images stand out in the crowd. This is where filters and effects come into play. Filters and effects can transform an ordinary image into a stunning work of art. They can add depth, vibrancy, and texture to an image, making it more appealing and engaging to viewers. Whether you want to enhance the colors of a landscape, create a vintage look for a portrait, or add a dramatic effect to a sports shot, filters, and effects can help you achieve your desired result. However, using filters and effects requires a certain level of skill and understanding of photo editing software. There are numerous options available, and selecting the right one can be overwhelming. Moreover, overusing filters and effects can make images look artificial and detract from their original beauty. This blog will provide you with a step-by-step guide on how to use filters and effects to enhance your images effectively. We will explore the different types of filters and effects, how to use them, and when to use them.
Step 1: Choosing the Right Software
To use filters and effects, you’ll need photo editing software. There are various options available, from free online tools to professional software like Adobe Photoshop or Lightroom. It’s important to choose software that suits your skill level and meets your editing needs.
Step 2: Importing Your Image
Once you’ve chosen your software, import the image you want to edit. Ensure that the image is in a high-resolution format to ensure the best quality output. Most photo editing software allows you to drag and drop images or import them through the file menu.
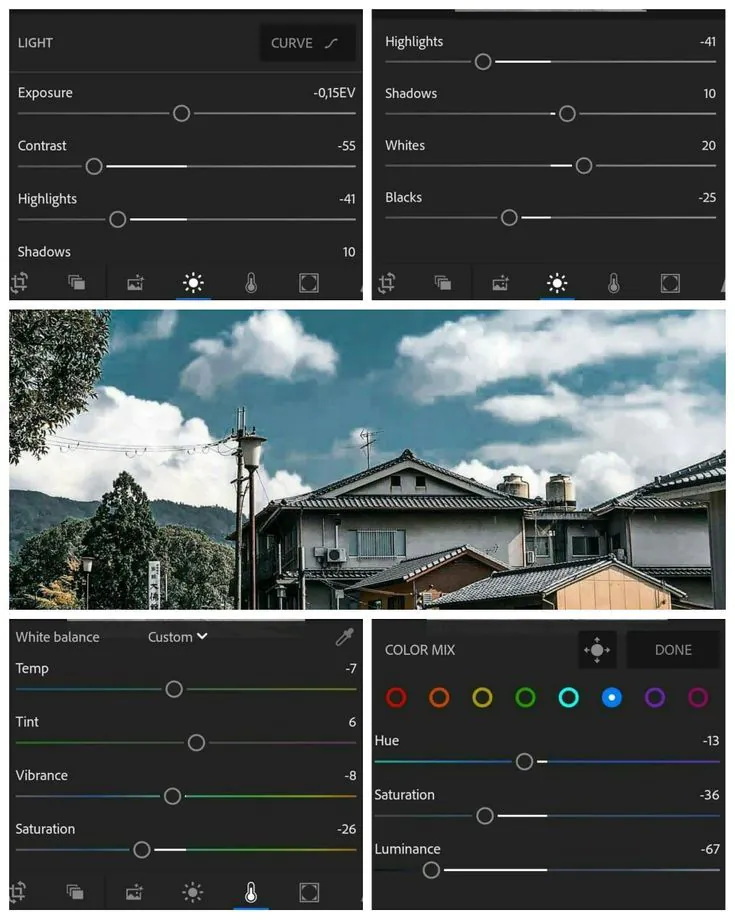
Step 3: Adjusting the Exposure and Colors
Before applying filters and effects, it’s essential to adjust the exposure and colors of your image. This ensures that the image is properly balanced and ready for further editing. Most photo editing software has tools for adjusting exposure, contrast, highlights, and shadows. Adjust these settings until the image looks balanced and the colors are accurate.
Step 4: Applying Filters
Filters are one of the easiest ways to enhance your images. They can add depth, vibrancy, and texture to your images. There are many types of filters available, including color, black and white, vintage, and more. To apply filters, select the filter option in your software and browse through the available options. Experiment with different filters to see which one best suits your image. Once you’ve selected a filter, adjust its intensity to your liking. Be careful not to overuse filters, as this can make images look artificial.
Step 5: Using Presets
Presets are pre-configured settings that can be applied to your image. They are useful for achieving a consistent look and feel across a series of images. Presets can be created or downloaded from various sources. To use presets, select the preset option in your software and browse through the available options. Choose a preset that best suits your image and adjust its intensity to your liking. Be sure to experiment with different presets to find the one that works best for you.
Step 6: Applying Textures
Textures can add depth and dimension to your images. They can be applied to backgrounds or specific parts of an image. There are many types of textures available, including grunge, wood, metal, and more. To apply textures, select the texture option in your software and browse through the available options. Choose a texture that best suits your image and adjust its intensity to your liking. Be careful not to overuse textures, as this can make images look busy and cluttered.
Step 7: Adding Borders
Borders can add a finishing touch to your images. They can be used to create a frame or to add a unique touch to your image. There are many types of borders available, including plain, textured, and custom. To add borders, select the border option in your software and browse through the available options. Choose a border that best suits your image and adjust its size and color to your liking. Be sure to experiment with different borders to find the one that works best for you.
Step 8: Saving Your Image
Once you’re satisfied with the changes you’ve made to your image, it’s time to save it. Save your image in a high-resolution format, such as JPEG or PNG, to ensure the best quality output. Most photo editing software allows you to choose the file type and adjust the compression settings.
Step 9: Sharing Your Image
Now that your image is ready, it’s time to share it with the world! There are various platforms available for sharing images, including social media, photography communities, and personal websites. When sharing your image, it’s essential to consider the platform and its audience. For social media platforms like Instagram, consider using relevant hashtags to reach a wider audience. Be sure to tag any relevant brands or individuals in the image, as this can increase visibility and engagement. When sharing your image on photography communities or personal websites, consider including a brief description or story behind the image. This can provide context and meaning to the image and make it more engaging for viewers.
Different Types Of Filters And Effects
Filters and effects are powerful tools that can be used to enhance images and add creative flair to them. There are various types of filters and effects, and each one has its unique characteristics and uses. Here, we go through the different types of filters and effects, how to use them, and when to use them to enhance your images.
Color Filters:
Color filters are one of the most popular types of filters. They can be used to add warmth or coolness to an image, change the mood or tone, and enhance or mute specific colors. Color filters work by affecting the color balance of an image, changing the color of the light that is captured.
To use color filters, select the filter option in your photo editing software and browse through the available options. Choose a color filter that best suits your image and adjust its intensity to your liking. Color filters are especially useful in landscape photography, where they can enhance the color of the sky or foliage.
Black and White Filters
Black and white filters can add a classic and timeless feel to an image. They work by removing color from the image, leaving only shades of gray. Black and white filters can also be used to emphasize texture, contrast, and patterns in an image.
To use black and white filters, select the filter option in your photo editing software and choose a black and white filter. Adjust the intensity of the filter to your liking. Black and white filters are especially useful in portrait photography, where they can add a sense of drama and moodiness.
Vintage Filters
Vintage filters can add a nostalgic and retro feel to an image. They work by simulating the look of old film cameras, adding grain, scratches, and vignetting to the image. Vintage filters can also be used to enhance the color and contrast of an image, giving it a vintage look.
To use vintage filters, select the filter option in your photo editing software and browse through the available options. Choose a vintage filter that best suits your image and adjust its intensity to your liking. Vintage filters are especially useful in street photography, where they can add a sense of timelessness to the image.
Blur Filters
Blur filters can add depth and focus to an image. They work by blurring specific parts of the image, creating a sense of depth and focus. Blur filters can also be used to remove distractions from the background of an image.
To use blur filters, select the filter option in your photo editing software and choose a blur filter. Adjust the intensity of the filter to your liking. Blur filters are especially useful in portrait photography, where they can blur the background and draw focus to the subject.
Distortion Filters
Distortion filters can add a unique and creative feel to an image. They work by distorting specific parts of the image, creating a sense of movement or surrealism. Distortion filters can also be used to add texture and depth to an image.
To use distortion filters, select the filter option in your photo editing software and choose a distortion filter. Adjust the intensity of the filter to your liking. Distortion filters are especially useful in abstract photography, where they can create a sense of movement and fluidity.
Conclusion:
In conclusion, filters and effects can enhance your images and add creative flair to them. By following the above-mentioned step-by-step guide, you can effectively use filters and effects to take your images to the next level. Remember to experiment with different filters, textures, and borders to find the ones that work best for your images. And when sharing your images, be sure to consider the platform and its audience to reach the widest audience possible.
