How To Update To The Latest WordPress Version?
Are you currently using the latest version of WordPress? There are many reasons why you should consider updating your existing website version to the new WordPress release, the popular reason is the addition of improved features, advanced performance, and WordPress developers fixing bugs that can help you stay updated with the industry’s ongoing trends. However, if you choose to ignore updating your website on time then you are at a higher risk of website security breaches and eventually fall behind your competitors in the race.
In this blog, we shall cover how to independently check and update your WordPress site to the latest version. Let’s get started!
Why You Must Use the Latest Version of WordPress?
The most special reason to always be mindful of updating your WordPress account is for enhanced WordPress security. More than 43% of all websites over the Internet use WordPress thus this platform has become a common target for potential hackers, data extractors, and virus distributors. Whenever a security threat is posed, the core WordPress team works every minute to release an update to cover up the issue for the future. This makes the latest release more secure and trustworthy for your website content. Popular updated fixes usually involve bug fixes and new feature introductions. It so happen’s that plugins and other theme developer sync their updates with every WordPress release to gain the advantage of user interest thus making them a compatible option for every latest WordPress version.
How to Easily Check Your WordPress Version?
The initial step is to login to your WordPress admin area and navigate your way to the bottom of the page. Here you will find a phrase saying ‘Thanks for creating with WP’ right next to it you will see the WordPress version number written as highlighted in the reference image:
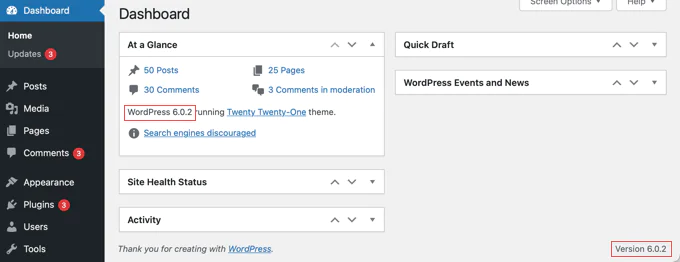
Move on towards the Dashboard » Home screen, here you will find the WordPress version number in the admin widget labeled ‘At a Glance. Here in this blog, we are using WordPress version 6.0.2.
How to Check for WordPress Updates?
After becoming aware of what version of WordPress you are using now it’s time to check for available WordPress updates, for this purpose visit the updates page present in the dashboard section of your WordPress admin area. In case your WordPress site version is up-to-date then there will be a message reading that you have the current version. In this demonstration, the version is 6.0.2.
Exactly on this page, you will find a timestamp that tells when your WordPress site was last updated. WordPress does checks for updates automatically and daily but you can still make sure by clicking on the ‘Check Again’ link given below for fresh results. Under the WordPress version, you will see the ‘Update Now button. In the next phase, we will show you how to successfully install a WordPress update for your site.

How to Safely Update to the Latest Version of WordPress?
Before you start updating anything, it is essential to ensure your WordPress site content is backed up. Once you do this you can return to the updates page and click on the ‘Update Now’ option as shown above. Doing so will enable WordPress to automatically put your website under maintenance cover. After a few minutes, the latest version of the software will be installed for you. The progress will be shared on your screen the whole time. In this way, users can easily update their WordPress site automatically. Later on, you can visit your website homepage to ensure that the latest version works right. If everything works fine and no fixes are needed then you can restore the website data that you backed up before the start of the process.
How to Enable Automatic WordPress Updates?
As soon as you go back to the updates page in your WP admin area you will get a message alert reading ‘This site is automatically kept up to date with maintenance and security releases of WordPress only’.
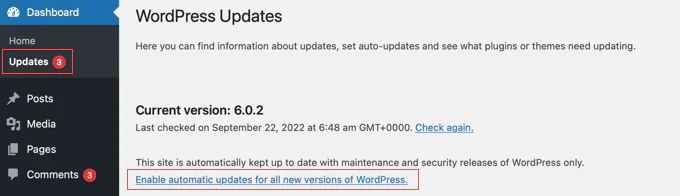
This is by far the best solution to update your WordPress immediately amid security concerns. All this is done automatically with just the push of a few right buttons. You can stay super confident that your website will be safe and sound even if you are too busy to sort out everything. If you wish to enable WordPress to update instantly without any warning or suggestion then you must click the link saying ‘Enable automatic updates for all new versions of WordPress’.
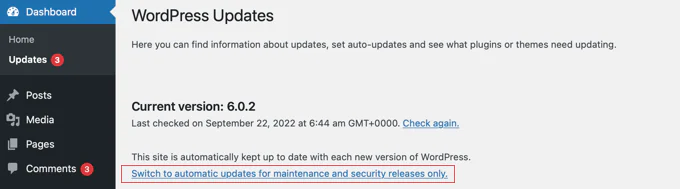
There are a few other ways as well by which you can enable WordPress automatic updates.For example, if you’re using a WordPress-specific web hosting solution, you can normally enable automatic updates through your provider. With the managed WordPress hosting service Cloudways, for instance, you can automatically detect, test, and deploy WordPress updates using its SafeUpdates feature. It goes without a cloud of a doubt that automatic repairs and updates are far more convenient than manual methods but they can still lead to many unwanted issues, for example, they can break your website and you might not be able to fix it at your disposal. Therefore it is the best idea to have a lot more control over your WordPress site updates. If you plan to switch back the automatic updates to turn them off then simply click on the link saying ‘Switch to automatic updates for maintenance and security releases only’.
Keep in mind that the major WordPress releases will not break your site but the security updates regularly are less likely to have conflicts that can cause unwanted damage.
How to Test a WordPress Update on a Staging Site?
If you are worried about any important website that can break your site then you can check it for potential problems before installing it on your business site. You can accomplish this task with a staging site. A staging site is a copy of your present website and can be installed on the same web hosting server. This happens only when the WordPress updates are working accurately on the staging site. At this point, you should be confident that the WordPress updates are working just fine and that there is no problem whatsoever with your blogging site.
For staging websites, you can consult ‘Best WordPress hosting companies that offer one-click staging sites. If you are using a website hosted by any one of them then you can easily create a staging site without facing any inconvenience.
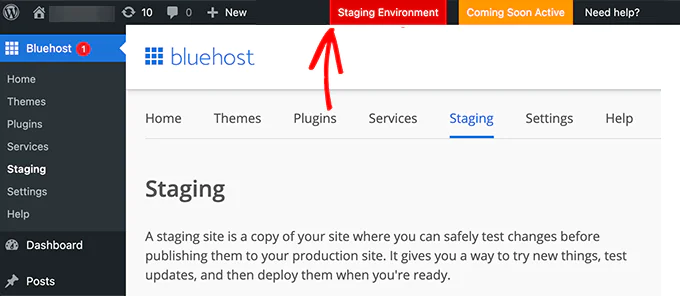
In case the hosting service provider does not offer this service then you can create a staging site for yourself to do so manually or automatically you can use the essential plugin ‘WP Stagecoach’.
How to Install the Latest WordPress Nightly Builds?
The most advanced form of WordPress updates is known as ‘Nightly Builds’ however these updates must not be updated on live websites as they are under supervision for bugs till now. Instead, you can install these updates on a staging site and Mac or Windows computers. To install nightly builds you need to use the ‘WordPress Beta Tester plugin to automatically introduce updates to your WordPress site.
Who should install WordPress Nightly Builds?
Developers who can use nightly builds intend to ensure that their themes and plugins can work efficiently with future WordPress versions before being introduced in the market. If an issue comes up then they can fix the code on their own which helps the WordPress core developers learn more about any bugs they discover. Both coders and non-coders can install these updates and report any bugs along the way.
