How To Shoot HDR Bracketed Images?
By using bracketing techniques within photography you can short high contrast and high-resolution scenes to create dynamic images. Although there are many other techniques to obtain high dynamic range results there are attached limitations with each method. Using the HDR bracketing technique you overcome various technical limitations associated with other methods. You can elicit maximum benefits using HDR bracketing techniques and create more natural-looking images.
The blog sheds light on photography bracketing with specific usage in HDR photography. Modern-day cameras support the feature of auto-HDR bracketing. These latest cameras allow you to click bracketed photos by going into the camera settings. If you are a beginner then this blog will present you with a clear demonstration of how to shoot High Dynamic Range bracketed images at your disposal.

Types of Bracketing
There are two basic types of bracketing in photography.
Exposure Bracketing
Exposure bracketing is a renowned photography technique in which you carry on taking multiple photos in a single shot. You can take two-three clicks with different exposure settings. This is because no matter how much advanced the camera technology is you can’t replicate the human eye capability to see things in high contrast scenes. It is a technique commonly used to capture panorama/landscape scenes with higher resolution and contrast.
How to Shoot Bracketed Photos for HDR?
Although you can shoot bracketed images by simply gliding your phone it is not ideal for a clear picture. Hand movements can alter the quality of photographs. Therefore, it is recommended to practice shooting exposure bracketed via tripod and execute the following steps –
Camera placement is crucial for the perfect result; place the camera in the exact focus of the scene on a tripod.
Select the scene you want to shoot.
From camera settings select the bracketing mode of your camera. Many cameras have another option for this action (refer to your camera user manual if you are unable to find it).
Choose the number of brackets that you want to include for the respective scene. For an advanced HDR effect tend to use more brackets.
If possible set a delayed shutter speed for 2 seconds. By doing so your camera will take multiple images automatically.
By clicking on the shutter button you can begin with shooting images immediately.
Focus Bracketing
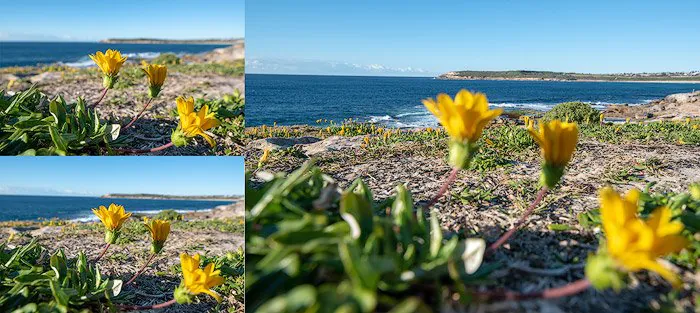
Focus bracketing is yet another type of bracketing which is specifically used to provide images with a wider depth of the field other than the camera aperture. Brackets with various ranges focus points are created. These focus points are then merged to obtain accurate focus bracketed images in HDR.
To obtain precise focus bracket results you must follow the below-mentioned steps in the exact order they are mentioned –
Place the camera on a tripod.
Select the scene you want to capture using the camera.
Opt for the “Manual Focusing Mode”.
Focus on the nearest object you want to capture and just click to shoot. Use a remote to eliminate camera movements.
After capturing the first image, you can now carefully focus on another object farther away than your first object and shoot. Repeat the process.
How to Merge Exposure-bracketed Photos
To merge bracketed images for HDR photography you will need modern technology dedicated software otherwise you will not achieve desired results. Lightroom and Photoshop are commonly used tools to perform the merging of bracketed photos.
The simple process of creating HDR images from bracketed images include –
Choose the brackets.
Press right-click to merge the brackets into HDR.
Sometimes you might include moving objects within your photograph such as waves, trees, leaves, etc. These objects reduce the quality and clarity of HDR images.
How to Blend Focus-bracketed Images
The process to merge the focus bracketed images into ones similar to that of exposure bracketed images. To perform blending action you must follow these steps –
Place your bracketed photographs within perfect layers.
Select all the bracketed layers that you want to merge.
Select the “Edit” option and afterward the “Auto-Align” option to align all your selected images.
You can easily remove artifacts from the images taken during hand movement.
Choose the “Edit” option and then the “Auto-Blend” or “voila” option, here you have well merged HDR bracketed images.
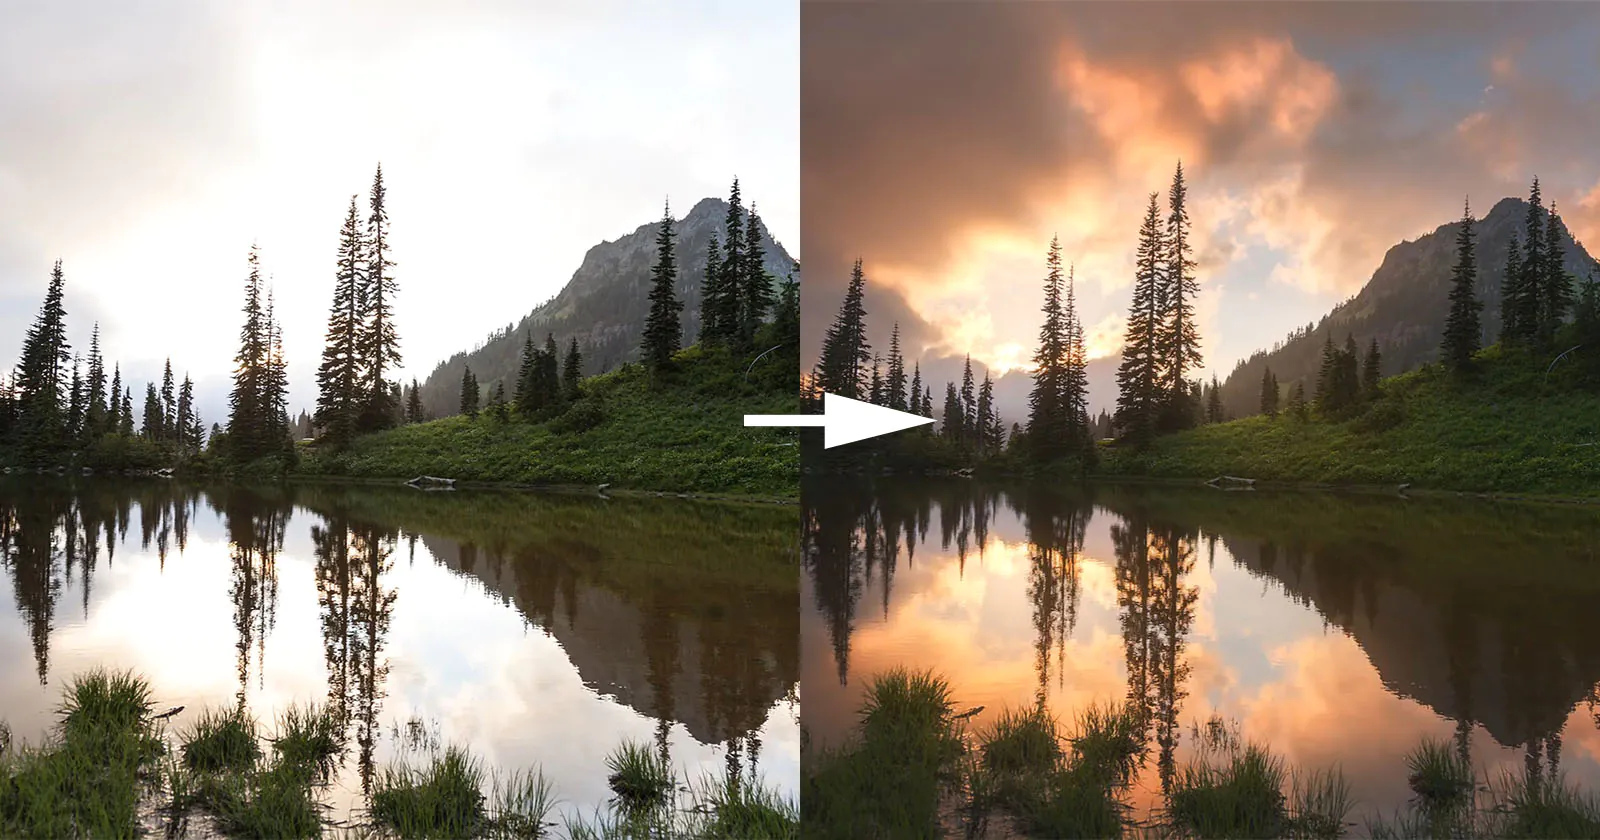
Why We Need Exposure Bracketing?
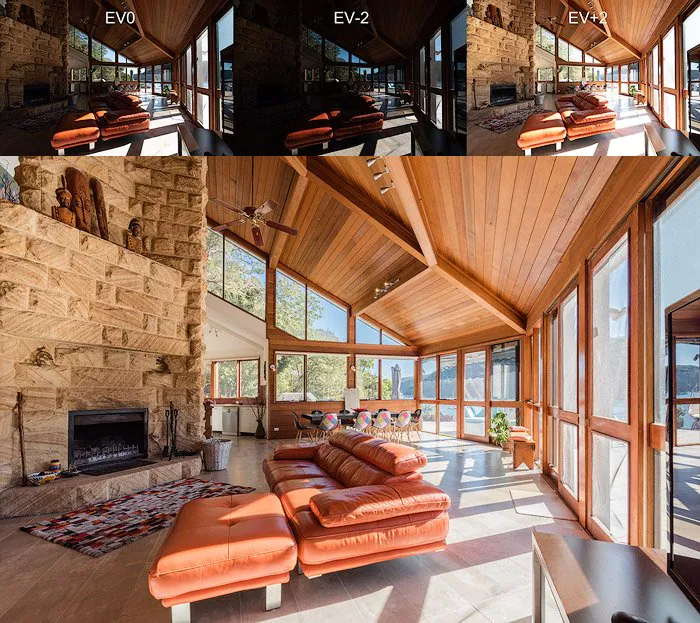
A newbie landscape photographer has to deal with exposure bracketing more often it proves to be a challenge to overcome it with perfection. A scene looks beautiful but the photo comes out to be with a plain white sky or a black background. Modern cameras are equipped with the right exposure features to compensate for every shot. The technology still has a lot of loopholes what the camera sees as correct exposure value is not always accurate!
When we look at a high contrast scene our eyes adjust with the result quickly. Our eyes make the aperture wider or narrower depending upon the scene contrast. Cameras do not work in the same manner you only have a single set of settings to accomplish the best result. The exposure bracketing technique is a good method to overcome this challenge. It allows you the exact scene multiple times with different dimensions and settings that can be later blended through photo editing.
When people hear about HDR photos they tend to think it is some complicated technique and make up their minds for it being overused. However, let me make this assumption clear to you that this is not the case, An HDR photo, when accomplished rightfully adds a more sensual and natural touch to the image. This is why exposure bracketing is still winning the hearts of photographers to date and will continue for years in the future.
Conclusion –
Modern cameras are equipped with unique features and provide numerous useful editing tools so far. However, the technology is still working on minimizing existing limitations to present flawless and picture-perfect results every time you click a picture. Different types of bracketing techniques help us to cover up arising technical limitations. Use HDR blending instead of applying numerous filters to achieve a high contrast effect. Focus stacking helps to further get everything in focus for better landscape photography.
How ITS Can Help You With Image Enhancement Service?
Information Transformation Service (ITS) provides high-end solutions to each one of your editing problems at affordable rates. Thousands of satisfied customers are evidence of our reputed services in each domain. ITS, hold a vast category to choose from depending upon your interests and need. Our Modern Photo Editing Experts very well understand the science behind restoring your damaged images and can fully trace them back through modern tech and handicraft. A twist of both modern and traditional means can get you the sort of ambiance in the product images you had wished to achieve. ITS takes great consideration with what you like and what is best for your business side by side. If you are interested in ITS Image Enhancement Services, to proceed further ask for a free quote!
