How to Restore Damaged or Old Photos Using Digital Tools?
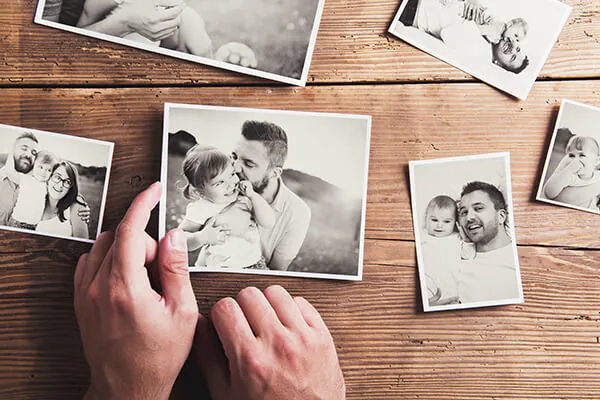
Photographs are comparable to time capsules. There is no big thought that goes into the making of memories but are important captures that come with the ability to take us back in time. Remember the time when people bunched together for a snap session the moment was for a second but the memory lasts for years to come. Photo Restoration Service is a unique service that provides you efficient image enhancement services vital to making your memories stay lifelong.
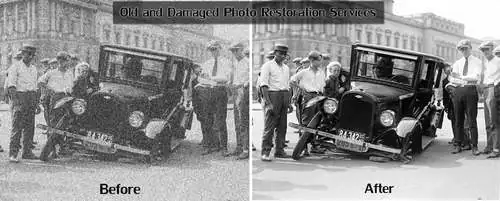
Today you can enjoy all the freedom to shoot your best memories free of care without thinking of capacity issues and memory cards. Digital Globalization has made photographs immune to wear and tear however the same is not true for printed photos. Here is the reason why image restoration services have gained popularity within such a short span. This is true because analog photos can be easily damaged and are prone to lose. However modern technology has devised new ways to restore and preserve old or damaged photos to a greater extent. Here are 9 tips and tricks to efficiently restore photos like a professional and save your family’s treasure trove of memories.
9 Tips on How to Use Photo Restoration
Several easy-to-go methods can be used to restore old or damaged photos like a professional. The steps included in the digital photo restoration process are largely utilized to repair, reconstruct, and digitally enhance old versions of images that are on the verge of destruction. These tips include –
Enhance Composition by Removing Unwanted Elements
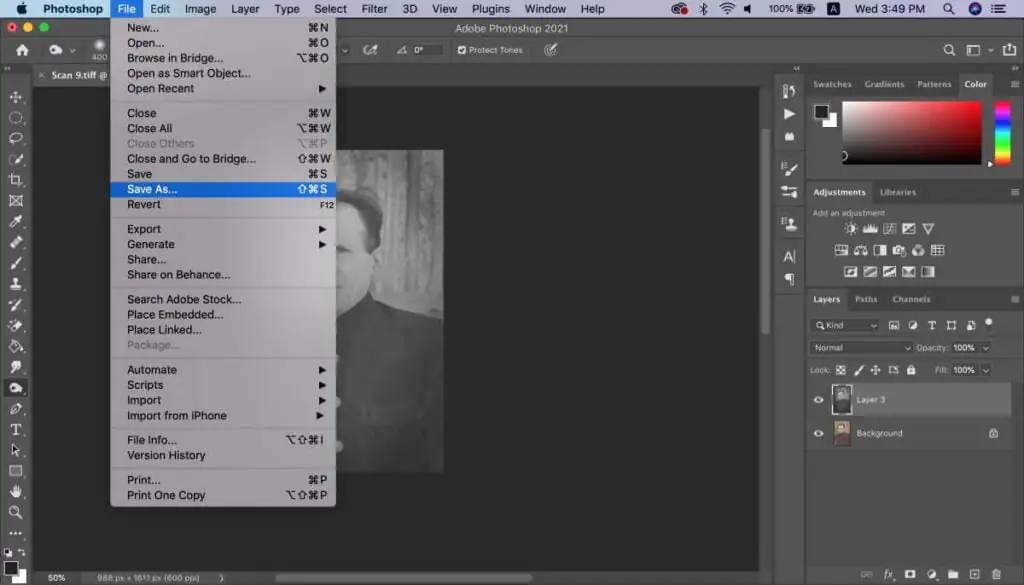
At first, import the respective image that needs to be restored. Make it editable by working on unlocking the image background layer. To do so double click on the image thumbnail, you can now enhance the image by fixing all insignificant details in the border. You can also crop or straighten the alignment of the whole image. There is no hard and fast rule to use one prescribed software tool. Most commonly Adobe Photoshop is used to edit the image successfully. The tool consists of many useful options under the tool panel. Always make sure to select the original ratio to keep the shape of the photograph in its place. To remove unwanted details drag the crop handle on the areas keeping the dimension intact.
Rotate the shot to straighten the frame
To straighten the frame, move the cursor outside the crop box to rotate the image. Drag the image making it tilt to its parallel grid. In some cases, image edges may appear transparent but you shouldn’t worry because the changes can be reverted again if you like. Once you have reached your final settings you must click on the “OK” option to save the changes made to the image and move forward toward other editorial tasks.
Adjust Contrast for Clarity
If the image has flat color tones or dim contrasts, you can rightfully adjust them with careful editing skills. You can correct your image contrasts and replace them with richer ones by clicking “New Adjustment Layer”. You must play with the tones and save changes until the desired contrast is achieved. By dragging the slider left you can easily reduce contrast and by dragging it towards the right you can increase image contrast. It is as simple as this! Likewise, you can also adjust highlights and mid-tones of images by dragging the sliders adjacent to the image contrast.
Convert Image into Smart Objects
Professional editors before editing an image create a copy of the original image. This serves as a backup plan in case if anything goes wrong during the editing process. Also, before and after image results make it easy to detect change. To go about this you can create a duplicate of “Layer 0” i.e. another “Layer 0 copy”. By using the “Convert to Smart Filter” option you can efficiently filter the results and hit “Ok”. The layer changes are resultantly converted to Smart Object. Now you can remove scratches by selecting “Dust & Scratches” under the “Noise” icon.
Disable Filters to Adjust Sharpness
When you fill in the scratches and dust spots there is a chance of some detail being overlooked or getting lost during the process. The ideal way is to use a smart filter layer from the Layer Panel section to perform the perfect inversion. The filter helps in the prevention of any change against the black color. Now paint white on selected image areas that require sharpening.
Remove Dust and Minute Imperfections with Smart Filter
Choose the Brush Tool from the toolbox with a rounded tip. Now steadily make the foreground white. Afterward, select black color as Smart Filter and sprinkle it over the white background. This action will cover all dust spots, stray fingerprints, and white scratches existing within your image.
Fixing Simple Background Flaws
If your image is worn out or happens to have much deeper scratches and scruffs. You can use the “Scratches & Dust Filter” function from the toolbar. The only problem is that the setting does not allow the elimination of overlapping artifacts in front of faces and clothes.
Using Patch Tools for Precision Blending
You can also select a patch from the menu and place it over Layer 1. This will cover up even the minute signs of scratches on transparent areas. Afterward, these patches can be effectively be blended in by dragging around the cursor over the patchy areas. In case if the editable image has larger scratches then it is preferred to use smaller patches to cover them properly.
Conclusion –
It takes little trial and error methods to achieve professional results especially when you want to improve your Photoshop skills. By experimentation, you are better able to achieve perfect results. The above-mentioned tested and proven tips are excellent if you want to get started with basic photo restoration ideas. With minimal effort and surface knowledge of Adobe Photoshop, you can create remarkably flawless images that have lost their color and luster. These special tricks not only restore but enhance your photos to last for many more years to come.
How ITS Can Help You With Image Restoration Service?
Information Transformation Service (ITS) provides high-end solutions to each one of your editing problems at affordable rates. Thousands of satisfied customers are evidence of our reputed services in each domain. ITS, hold a vast category to choose from depending upon your interests and need. A charming and attractive piece of art that glorifies your product’s visual qualities is in the end the key to winning like and sales. Our Modern Photo Editing Experts very well understand the science behind restoring your damaged images and can fully trace them back through modern tech and handicraft. A twist of both modern and traditional means can get you the sort of ambiance in the product images you had wished to achieve.
ITS takes great consideration with what you like and what is best for your business side by side. If you are interested in ITS Image Restoration Services, to proceed further ask for a free quote!
