
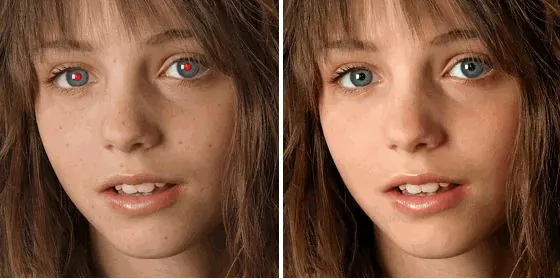
How to Remove Red Eye from Photos for Perfect Portraits
Capturing memorable moments through portrait photography is a cherished endeavour for many photographers. However, there’s nothing more disheartening than finding red-eye in your otherwise perfect portraits. Red-eye occurs when the camera flash reflects off the subject’s retina, resulting in a disturbing red glow in their eyes. Fortunately, removing red-eye has become an accessible and straightforward process with the advent of photo editing software and tools. This blog overviews various manual and automatic techniques to help remove red-eye from your photos effectively. By mastering these techniques, you’ll be able to transform your portraits into captivating works of art, where the subject’s eyes are free from distracting red-eye and convey their true beauty and emotion.
Understanding the Causes of Red Eye:
Red-eye occurs due to the camera’s reflection flashing off the subject’s retina, which is rich in blood vessels. When the flash is too near to the camera lens, the light reflects off the retina and captures the red colour of the blood vessels, resulting in the appearance of red-eye in the photograph.
Several factors contribute to the occurrence and intensity of red-eye. The first factor is the angle of the flash concerning the camera lens. When the flash is positioned too close to the lens, the light has a direct path to reflect off the retina, causing a prominent red-eye effect. Similarly, the size of the subject’s pupils plays a role in the intensity of red-eye. Dilated pupils allow more light to reach the retina, increasing the likelihood of red-eye.
Red-eye is also influenced by the subject’s distance from the camera. When the subject is too near the camera, the flash illuminates a larger portion of the retina, leading to a more pronounced red-eye. Additionally, certain individuals may be more prone to red-eye due to factors like eye colour and certain eye conditions.
By understanding these causes, photographers can employ effective techniques and strategies to prevent or minimize red-eye during photo-taking. Furthermore, this knowledge allows for informed decision-making when choosing post-processing methods to remove red-eye effectively. In the following sections, we will explore various manual and automatic techniques to help you achieve red-eye-free portraits with stunning results.
Manual Red Eye Removal Techniques:
While automatic red-eye removal tools in photo editing software can be effective, a more hands-on approach is sometimes required for precise and fine-tuned results. Manual red-eye removal techniques give photographers full control over the correction process.
Red Eye Reduction Mode: Many cameras offer a built-in red-eye reduction mode that emits a series of pre-flashes before capturing the photo. These pre-flashes cause the subject’s pupils to constrict, minimizing the occurrence of red-eye. It’s important to note that this mode may not eliminate red-eye in all situations, but it can significantly reduce its appearance.
Selective Color Correction: Photo editing software like Adobe Photoshop provides a powerful toolset for manual red eye removal. One technique uses selective colour correction to target and adjust the eyes’ red areas. By precisely selecting the red portion and adjusting the colour balance, you can restore the natural eye colour and eliminate the red-eye effect. This technique requires careful attention to detail and patience but offers precise control over the correction process.
Clone Stamp Tool: Clone stamp is another effective photo editing tool. This tool allows you to sample a nearby eye area with the desired natural eye colour and then paint over the red-eye area. You can seamlessly eliminate the red-eye effect by replacing the redness with the sampled colour. It’s important to use a small brush size and feather the edges to ensure a smooth and realistic result.
Customized Adjustment Layers: Using adjustment layers in photo editing software, such as curves or hue/saturation, can also help remove red-eye. By creating a new adjustment layer and targeting the red areas of the eyes, you can adjust the colour and tone to match the natural eye colour. This technique provides flexibility in fine-tuning the correction and allows for non-destructive editing.
Manual Brushing and Healing Tools: Utilizing the brush and healing tools in photo editing software allows for precise manual correction. By carefully brushing over the red-eye areas with a colour-correction brush or using the healing brush to blend and repair the affected regions, you can effectively remove the red-eye and restore the natural appearance of the eyes. These tools require a steady hand and attention to detail to achieve seamless results.
When employing manual red eye removal techniques, it’s important to zoom in on the affected areas and work with high accuracy. Taking breaks and reassessing the corrections with fresh eyes can also help ensure optimal results. Experimentation and practice are key to mastering manual techniques, as each photo may require a slightly different approach depending on the severity and nature of the red-eye effect.
By utilizing these manual red eye removal techniques, photographers can have complete control over the correction process, ensuring precise and natural-looking results. However, it’s worth noting that manual methods may be time-consuming, especially when dealing with many photos. In such cases, automatic red-eye removal tools can be a more efficient option.
Automatic Red Eye Removal Tools:
In addition to manual techniques, various automatic red-eye removal tools are available in photo editing software and mobile apps that can efficiently and quickly correct red-eye in your photos. These tools utilize advanced algorithms to detect and eliminate red-eye, making the process more convenient and time-effective. Let’s explore some popular automatic red-eye removal options:
Red Eye Removal Tools in Photo Editing Software: Many professional photo editing software, such as Adobe Photoshop, Lightroom, and GIMP, offer dedicated red eye removal tools. These tools analyze the image and automatically detect the red-eye areas. Once identified, the software applies corrections by adjusting the colour and tone to restore the natural eye colour. These tools often allow fine-tuning adjustments, such as the affected area’s size and the correction’s intensity.
Red Eye Removal Apps: Mobile apps for photo editing and enhancement also provide automatic red-eye removal features. These apps offer a user-friendly interface and streamlined editing options, making it convenient to fix red-eye directly from your smartphone or tablet. Popular apps like Snapseed, Adobe Photoshop Express, and Pixlr include automatic red-eye removal tools that detect and correct red-eye with a single tap.
Online Red Eye Removal Services: Several online platforms and websites specialize in automatic red-eye removal services. These services allow you to upload photos, and the platform’s algorithms automatically detect and correct red-eye in your images. Once the correction is complete, you can download the edited photos to your device. This option is particularly useful for many photos that require red-eye removal, as it saves time and effort compared to manual editing.
Batch Processing Functionality: Some photo editing software and apps provide batch processing functionality, allowing you to apply automatic red-eye removal to multiple photos simultaneously. This feature is highly efficient when you have a collection of pictures with red-eye issues that must be corrected consistently. Select the images, apply the red eye removal tool, and let the software or app process them automatically, saving you considerable time and effort.
AI-Powered Red Eye Removal: Advancements in artificial intelligence have led to the development of AI-powered red eye removal tools. These tools utilize sophisticated algorithms and machine learning techniques to detect and correct red-eye more accurately and automatically. AI-powered solutions can intelligently analyze the image and make corrections that closely resemble the natural eye colour, resulting in more realistic and pleasing results.
When using automatic red eye removal tools, it’s important to review the corrections and make any necessary adjustments manually, if needed. While these tools can be highly effective, they may occasionally misidentify red-eye or produce unnatural-looking results. Therefore, checking the final output and making additional refinements is always recommended to ensure the best possible outcome.
Prevention Tips to Avoid Red Eye:
While post-processing techniques can effectively remove red eye from photos, it’s always better to prevent it during photo-taking.
Use Natural Lighting: Opt for natural lighting instead of a camera flash whenever possible. Natural light reduces the chances of the red eye occurring in the first place.
Increase Ambient Lighting: If artificial lighting is necessary, ensure the surrounding area is well-lit. Adequate ambient lighting helps to shrink the subject’s pupils, minimizing the reflection of light and reducing red eye.
Adjust the Angle: Position the camera slightly above or below the subject’s eye level to change the angle of the flash. This technique minimizes the direct reflection of light off the retina, decreasing the likelihood of red eye.
Move the Flash Away: If using an external flash, consider moving it farther from the camera lens. Increasing that distance can reduce the chances of direct reflection and minimize red eye.
Use Red Eye Reduction Mode: Take advantage of the red-eye reduction mode on your camera. This mode emits pre-flashes to cause the subject’s pupils to constrict, reducing the occurrence of red eye.
By implementing these prevention tips, you can significantly reduce the likelihood of red eye in your photos, allowing you to capture beautiful portraits with natural-looking eyes. Remember, prevention is always better than correction when it comes to achieving flawless and captivating photographs.
Conclusion:
Removing red eye from photos is essential for photographers aiming to create flawless portraits. Whether you choose manual techniques or use automatic red-eye removal tools, the key lies in understanding the causes and applying the appropriate methods. By adhering to the recommendations in this blog post, you can confidently eliminate red-eye from your photos, resulting in perfect portraits that capture the true beauty of your subjects.
