How To Juxtapose Images
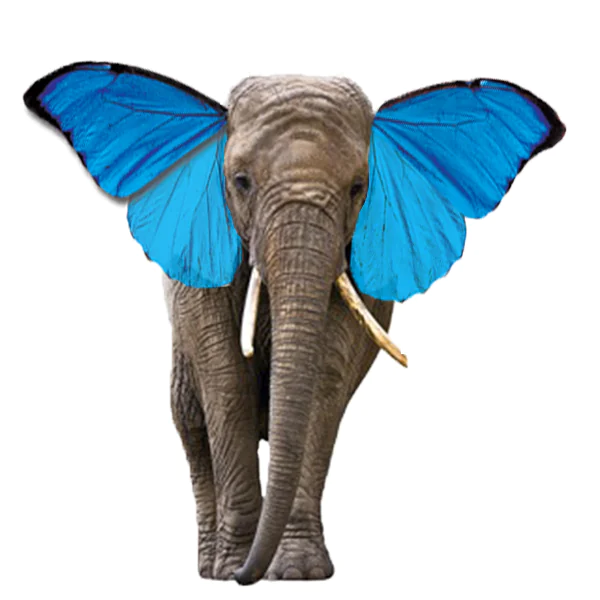
Image juxtaposing is an impactful approach to composing a new context from two or more images that are aligned to point out the differences or similarities. Placing images side by side can highlight flinty differences between subjects, such as varying color, shape, size, or subject matter. This contrast rapidly gathers focus and can effectively deliver a message or emotion. When two images are placed side by side, viewers will congenitally assimilate them. Juxtaposing images can have various purposes, like showing prior to and following situations, demonstrating changes throughout time, or comparing multiple objects or concepts. To excel at the composition of juxtaposed images, knowledge of essential techniques is a compulsion for creating a flexible and harmonious coexistence of visual elements. Carefully considering color and tone, tuning transparency, and layering make juxtaposed images act like magnets to attract the masses.
Prepare your images
Step 1: Choose a concept or message you want to convey in your images. That concept will be the pillar of your image juxtaposing process.
Step 2: After conceptualization, you have to choose two images that align with your chosen concept. For a desirable result, you must be sure about the presence of an impactful comparison or contrast between your chosen images.
Step 3: Before confirming, you should also consider that your images hold high resolution and quality, which provides better results for your composition.
Step 4: If you use images from an online source, respect copyright and usage rights.
Step 5: Create a folder on your PC to save your images, and also make a backup before starting the editing process.
Step 6: Affirm you have appropriate image editing software installed on your device. If you do not have sufficient know-how of such software, you can go for the popular ones, including Adobe Photoshop, GIMP, or Canva, as per your preferences.
Launch your image editing software
Step 1: Open your installed software to continue the flow and accuracy of our actions. Let us suppose you are utilizing Adobe Photoshop.
Step 2: Click the “File” button at the top menu bar. That will display a drop-down menu.
Step 3: Click “Open” in the menu to open a file dialog box. That lets you navigate directories to select the images you want to edit.
Step 4: Locate the folder you created to store your original images. Click on your desired image to proceed further. You can also select both of the photos you want to juxtapose in unison. Alternatively, you can repeat the steps in a different tab to open your second desired image.
Step 5: After selecting the images, click on the “Open” or “OK” option in the file dialog box. This command will immediately load the image or images into your editing workspace.
Adjust the position and prepare your images
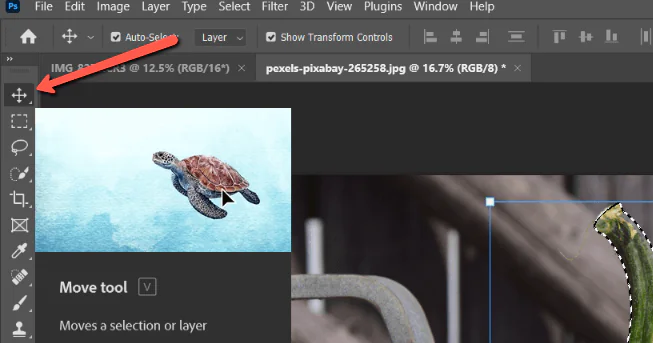
Step 1: Pick one out of your two images to make it the base image, serving as a background or context for your juxtaposed composition.
Step 2: Use tools that are usable for relocating or picking objects from the image. You can get these move or selection tools from the options that look like an arrow or marquee selection tool.
Step 3: Once the tools are selected, click and drag your second image onto the base image. In reaction to your act, you will see the second image superposing the base image.
Step 4: You should carefully place the second image where you want it to appear relative to the base image. Consider overlapping placements, side by side, or any other innovative way.
Step 5: Next, resize the newly placed image according to the composition propriety, using resizing tools for accurate dimensions.
Step 6: Use the alignment or snapping options offered by positioning tools like grids or guidelines for alignment and fidelity in your juxtaposed compositions. That can fine-tune your images for a compelling result.
Step 7: The second image should be placed above the base image on a separate layer. This layout eases ideal adjustment and individual editing of every shot.
Tune image placement and size
Step 1: Guesstimate the position of the second image relative to the base image. Make it clear that it agrees with your creative ideas and the message you want to communicate. Be attentive to visual stasis and coherence.
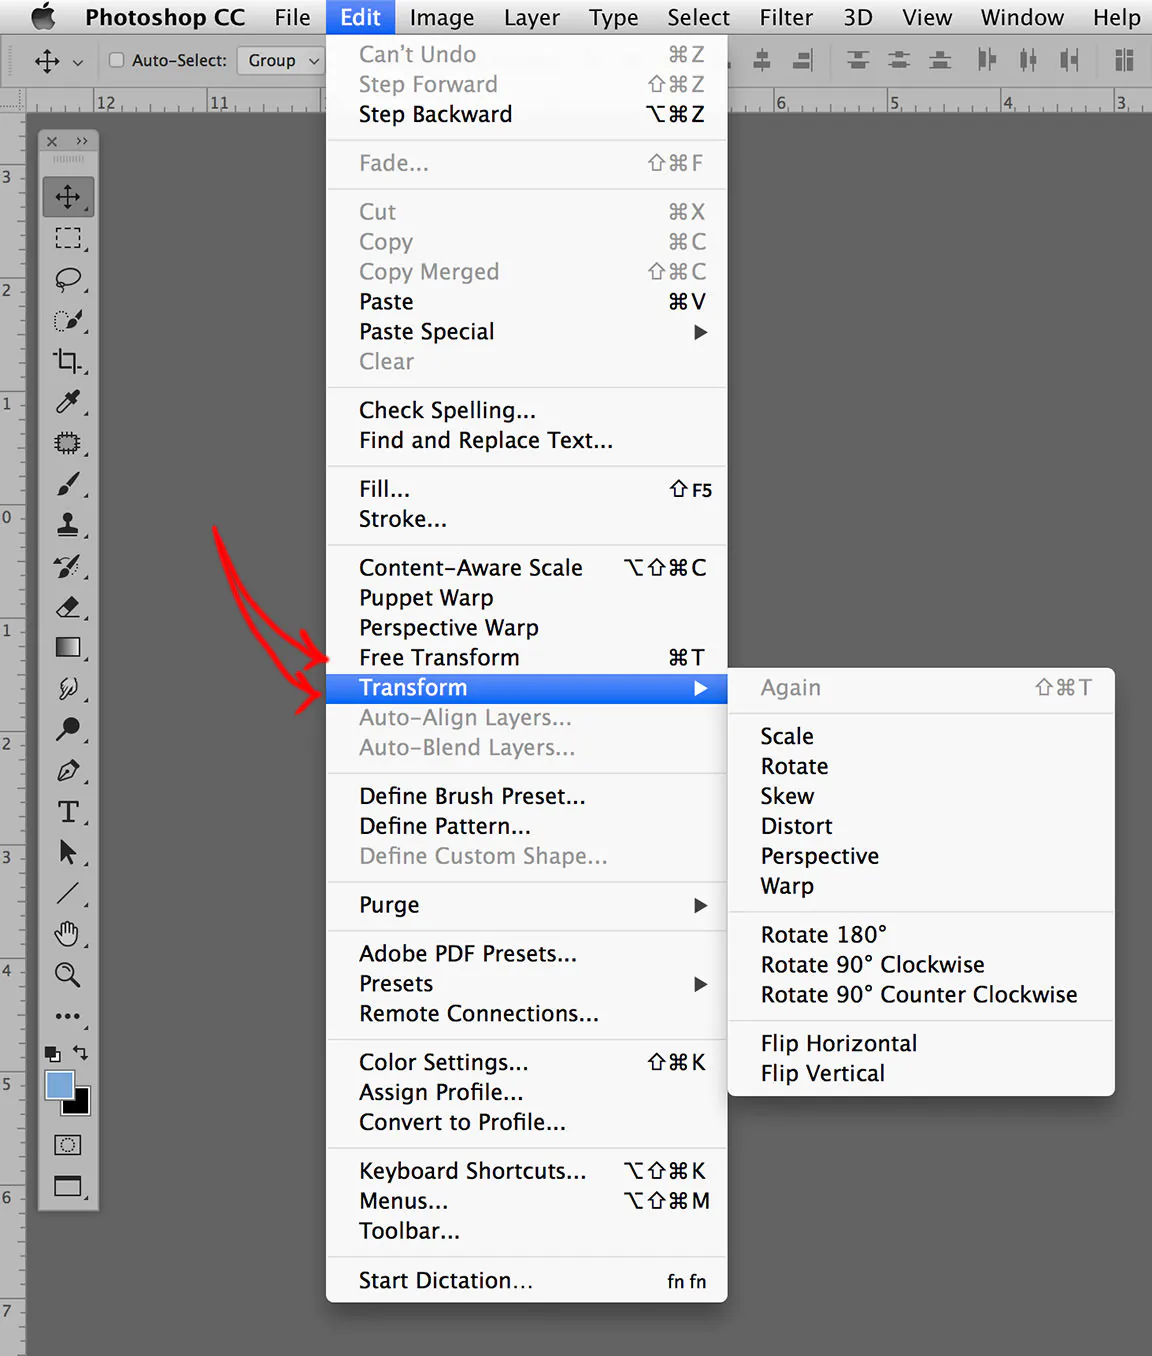
Step 2: Use transformation tools, including “Free Transform” or “Scale,” to set the size of the overlapped image, then click to drag the handles or resize it symmetrically.
Step 3: Hold down the Shift key to maintain the aspect ratio and avoid squishes. That will also prevent the image from overstretching.
Step 4: Hinge on your contiguous theme; consider experimenting with different angles by slightly rotating the second image for added brio or visual stake.
Step 5: If your juxtaposition touches on overlapping elements of both images, be sure they collaborate compatibly. Accommodate the position and size of the overlapping region to breed an absolute blend.
Step 6: Zoom in on your canvas to precisely fine-tune your artwork, especially when haggling with convoluted details or precise element arrangement.
Step 7: Linger to appraise the overall composition. Take a critical view of how the juxtaposed images fit together and determine if further advancement is needed.
Step 8: Remember to save your proceedings regularly. That helps you reserve your painstaking efforts for image editing.
Finalize your composition
Step 1: Try applying different blend modes like “Overlay,” “Multiply,” “Screen,” or others. Blending modes will considerably affect the interaction of two images. Choose the mode that is most suitable for your innovative vision.
Step 2: To control the transparency of the top layer, adjust the opacity. Usually, reduced opacity is preferred, which makes your base image easier to see through the upper one and creates an elusive mix of images.
Step 3: Adjust both photographs’ color and saturation levels and match color profiles using color tools.
Step 4: Confirm brightness and contrast as necessary to attain a balanced and visually alluring composition. This step guarantees that the two images effectively supplement each other.
Step 5: Use masking techniques to define the boundary between two images accurately. It can create a gradual shift or selectively show specific elements of the image while hiding other aspects.
Step 6: Once you feel okay with all modifications and your final image, save it in a separate file in an appropriate format like JPEG or PNG.
Step 7: You have now accomplished your image juxtaposing process. For optimal results, it is recommended to export your inventive picture at a suitable resolution and size for the platform or medium you choose when sharing it online or in print.
Conclusion
In a nutshell, image juxtaposing is a powerful and innovative editing technique that can enrich your creative projects. You can create dramatic visual compositions to convey messages that stir enormous emotions. You can use this technique to bring together two or more images and create a visual representation that precisely describes your imaginative conceit. The final layout, refined and optimized for sharing, becomes the vehicle for effectively communicating your ideas to your audience. Following the steps and techniques mentioned earlier will prepare you to juxtapose your photographs ideally and fabricate conclusive and memorable visual stories.
