How To Edit A Hyperspectral Image
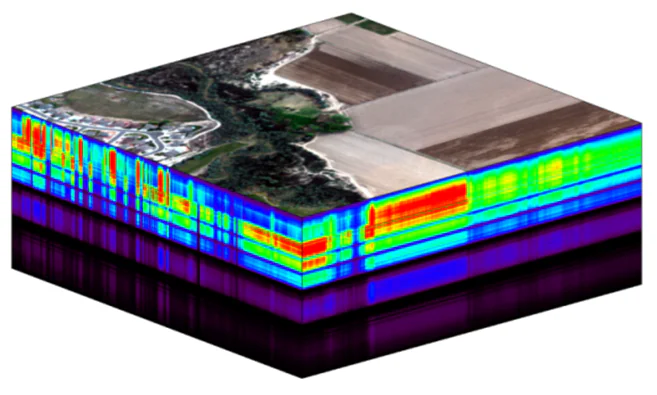
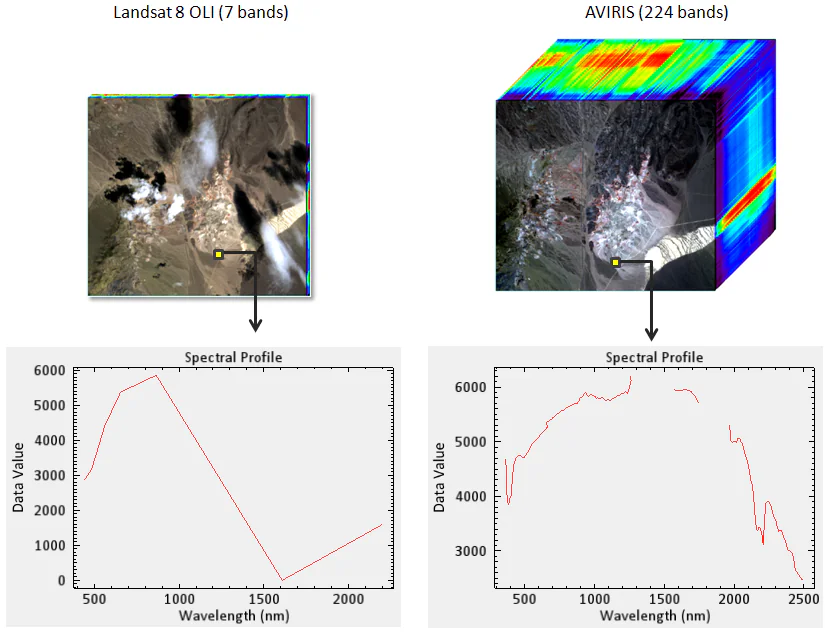
The hyperspectral images exclude imagery captured over a vast number of narrow and contiguous bands of the electromagnetic spectrum. Contrary to conventional RGB shots, hyperspectral images collect information at various, often adjacent, spectral groups, giving a thorough spectrum for each pixel. That extensive range of spectral data provides exact investigation and identification of materials based on their unique spectral signatures. Each pixel contains a spectrum in a hyperspectral image, delineating the reflectance or radiance values at different wavelengths. These pictures are paramount in scientific, natural, agricultural, and remote sensing utilizations. The high spectral resolution permits the separation of slight variations in material composition, helping in errands like mineral identification, vegetation wellbeing evaluation, and contamination observation. Nevertheless, specific software applications and alternatives are essential to examine hyperspectral information and extract significant insights vividly. The resultant images offer evident details that are readily perceivable. This blog will discuss those strategies and critical tools to turn an intricate hyperspectral image into a well-discernable composition.
Step 1: Import the initial data in ENVI
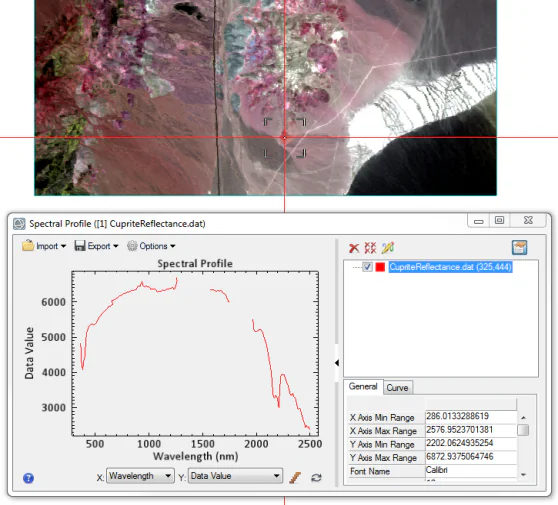
Start the hyperspectral image-altering workflow by bringing the raw information into ENVI, a specialized spectral image software designed for an in-depth examination. ENVI encourages the beginning stages of handling with its robust tools custom-made for spectral data.
Inside ENVI, commence with the primary task of noise-lessening. Execute algorithms and filters to dispense with undesirable artifacts and improve the overall information quality. This step guarantees a cleaner and more exact establishment for the ensuing investigation.
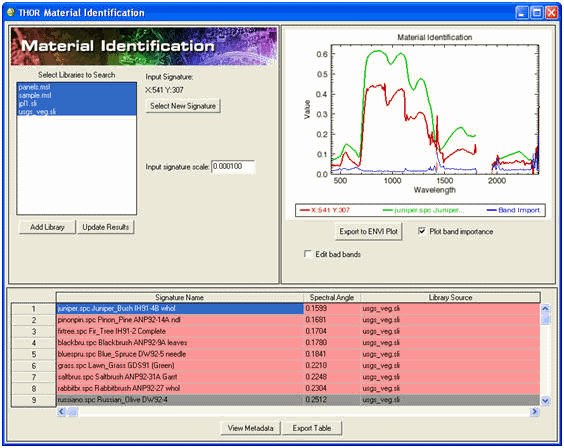
Continue to spectral examination, fastidiously looking at the distinct signatures across different wavelengths. ENVI’s specialized functionalities help provide a comprehensive understanding of the spectral characteristics, recognizing key highlights inside the hyperspectral information.
After spectral examination, move on to feature extraction. Utilize ENVI’s tools to pinpoint and extricate particular data crucial to the examination. This step is significant in segregating basic information to encourage manipulation and interpretation.
Conduct initial classification forms to classify pixels based on spectral properties as the ultimate step in ENVI. ENVI’s classification capabilities lay the foundation for consequent enhancements and inventive adjustments in other software like Photoshop. Confirm the information is ready and optimized for consistent integration into the following phase of the workflow.
Step 2: Bring the hyperspectral data into Photoshop
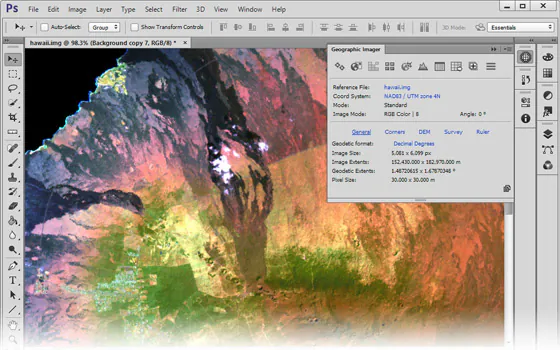
Next to the foundational processing in ENVI, move smoothly to Photoshop for advanced refinement and inventive editing. Start by exporting the prepared hyperspectral information from ENVI for compatibility with Photoshop’s versatile stage.
Upon consequence into Photoshop, start extra noise diminishment and cleanup forms. Use Photoshop’s spontaneous tools to regulate the visual clarity of the hyperspectral image, tending to any residual abandons or flaws presented during the introductory processing stages in ENVI.
Continue with specific color alterations inside Photoshop, deliberately improving particular spectral highlights. The software’s progressed color control capabilities permit exact alterations, emphasizing key components distinguished during the spectral examination in ENVI.
Capitalize on Photoshop’s layering usefulness to coordinate distinctive spectral layers with complementary visual data. This combination improves the general setting of the hyperspectral image, giving a more comprehensive and interpretable see of the information.
Apply creative altering strategies in Photoshop to improve the visual appeal of the hyperspectral image. Through contrast alterations, color grading, or other innovative improvements, Photoshop permits creative adaptability while keeping up the astuteness of the spectral data.
Conclude this step by preparing the hyperspectral image for approval and comparison. Send out the information in a format appropriate for side-by-side evaluations so that the collaboration between ENVI and Photoshop comes about in a refined and outwardly impactful representation of the hyperspectral data.
Step 3: Experiment with layering strategies
As the hyperspectral image gets through refinement in Photoshop, use the software’s layering capabilities to coordinate processed spectral layers with extra visual data.
Start by importing significant visual components, such as maps or relevant imagery, into isolated layers in Photoshop. Adjust these layers deliberately with the hyperspectral information to make a unified and enlightening composite.
Use blending modes in Photoshop to consistently blend the spectral layers with additional visual data. Play with blending modes such as “Overlay” or “Multiply” to improve the visibility of spectral highlights while keeping up the relevant abundance of the overall picture.
Execute layer masks in Photoshop to selectively reveal or cover up particular parcels of the spectral layers.
Consider altering layer opacity to fine-tune the harmony between the spectral information and other visual components.
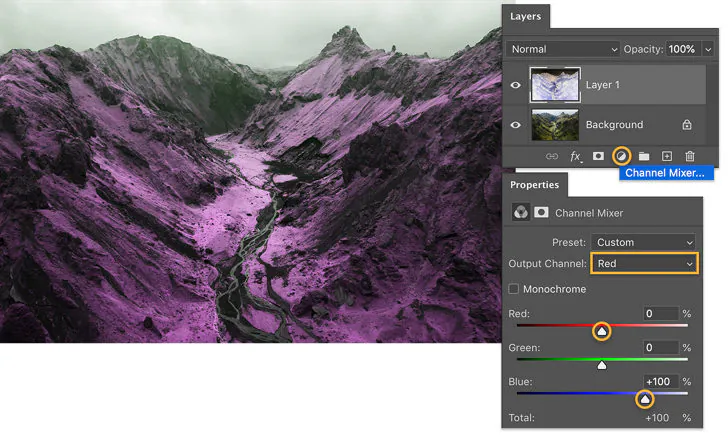
Proceed to refine the composition by exploring adjustment layers in Photoshop. These layers empower non-destructive tweaks to aspects like brightness, contrast, and color balance, giving further control over the overall look.
Step 4: Apply creative filters and effects
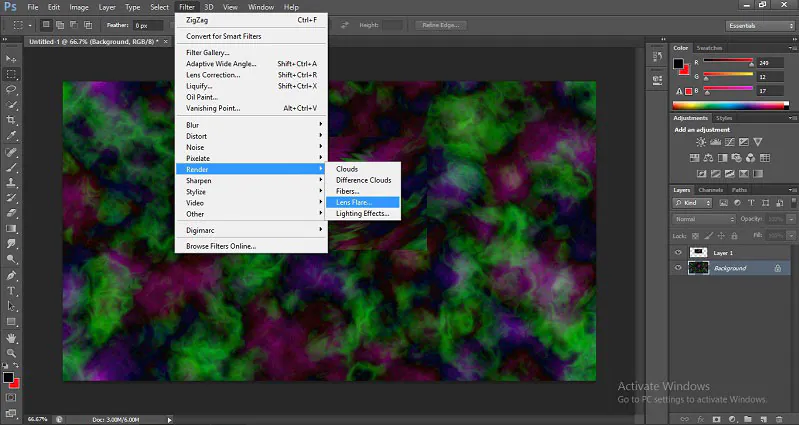
Begin this step by investigating Photoshop’s inventive filters and effects to include an elaborate touch to the hyperspectral information. Try options like blurring, sharpening, or creative filters to attain extraordinary visual impacts regarding the fundamental spectral data.
Consider altering color gradients and tones to advance and emphasize imperative highlights. Photoshop’s color reviewing tools offer the adaptability to improve particular spectral bands, bringing out nuances within the information that can be significant for interpretation.
Access advanced modifying tools in Photoshop for delicate alterations like spot healing, cloning, and content-aware fill to address any remaining imperfections or diversions within the hyperspectral composition.
Try using diverse layer styles and blending choices to make visually engaging compositions. Whether applying mild glows, shadows, or other impacts, these upgrades contribute to a polished representation of the hyperspectral data.
Execute Photoshop’s layer alteration choices for exact control over brightness, contrast, and saturation. This step guarantees that the novel alters complement the spectral substance, keeping up precision while upgrading the general visual effect.
All through the inventive editing process, balancing aesthetic upgrades and the astuteness of the hyperspectral information. Photoshop’s distinct toolkit gives plentiful opportunities for inventiveness while protecting the scientific esteem of the fundamental spectral data.
Step 5: Compare the initial and final data versions
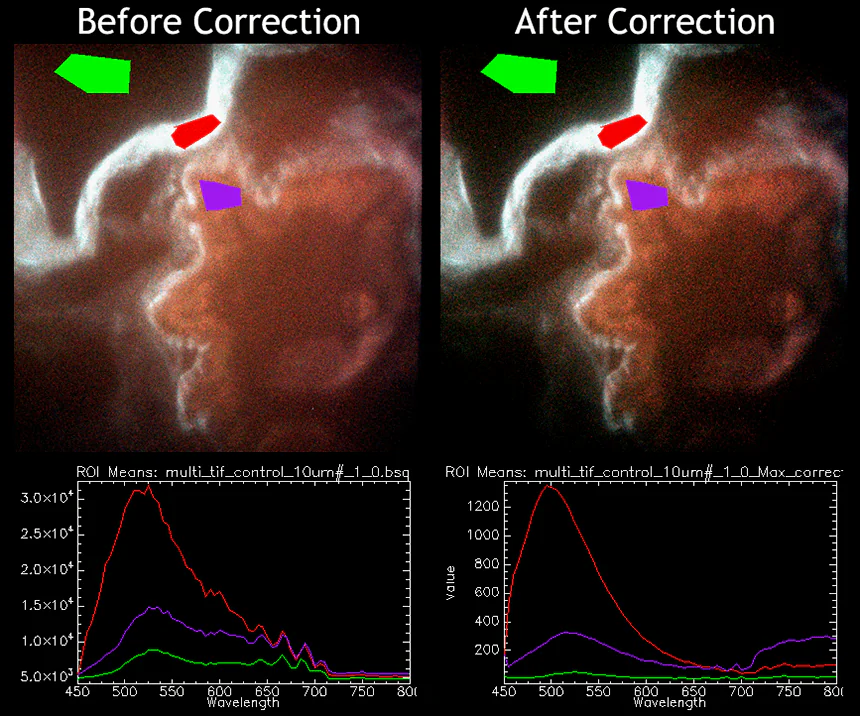
As the refining altering in Photoshop concludes, move the focus to approval and comparison, guaranteeing the precision and reliability of the hyperspectral picture.
Start a side-by-side comparison between the processed image in Photoshop and the initial information from ENVI. Scrutinize key features, spectral signatures, and general image constancy to confirm that the inventive improvements have kept the logical insight of the data intact.
Utilize Photoshop’s split-screen or layer comparison highlights to survey the effect of innovative edits on the hyperspectral information.
Consider quantitative approval strategies, such as statistical examinations or metrics specific to hyperspectral information, to equitably evaluate the precision of the altered image.
Collaborate with specialists or partners within the field to accumulate feedback on the altered hyperspectral image. Join in talks to approve the interpretation of highlights and survey whether the creative enhancements accommodate the aiming communication objectives.
If essential, iterate on the hyperspectral composition by returning to particular steps within the workflow. This iterative process aids in defining the balance between creative altering and information precision.
Conclude this step by documenting the approval process and counting any alterations made to add transparency and accountability in creating the hyperspectral photo.
Step 6: Execute the concluding refinements and export
Moving on to the ultimate refinement phase, coordinate alterations from both ENVI and Photoshop to improve the hyperspectral image for practical utilization while validating its precision.
In ENVI, fine-tune the hyperspectral information based on the approval results. Address any errors distinguished during the comparison process, guaranteeing that spectral features stay precise and that classification results comply with the aiming interpretation.
Export the refined hyperspectral information from ENVI and move it back to Photoshop. In Photoshop, apply the feedback from approval to create finishing creative refinements. That may involve adjusting color gradients, refining aesthetic impacts, or tending to any remaining defects within the picture.
Work on the image’s different aspects as required, returning to particular steps in both ENVI and Photoshop to address any extra recommendations or necessities arising from the approval process.
After done with the refined image, wrap up the validation and refinement step by documenting the ultimate tweaks made. This documentation records the iterative process, guaranteeing authenticity in creating the hyperspectral image and providing a comprehensive understanding of its logical and visual precision.
Conclusion
In summary, hyperspectral images are a significant portion of various kinds of scientific visualizations, including remote sensing. The smooth integration of advanced editing tools can distinctly refine them, thus vitally assisting in their analysis and study. The steps addressed in this article encourage both editing and refining hyperspectral images, as well as making an ultimate representation that ideally combines the explanatory insights from specialized programs like ENVI with the creative upgrades given by Photoshop. Ultimately, you can get an aesthetically compelling, deductively exact, and virtually fitting representation of complex spectral information.
