How to Create Striking Star Trail Photo Effects in Post-Processing
Photographing star trails is an enthralling hobby that inspires wonder and amazement. Stars travelling across the night sky produce these intangible trails. Careful planning and shooting procedures are required to boost star trail photos. Nevertheless, Post-processing techniques also of helping create eye-catching and visually appealing results. This blog will commute you about the basic steps and techniques of post-processing, assisting you in turning your star trail photographs into works of splendour.
Step 1: Preparing Your Images
Before diving into post-processing, preparing your star trail images to ensure a smooth workflow and optimal results is essential. This step involves selecting, organizing, and optimizing your images for editing. Here’s a breakdown of the subheadings within this step:
Selecting and Organizing Your Images: Review all your star trail images and select the ones that exhibit proper exposure, focus, and composition. Discard any images with significant blurring, unwanted artefacts, or poor framing. Organize your selected images in a separate folder or directory on your computer, making accessing and managing them easier during post-processing.
Shooting in RAW Format: When capturing star trail photos, always shoot in RAW format if your camera supports it. RAW files contain more image data and offer greater flexibility in post-processing. They preserve a wider dynamic range, allowing you to recover details from bright stars and dark sky. Shooting in RAW ensures that you have the best starting point for editing and allows for non-destructive adjustments without sacrificing image quality.
Importing Images into Post-Processing Software: Once you have selected your star trail images, import them into your chosen post-processing software. Adobe Lightroom, Photoshop, or other editing software offer powerful tools and features to enhance and transform your images. Importing your images allows you to access the full range of editing options and adjustments available for your post-processing workflow.
By taking the time to carefully select, organize, and import your star trail images, you set the stage for a streamlined and effective post-processing experience.
Step 2: Enhancing Contrast and Colors
Enhancing contrast and colours is crucial in creating striking star trail photo effects. It helps highlight the details, make the stars pop, and create a visually captivating image. Here’s a breakdown of the subheadings within this step:
Adjusting Overall Contrast: Start by adjusting the overall contrast of your star trail image. Use curves or level adjustments to create an S-curve, slightly lifting the highlights and lowering the shadows. This adjustment enhances the tonal range and adds depth to the image. It helps make the stars stand out against the dark sky and creates a more visually impactful photo.
Fine-tuning Colors: To make your star trails truly captivating, fine-tune the colours of the image. Use colour balance or selective colour adjustments to bring out the natural hues of the stars and the night sky. Increase the saturation of blues and cyans to intensify the colours of the starry sky. Experiment with different settings to find the right balance and enhance the overall mood of the photo.
Dodge and Burn Techniques: Dodge and burn techniques can selectively brighten or darken specific areas of the image. Use the dodge tool to brighten the star trails and stars, making them stand out more prominently. On the other hand, use the burn tool to darken the areas around the trails, creating a sense of depth and separation. Use these tools in moderation to maintain a natural look without overdoing the adjustments.
Targeted Adjustments: Utilize adjustment brushes or graduated filters to make targeted adjustments to specific parts of the image. You can brighten specific star trails, adjust exposure or colour in particular regions, or enhance the details in the foreground. These tools precisely control different elements, allowing you to create a cohesive and visually appealing star trail photo.
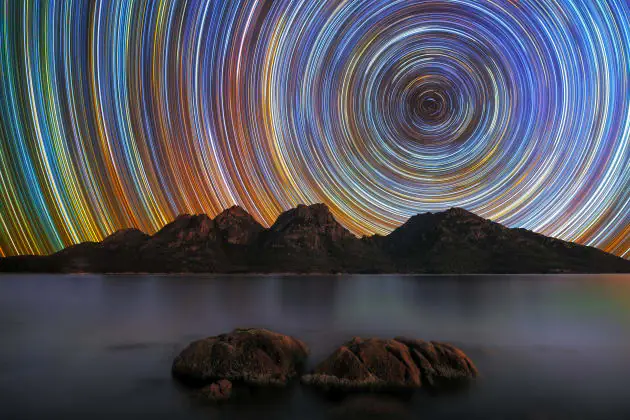
Step 3: Emphasizing Celestial Trails
Celestial trails is crucial to creating striking star trail photo effects. This step involves techniques to enhance and highlight the trails, making them more prominent and visually captivating. Here’s a breakdown of the subheadings within this step:
Stacking Multiple Exposures: Stacking or blending multiple exposures is often necessary to create well-defined and elongated star trails. Using software such as StarStaX or Adobe Photoshop, align and stack the individual frames to combine the trails into a single image. This process helps reduce noise and emphasizes the star movements’ cumulative effect over time.
Adjusting Blending Modes: Create a separate layer for stacked trails in your post-processing software after stacking the star trail exposures. Adjust the blending mode of this layer to “Lighten” or “Screen.” These blending modes allow the bright trails to blend seamlessly with the base image, making them more pronounced. Experiment with the trail layer’s opacity to achieve the trails’ desired intensity.
Refining the Trails: To ensure the star trails appear smooth and uninterrupted, refine them using layer masks. Remove any unwanted elements or artefacts that may have appeared during stacking. Carefully mask sections that may appear unnatural or distracting, ensuring the trails flow smoothly across the image.
Enhancing Star Trail Details: If the star trails lack definition or appear too faint, use selective sharpening or clarity adjustments to enhance their details. Apply these adjustments selectively to the trails while preserving a natural and balanced look.
Step 4: Reducing Digital Noise
Digital noise can often be present in long-exposure star trail images, detracting from their overall quality. Reducing digital noise is crucial during post-processing to ensure a clean and smooth appearance. Here’s a breakdown of the subheadings within this step:
Identify Noisy Areas: Zoom in on your star trail image at 100% magnification to examine the details carefully. Look for areas where digital noise is most noticeable, typically appearing as grainy or speckled patches, particularly in darker regions of the photo.
Utilize Noise Reduction Tools: Most post-processing software offers noise reduction tools to combat digital noise. Locate the noise reduction feature in your software and adjust the settings to reduce noise while preserving important image details. Apply noise reduction selectively to the areas affected by noise, such as the night sky or shadow regions, to maintain the integrity of the star trails and other significant elements in the composition.
Balance Luminance and Color Noise Reduction: Adjust the luminance noise reduction slider to reduce the graininess while preserving fine details in the star trails and other parts of the image. Be cautious not to overdo it, as excessive luminance noise reduction can result in a loss of sharpness and a “plastic” appearance. Similarly, adjust the colour noise reduction slider to minimize unwanted colour speckles or artefacts. Find a balance that preserves the natural colours of the stars and the night sky while minimizing distracting colour noise.
Use Masking for Selective Noise Reduction: Employ masking techniques to apply noise reduction selectively to specific areas of the image. Create a mask to protect the star trails and other desired elements while reducing noise in the background or less critical regions. That helps maintain the sharpness and clarity of the star trails while effectively reducing noise in other parts of the image.
Step 5: Fine-Tuning and Final Adjustments
In this step, we focus on fine-tuning the star trail photo effects and making any additional adjustments to ensure the desired look and feel of the image. Here’s a breakdown of the subheadings within this step:
Contrast and Clarity Enhancements: Fine-tune the overall contrast and clarity of the image to enhance the star trails and other elements further. Use adjustment tools like curves, levels, or clarity sliders to add depth and definition to the trails, emphasizing their visual impact. Be mindful of maintaining a balanced and natural appearance while making these adjustments.
Creative Color Adjustments: Experiment with colour grading techniques to give your star trail photo a unique and artistic touch. Adjust the white balance, hue, saturation, or use colour lookup tables (LUTs) to create a specific mood or atmosphere. Explore different colour schemes, such as cooler tones for a serene feel or warmer tones for a more dramatic effect, and find the colour palette that best complements the star trails and overall composition.
Fine Detail Enhancements: If desired, selectively enhance fine details in the image to bring out additional textures or subtle elements. Use tools like sharpening or clarity adjustments, but apply them sparingly and with precision. Focus on preserving the natural appearance of the star trails and avoid introducing artefacts or excessive sharpening that may detract from the overall image quality.
Cropping and Composition: Review the composition of your star trail photo and consider whether any cropping or minor adjustments to the framing would improve the overall balance and visual impact. Crop out any distracting elements at the edges of the frame or experiment with different aspect ratios to create a more pleasing composition.
Final Touches and Exporting: Make final adjustments, such as fine-tuning exposure, saturation, or contrast, to achieve the desired look. Ensure the image is properly optimized for the intended output, whether for online sharing, printing, or other display purposes. Consider resizing, applying sharpening for the specific output, and saving the final image in an appropriate file format, such as JPEG or TIFF.
By carefully fine-tuning and making final adjustments, you refine the star trail photo effects and bring out the full potential of your image.
Conclusion
Star trail photos, however, greatly impact visual expression and emotional contentment. These images can also inspire and enlighten people by exhibiting the fascinating nature of the universe. Subsequently, you can utilize star trail photo effect techniques to convey your ideas about the beauty of the night and stars and leave an indelible impression on viewers’ minds.
