How to create an online form with Formstack?
High-level security, feasible storage, easy access, and low costs make online data entry a desirable choice for businesses today looking to improve their data management. Data organization is vital to efficiency, operation, and productivity, and online data storage has been recognized as the most cost-effective and efficient method to manage data. Although it’s accessible to find experienced online data entry services providing low-cost and fast solutions, the most recent technological advancements have significantly enhanced the storage and maintenance of data on the internet.
There is a variety of data entry software in the market; let us discuss how to build online forms for data entry using Formstack.
What is online data entry?
Online data entry is gathering information from internet sources and putting it into an appropriate format for storage online and access. It consists of various procedures, including data entry, mining data typing, data extraction, and web research. They can be used to locate relevant information on the internet and organize it orderly. The information and data are transformed into digital format and then put together to be used on computers. Databases are created to keep them in storage and accessible at any time. The latest IT technology often encodes useful information for machine-readable analysis.
What is Formstack?
Formstack can automate the tasks we used to perform manually, such as sending out information to potential clients, gathering information from clients currently using it, and sending out a sequence of steps within the course of a project, etc. It’s a fantastic value for money and is relatively simple to use. People have been using it for a long time and cannot imagine a life without it. It’s vital to having a productive process for small businesses and is much cheaper than hiring an admin person to complete the same job.
Benefits of Formstack
With Formstack’s suite of services, you can automate the most critical processes–securely on the cloud and with no code. Scale your business quickly with tools that assist you in solving problems and eliminate inefficiency from your workflow.
Create questionnaires and forms and then transform your data into customized documents and also gather electronic signatures–all in one Platform.
With the help of intuitive drag-and-drop tools, everyone in your company can move from concept to solution in a short time. There are no special skills or programming needed.
Reduce the time you spend doing manual tasks out of your schedule by automating your work. This can be utilized throughout your company, from marketing and operations to onboarding and hiring.
With the flexibility of sub-accounts and user rights, your team can access, create, and collaborate on workflows wherever you’re working in the office or on your own.
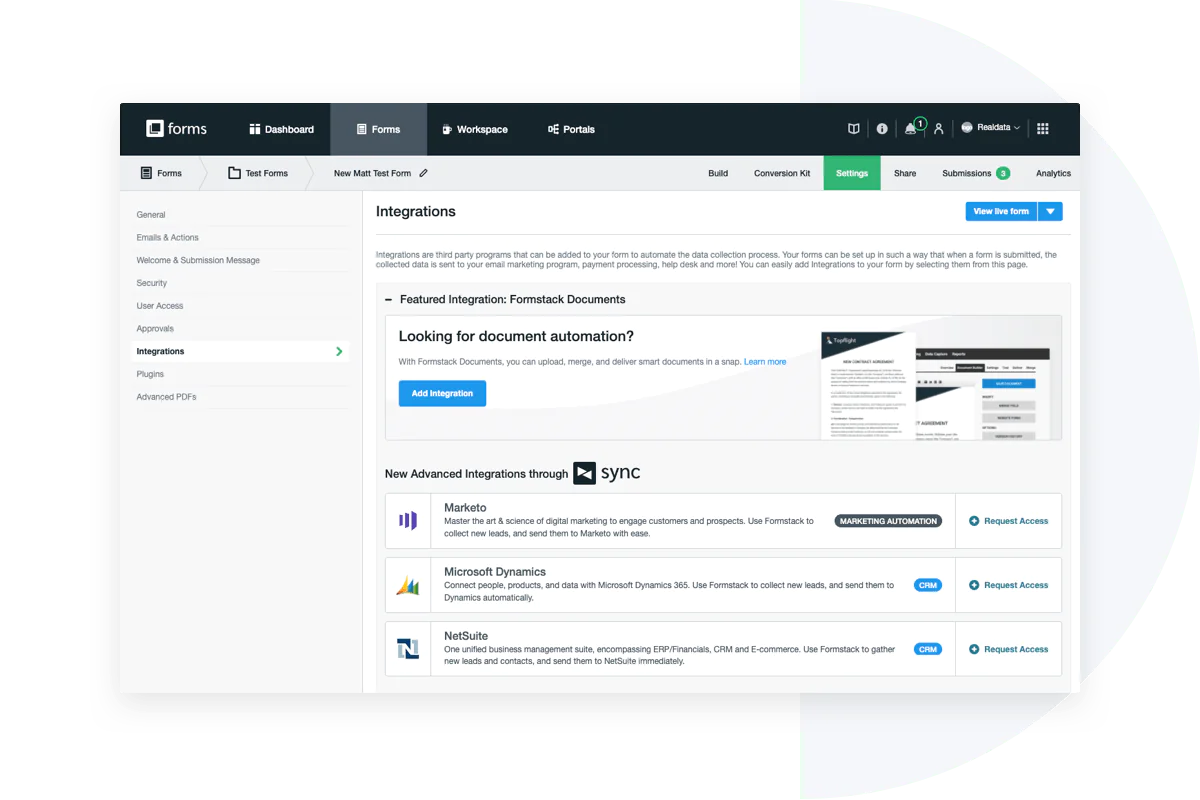
Integrate Formstack with other tools essential for your company, from CRMs such as Salesforce and HubSpot to storage apps such as Google Drive and Dropbox.
Automate your processes without sacrificing security. Formstack secures your data through encryption, secure SSL connections, and data centers compliant with HIPAA GDPR, HIPAA, and many more.
How can we make an online form using Formstack?
Before doing anything else, you should start by reading this guide. This guide provides a brief outline of everything that is in the Builder area of the Formstack Formulas interface. It will help you understand the fundamentals of creating forms and editing. Let’s get started!
Basic Understanding
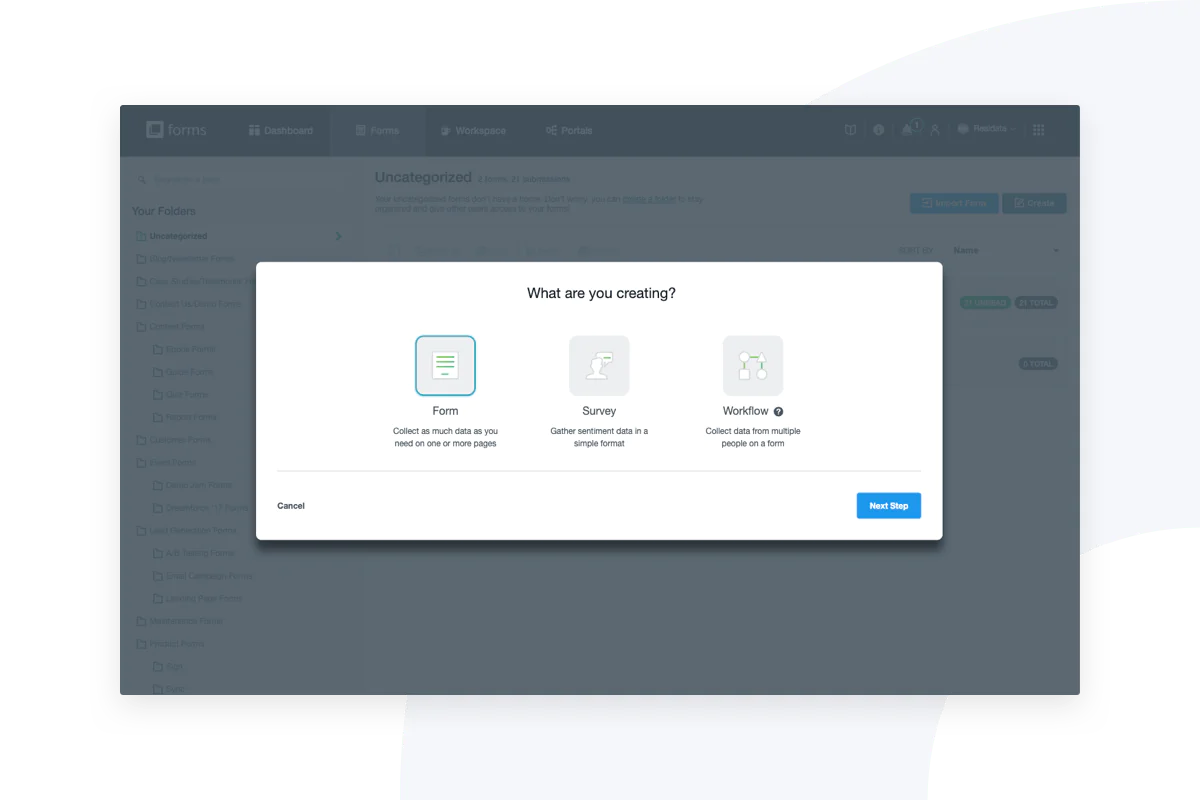
To start creating a new form, you must click on the “Create” button on the Forms tab (either at the top right or in the center of the screen if there aren’t any forms developed yet). When you click “Form,” you can add the name of the form, the URL, and the language, which will be filled in automatically. If you want to change this, you can select “Start with blank form instead” at the bottom of the screen to directly enter the constructor.
After that, select the type of form from the pre-built templates. Before you begin creating your layout, you can choose from the default, light, or dark themes. If you have a different music that you like, then you can select it from the builder.
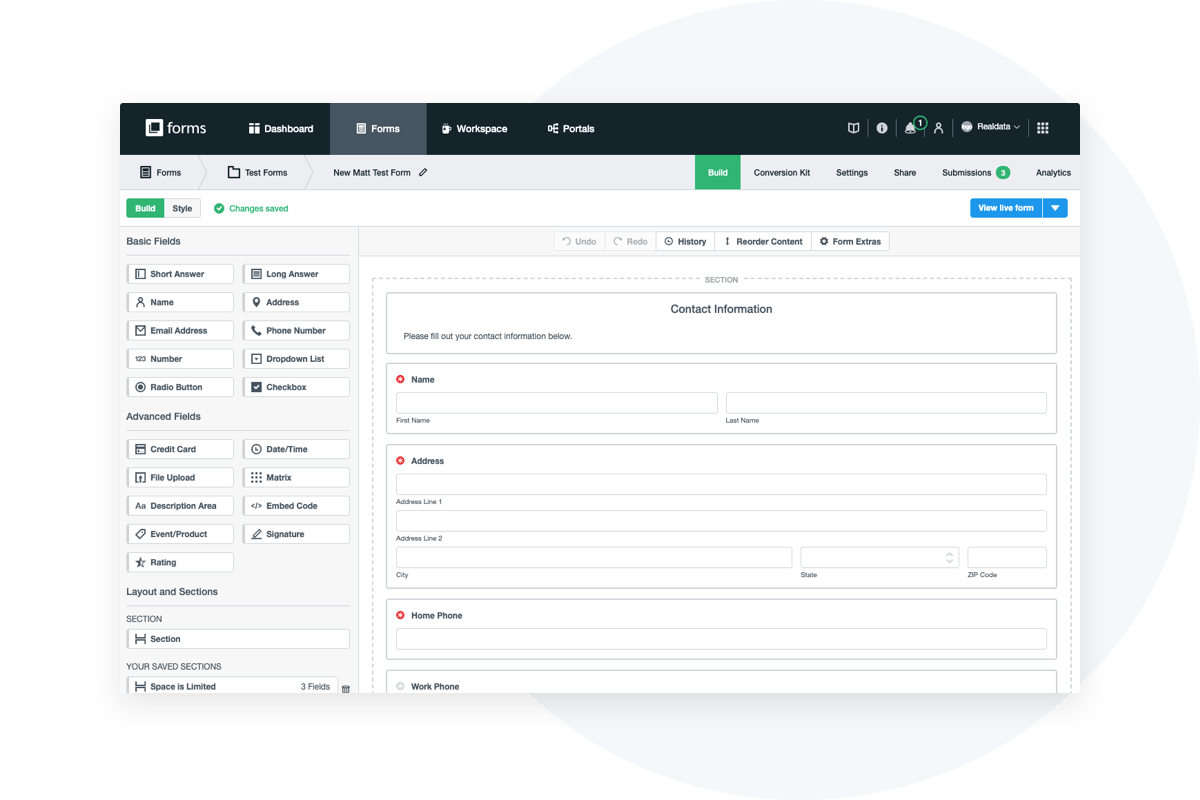
Start creating fields and adding them by dragging them out on the Form Fields menu to the left side of the builder.
You can add, edit, delete, copy, or move your fields by using the slide-out window to the left.
Once the basic structure is set, it’s time to include the fields on your form to help it become more dynamic.
Choosing Your Form Field Options
Long and Short Answer Fields
The two most popular field types include Short Answer and Long Answer. They allow users to provide their answers.
Long Answer fields are designed for responses with multiple lines and large quantities of text, like comment boxes. To include Long Answer fields, click the Long Answer field, and drag it from the Basic Fields menu on the left side to the right spot in your forms. The field’s name will reflect the question you’re asking. You can alter the width of your domain simply by changing the columns’ number and the dimension of the field by changing how many rows.
Short Answer fields are designed for straightforward, single-line answers such as first name, company name, company name, etc. To include a Short Answer field, drag it from the Basic Fields menu on the left-hand side to the proper place within your application. The field’s name will reflect the question you’re asking. You can alter the size that the domain by changing the columns’ number and the dimension of your field by choosing row numbers.
The Short Answer field can also be used for calculation. Click the Calculation option beneath the field-specific area to the left and select a date or numeric computation. Under the default value (Calculation) choice, choose the fields you want to use, numbers, and mathematical symbolisms to create the calculation.
Dropdown List, Radio Button, and Checkbox
Beyond text fields, there’s a variety of ways to display a query that includes answer options:
Dropdown List– These fields can be utilized to build an inventory of items users can pick from. You can use an existing list (such as age, state, and days of the week.) or build your own entirely from scratch.
Radio Button- The Radio Button Radio Button fields are used when you have an area offering multiple answer options. However, you want the users to choose one of those choices. (If you wish for users to be able to select various options, then you should choose the Checkbox field.)
Date/Time -This is a space where users can enter an entry for a date, time, or both (e.g., the day they were born).
File Upload– The File Upload feature lets users upload images, documents, or other kinds of files to your form. You should use this feature to allow users to upload resumes and cover letters to fill out employment applications.
Name, email address, phone Number Address -These fields are simple but essential. Drag and drop them as an easy way to include these fields on your form.
Matrix– A rating field that can be used in surveys or other forms that require you to let your users score or rank various things in one area.
Number- Users can input a number that helps transfer money.
Credit Card– Pay for transactions with ease by making it simple for users to enter their credit card numbers.
Description area- This is the place to add rich text (photos or text formatted hyperlinks, photos, etc.). Consider including your logo, designed for customers, etc.
Embed-Code- Embed HTML maps, videos, and widgets in the form.
Signature– Allows users to quickly as well electronically sign the form.
Section- Sections can aid in breaking into smaller sections to make the form more readable. Use explanatory text and headlines on a list of fields, create an entirely new page for an online form with multiple pages or alter the layout of some fields without changing the overall layout of the form.
Event/Product– Organize and create products or events based on availability or prices and then adjust the handling once the supply has been exhausted.
Rating -This field is used to collect customer feedback, evaluate the event’s effectiveness, or calculate the Net Promoter Score (NPS).
Are you looking to streamline your form creation process? Save the sections you’ve created to be reused! Click the “Save this section” button and save the section with a name that you can be able to remember for the future (e.g. the Payment Information and Contact Information). When you’re ready to use it again, add it to the saved Sections section on your form exactly as you would for a regular field.
Final words
The data entry process is the core of any company. Everything could be turned on track with it, and you’ll remember when something happened or by whom! A variety of data entry services and companies employ software for data entry to make their job easier and more efficient. This article looked at how to make an online form using Formstack.
Formstack’s Platform is an interactive workflow builder that combines online forms, documents, and signatures, provides solutions to your most challenging workplace challenges, and surpasses customers’ digital technology expectations.
