How to create an automatic data entry form in Google Sheets using Apps Script
Data entry is the difficult process of manually entering values into an organization’s system or ERP software that’s why many data entry services and businesses use data entry automation tools to save their time and energy. In this article, we’ll show you how to use Apps Script to create an automatic data entry form in Google Sheets.
What is data entry automation?
Software-based solutions that can optimize data entry by getting rid of or minimizing human operations are referred to as data entry automation. Typically, this type of software may extract data from PDFs, papers, photos, emails, or websites and show only the pertinent information in an organized style (CSV, JSON, XML, etc.). While automating time-consuming repetitive/menial operations, automated data entry systems allow staff to focus on high-value tasks that influence productivity!
How to use Apps Script to create an automatic data entry form in Google Sheet?
You may simply access Google Sheets from anywhere at any time because it is available on the cloud. With coworkers, friends, and other people, you may share and work together. In addition to all of these things, Google Apps Script enables you to automate all monotonous tasks and data input jobs, add additional functionality to an existing application, and more.
In this article, we’ll show you how to use Apps Script to create an automatic data entry form in Google Sheets.
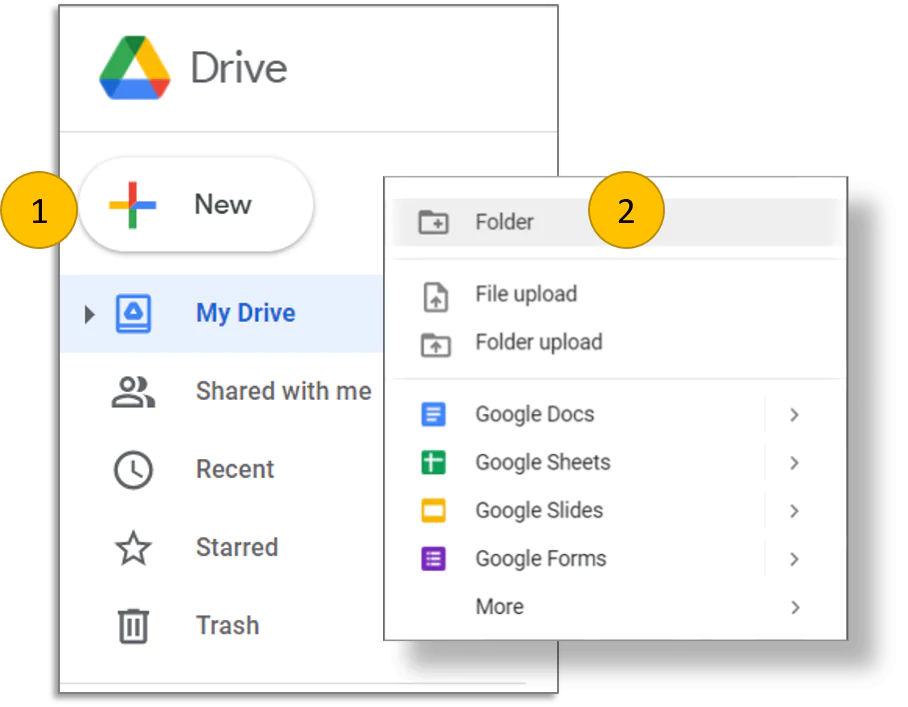
Step 1: Use your current Google ID to sign in to Google Drive (1) or create a new Google Account (3) before signing in to Google Drive.

Step 2: To make a new folder for our project, click New and then click Folder.
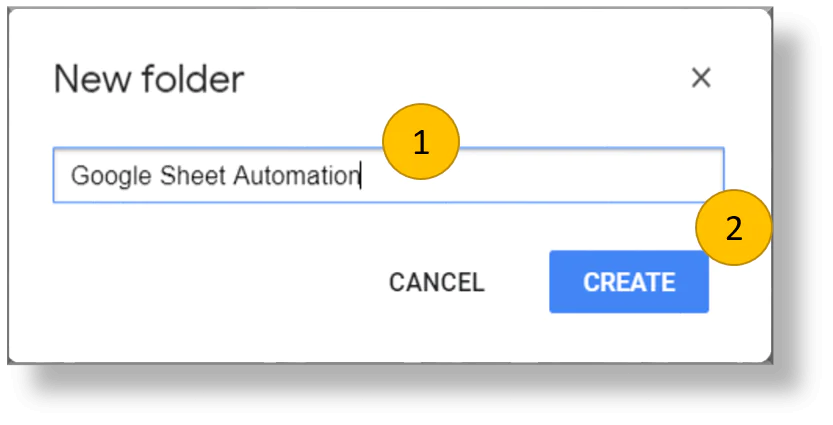
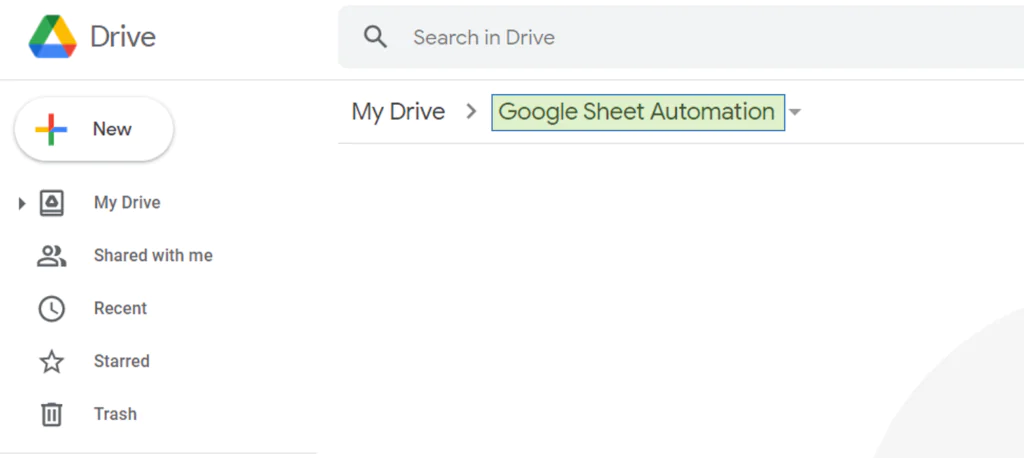
Step 3: Type “Google Sheet Automation” into the new folder window, then click Okay.
Step 4: Create a Google Sheet by opening the Google Sheet Automation folder.
Step 5: Select Google Sheets -> Blank spreadsheet from the pop-up menu by right-clicking in the Google Sheet Automation folder.
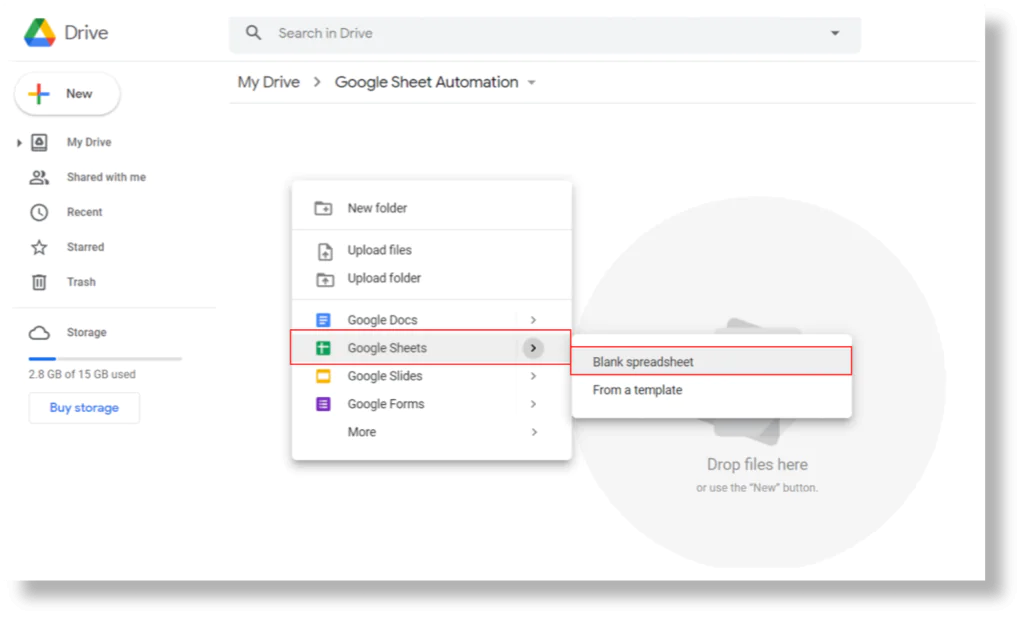
When you select Blank Spreadsheet, a new tab of the browser is opened and a blank spreadsheet is created.
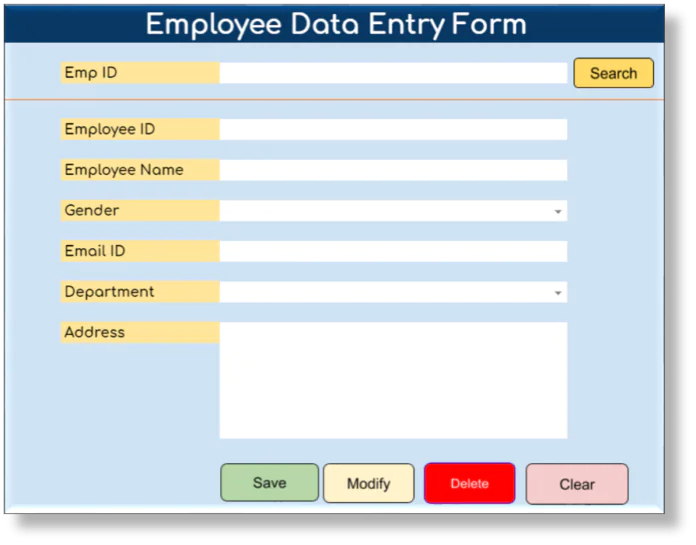
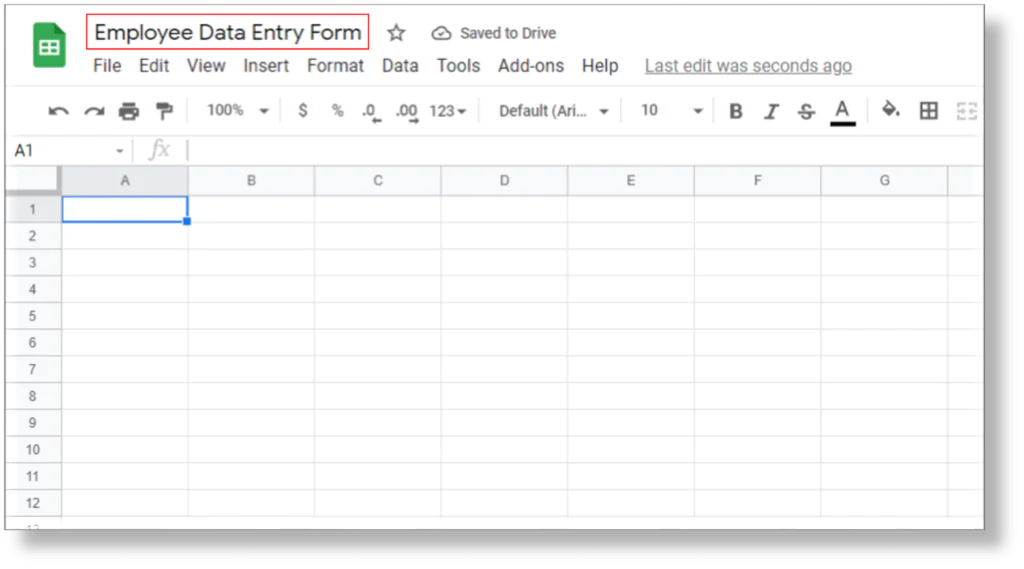
Step 6: The spreadsheet should now be named “Employee Data Entry Form.”
Step 7: Three worksheets should be added and given the names “User Form,” “Database,” and “Support Sheet” in the newly generated spreadsheet.

To develop a data entry form, we will use the “User Form” sheet, the “Database” sheet to keep the data that is transmitted from the data entry form, and the “Support Sheet” to hold a list of departments.
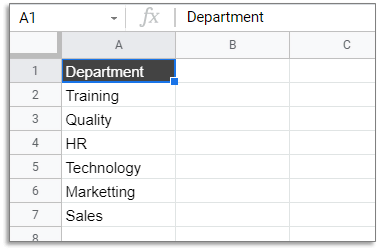
Step 8: Create a list of departments in Column A of the Department sheet.
Step 9: Let’s go to the Database sheet and add the necessary column headings in row 1, starting with Column A and going through Column H, for example. Employee number, employee name, gender, email address, department, address, submitted on and submitted by.

Step 10: Let’s come to the “User Form” sheet and start creating the Employee Data Entry Form by adding the necessary labels, input fields, and buttons.
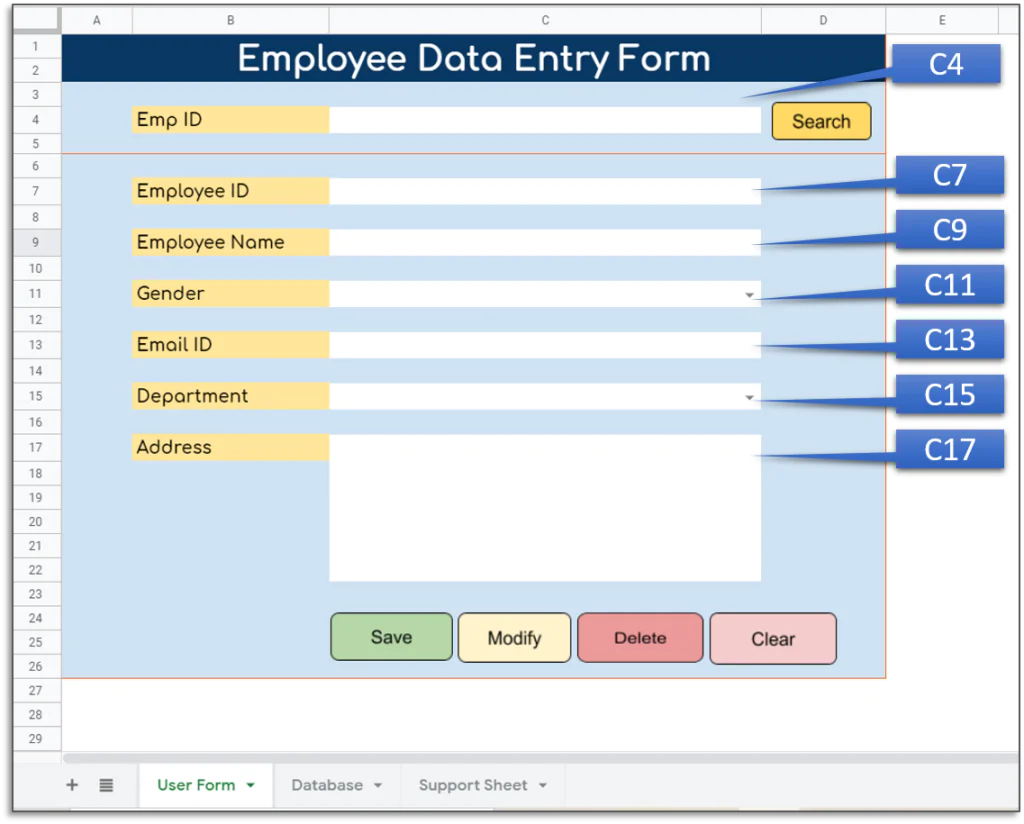
In this case, there is one field for data searching and six input fields for data inputting. Emp ID (C4) is an input field used to look up a specific employee’s record.
Cells C7, C9, C11, C13, C15, C17, and C15 are the primary input fields that will be modified by the user to transfer the data from the Database sheet to this sheet. Cells C7, C9, C11, C13, C15, and C17 are the Department, the Employee ID, the Employee Name, the Gender, and the Email ID. We’ll use a drop-down menu for Gender and Department in these input fields.
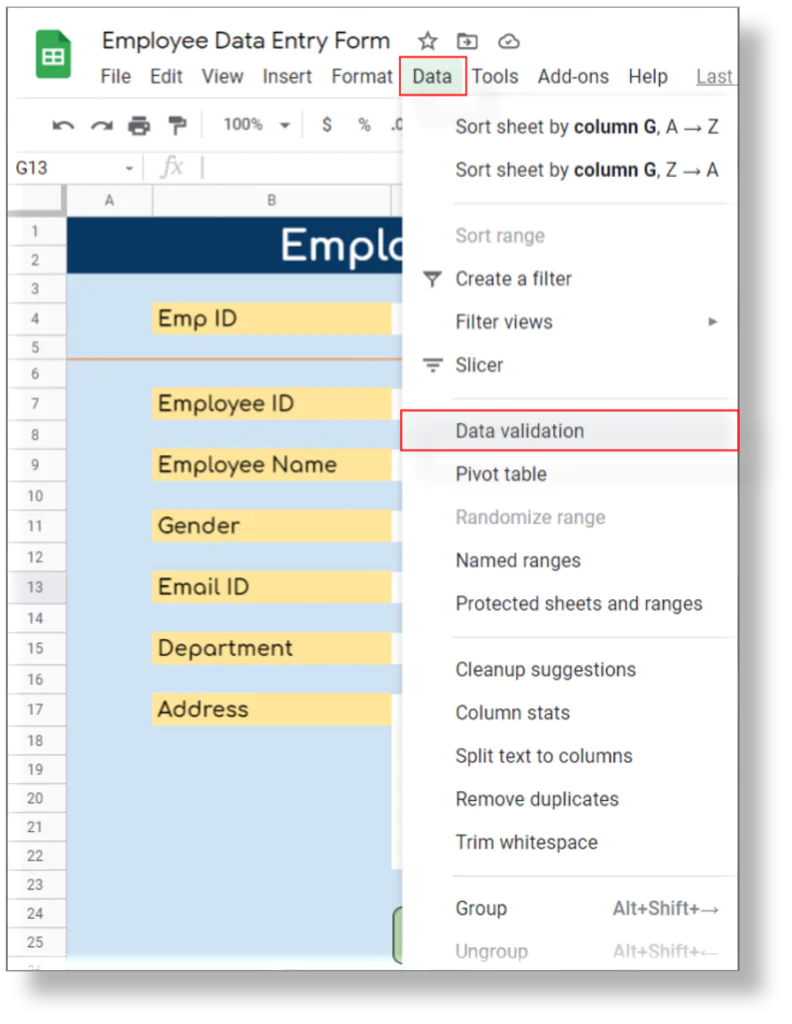
Step 11: Simply pick Data Validation from the Data menu to create a drop-down for gender.
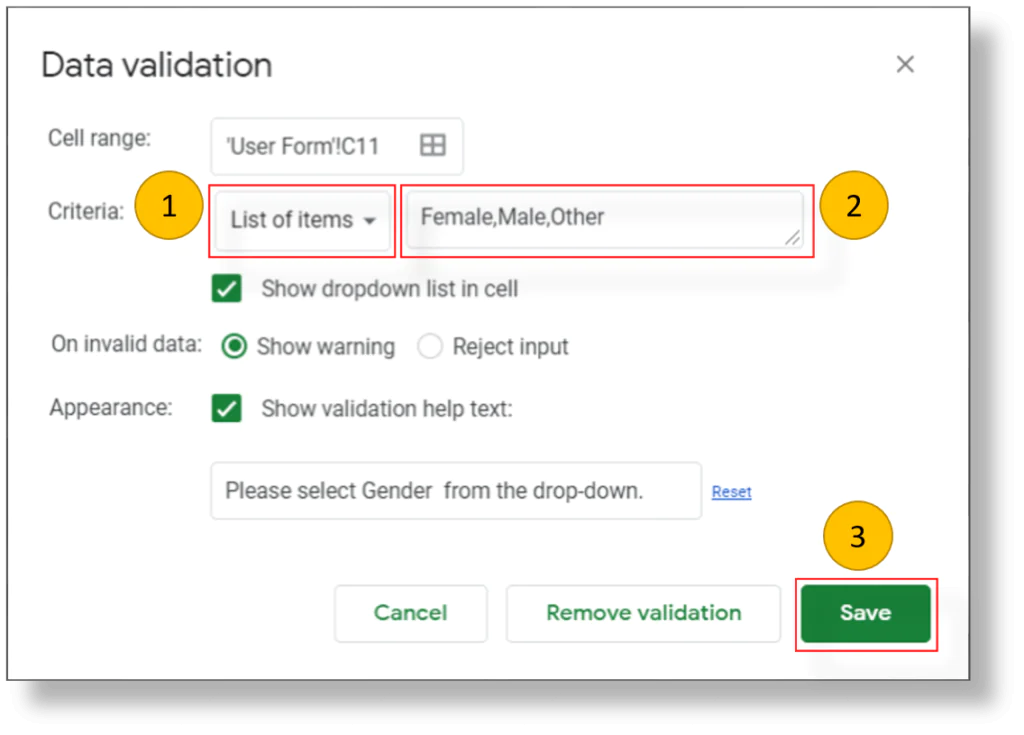
Step 12: Choose “List of items” from the drop-down list of Criteria in the Data Validation window, and then type “Female, Male, Other” in the text box. Check the boxes next to “Show dropdown list in cell” and “Show validation help text:” Please select Gender from the drop-down. Enter this as the help text in the provided text box. To build the drop-down for gender, click Save now.
Step 13: To construct the drop-down for Department, repeat the previous step. We will use the Department drop-down list from the Support Datasheet.
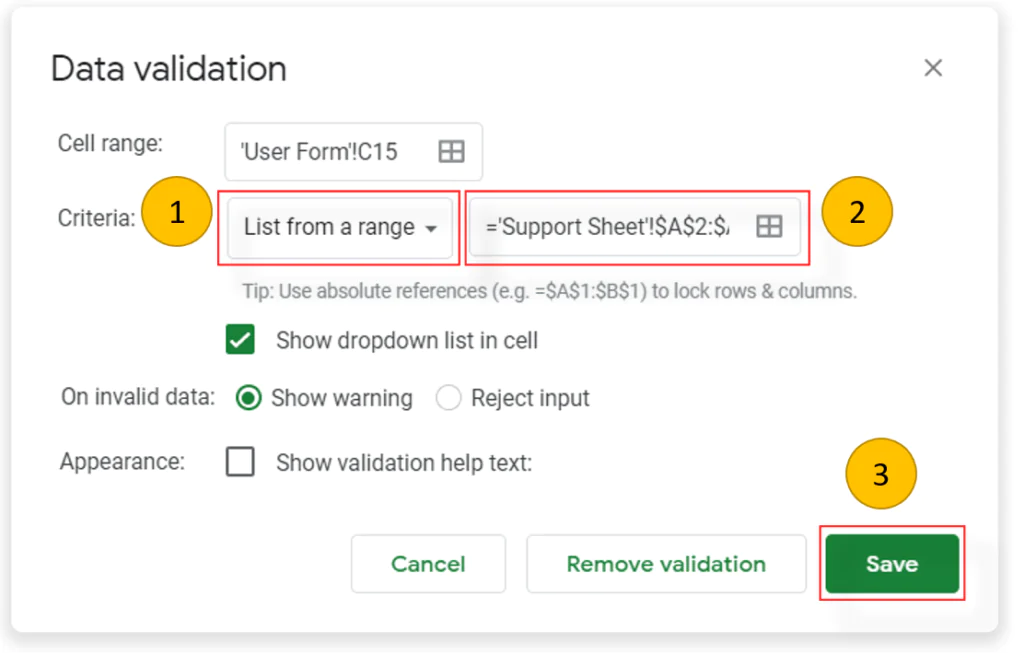
Choose “List from a range” from the criteria drop-down menu, then enter the list items’ references from the “Support Data” sheet.
In this form, there are 5 separate buttons that may be used to carry out the necessary operations according to the specified name: Search, Save, Modify, Delete, and Clear.
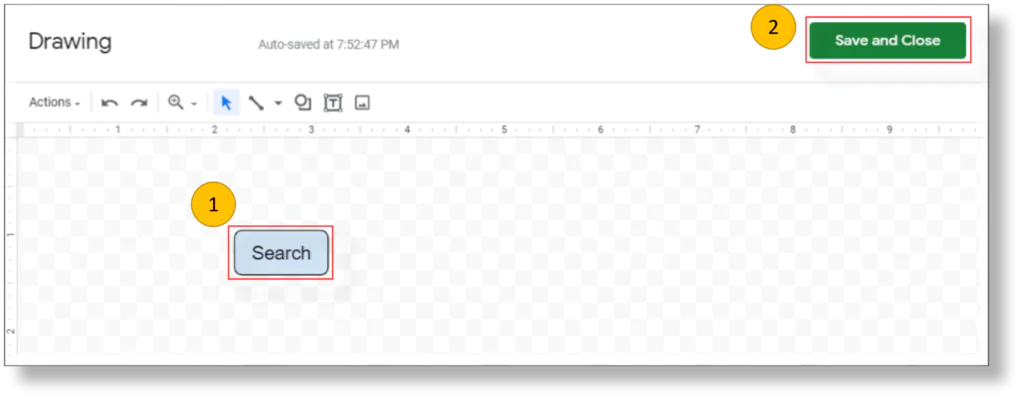
Step 14: Simply select Drawing from the Insert menu to make a button.
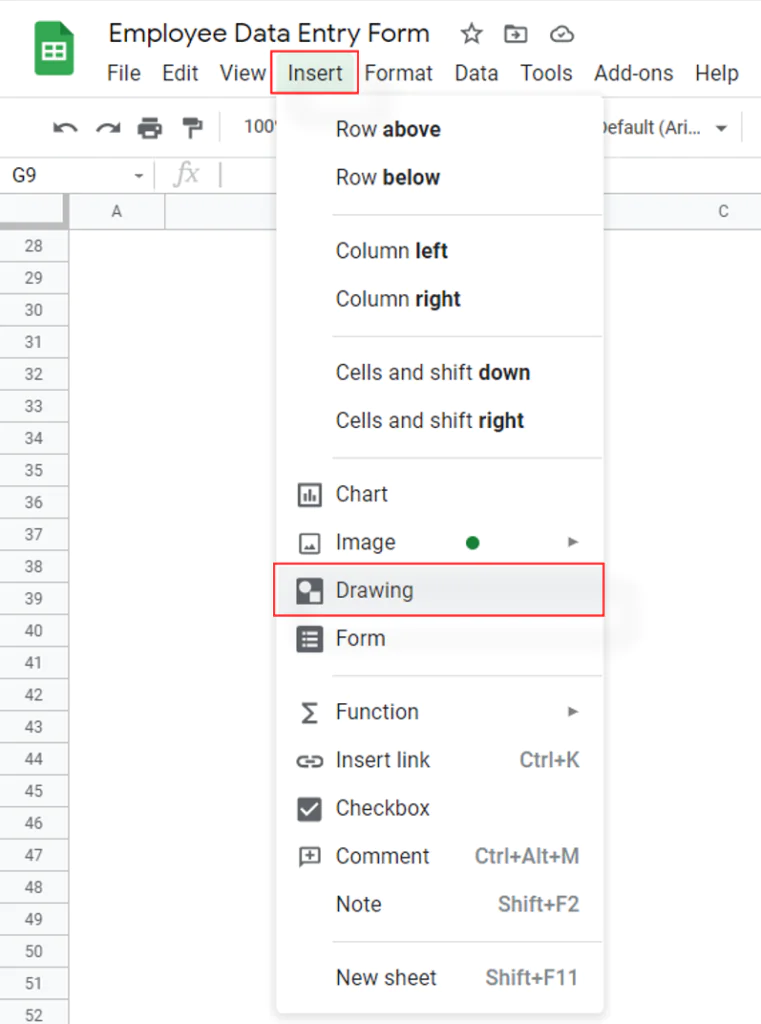
Step 15: Simply make a rounded rectangle in the drawing window, fill it with the desired color, and label it “Search.” Click Save and Close to add the button to the sheet after creating the button.
Step 16: To make the Save, Modify, Delete, and Clear buttons, follow steps 14 and 15.

The form’s design, drop-down menu creation, and button insertion are now complete. Go ahead and open the code window.
Step 17: Simply select the Tools menu, then select Script Editors to get the Apps Script window.
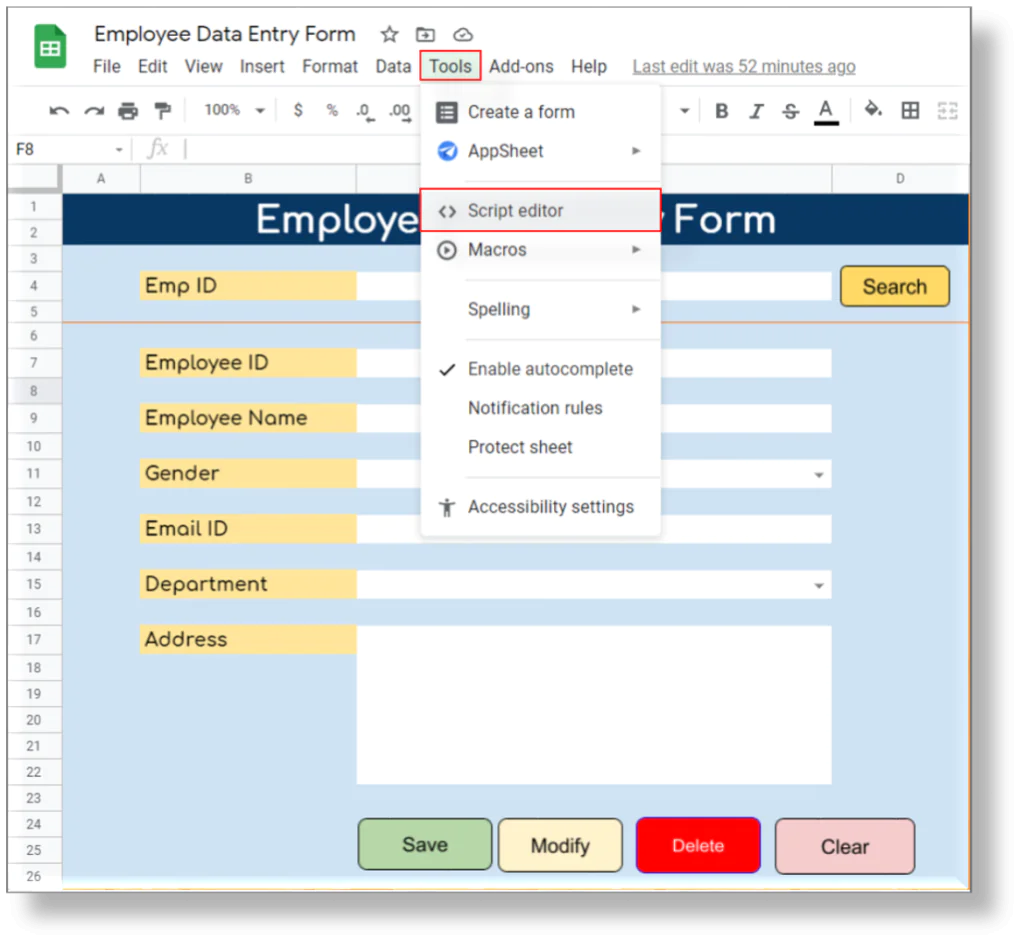
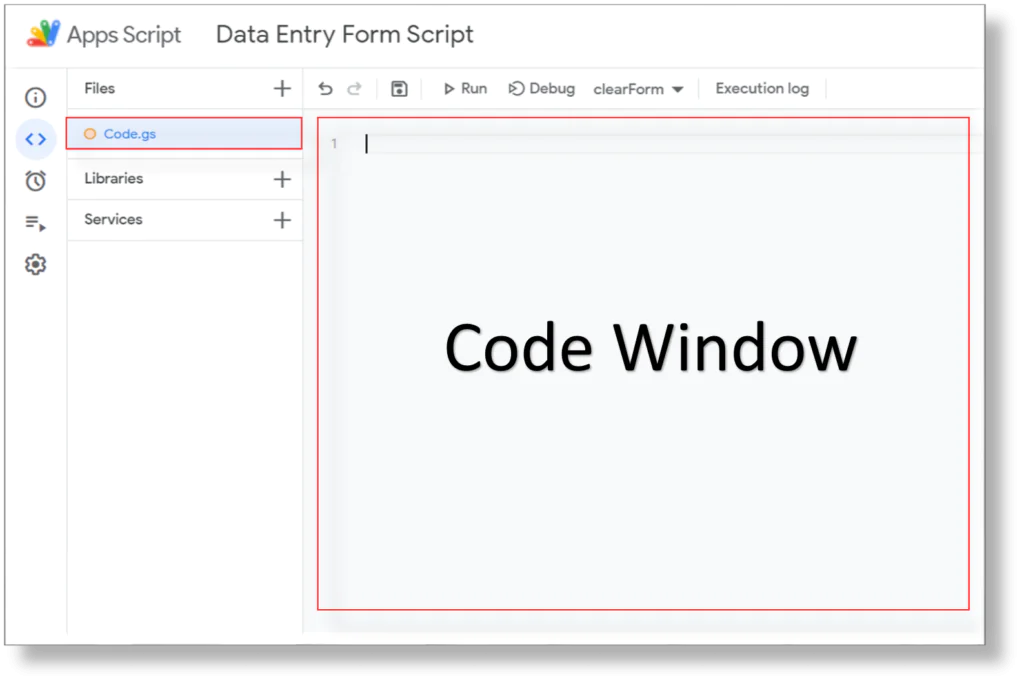
The Apps Script window for the Data Entry project will open when you select Script editor from the Tools menu.
Step 18: Write a function that will clear the data entry form. This function will be activated on click the event of the Clear button on the User Form sheet.
| 1
2 3 4 5 6 7 8 9 10 11 12 13 14 15 16 17 18 19 20 21 22 23 24 25 26 27 28 29 30 31 32 33 34 35 36 37 38 39 40 |
// Function to Clear the User Form
function clearForm() { var myGoogleSheet= SpreadsheetApp.getActiveSpreadsheet(); //declare a variable and set with active google sheet var shUserForm = myGoogleSheet.getSheetByName(“User Form”); //declare a variable and set with the User Form worksheet
//to create the instance of the user-interface environment to use the alert features var ui = SpreadsheetApp.getUi();
// Display a dialog box with a title, message, and “Yes” and “No” buttons. The user can also // close the dialog by clicking the close button in its title bar. var response = ui.alert(“Reset Confirmation”, ‘Do you want to reset this form?’,ui.ButtonSet.YES_NO);
// Checking the user response and proceed with clearing the form if user selects Yes if (response == ui.Button.YES) {
shUserForm.getRange(“C4”).clear(); //Search Field shUserForm.getRange(“C7”).clear();// Employeey ID shUserForm.getRange(“C9”).clear(); // Employee Name shUserForm.getRange(“C11”).clear(); // Gender shUserForm.getRange(“C13”).clear(); // Email ID shUserForm.getRange(“C15”).clear(); //Department shUserForm.getRange(“C17”).clear();//Address
//Assigning white as default background color
shUserForm.getRange(“C4”).setBackground(‘#FFFFFF’); shUserForm.getRange(“C7”).setBackground(‘#FFFFFF’); shUserForm.getRange(“C9”).setBackground(‘#FFFFFF’); shUserForm.getRange(“C11”).setBackground(‘#FFFFFF’); shUserForm.getRange(“C13”).setBackground(‘#FFFFFF’); shUserForm.getRange(“C15”).setBackground(‘#FFFFFF’); shUserForm.getRange(“C17”).setBackground(‘#FFFFFF’);
return true ;
} } |
Step 19: Make a function that validates user-submitted data. This feature will be used when moving data from a user form to a database sheet.
| 1
2 3 4 5 6 7 8 9 10 11 12 13 14 15 16 17 18 19 20 21 22 23 24 25 26 27 28 29 30 31 32 33 34 35 36 37 38 39 40 41 42 43 44 45 46 47 48 49 50 51 52 53 54 55 56 57 58 59 60 61 62 63 64 65 66 |
//Declare a function to validate the entry made by user in UserForm
function validateEntry(){
var myGooglSheet= SpreadsheetApp.getActiveSpreadsheet(); //declare a variable and set with active google sheet var shUserForm = myGooglSheet.getSheetByName(“User Form”); //delcare a variable and set with the User Form worksheet
//to create the instance of the user-interface environment to use the messagebox features var ui = SpreadsheetApp.getUi();
//Assigning white as default background color
shUserForm.getRange(“C7”).setBackground(‘#FFFFFF’); shUserForm.getRange(“C9”).setBackground(‘#FFFFFF’); shUserForm.getRange(“C11”).setBackground(‘#FFFFFF’); shUserForm.getRange(“C13”).setBackground(‘#FFFFFF’); shUserForm.getRange(“C15”).setBackground(‘#FFFFFF’); shUserForm.getRange(“C17”).setBackground(‘#FFFFFF’);
//Validating Employee ID if(shUserForm.getRange(“C7”).isBlank()==true){ ui.alert(“Please enter Employee ID.”); shUserForm.getRange(“C7”).activate(); shUserForm.getRange(“C7”).setBackground(‘#FF0000’); return false; }
//Validating Employee Name else if(shUserForm.getRange(“C9”).isBlank()==true){ ui.alert(“Please enter Employee Name.”); shUserForm.getRange(“C9”).activate(); shUserForm.getRange(“C9”).setBackground(‘#FF0000’); return false; } //Validating Gender else if(shUserForm.getRange(“C11”).isBlank()==true){ ui.alert(“Please select Gender from the drop-down.”); shUserForm.getRange(“C11”).activate(); shUserForm.getRange(“C11”).setBackground(‘#FF0000’); return false; } //Validating Email ID else if(shUserForm.getRange(“C13”).isBlank()==true){ ui.alert(“Please enter a valid Email ID.”); shUserForm.getRange(“C13”).activate(); shUserForm.getRange(“C13”).setBackground(‘#FF0000’); return false; } //Validating Department else if(shUserForm.getRange(“C15”).isBlank()==true){ ui.alert(“Please select Department from the drop-down.”); shUserForm.getRange(“C15”).activate(); shUserForm.getRange(“C15”).setBackground(‘#FF0000’); return false; } //Validating Address else if(shUserForm.getRange(“C17”).isBlank()==true){ ui.alert(“Please enter address.”); shUserForm.getRange(“C17”).activate(); shUserForm.getRange(“C17”).setBackground(‘#FF0000’); return false; }
return true;
} |
Step 20: To transmit data from the User form to the Database sheet, create a function.
| 1
2 3 4 5 6 7 8 9 10 11 12 13 14 15 16 17 18 19 20 21 22 23 24 25 26 27 28 29 30 31 32 33 34 35 36 37 38 39 40 41 42 43 44 45 46 47 48 49 50 51 52 53 |
// Function to submit the data to Database sheet
function submitData() {
var myGooglSheet= SpreadsheetApp.getActiveSpreadsheet(); //declare a variable and set with active google sheet
var shUserForm= myGooglSheet.getSheetByName(“User Form”); //delcare a variable and set with the User Form worksheet
var datasheet = myGooglSheet.getSheetByName(“Database”); ////delcare a variable and set with the Database worksheet
//to create the instance of the user-interface environment to use the messagebox features var ui = SpreadsheetApp.getUi();
// Display a dialog box with a title, message, and “Yes” and “No” buttons. The user can also // close the dialog by clicking the close button in its title bar. var response = ui.alert(“Submit”, ‘Do you want to submit the data?’,ui.ButtonSet.YES_NO);
// Checking the user response and proceed with clearing the form if user selects Yes if (response == ui.Button.NO) {return;//exit from this function }
//Validating the entry. If validation is true then proceed with transferring the data to Database sheet if (validateEntry()==true) {
var blankRow=datasheet.getLastRow()+1; //identify the next blank row
datasheet.getRange(blankRow, 1).setValue(shUserForm.getRange(“C7”).getValue()); //Employee ID datasheet.getRange(blankRow, 2).setValue(shUserForm.getRange(“C9”).getValue()); //Employee Name datasheet.getRange(blankRow, 3).setValue(shUserForm.getRange(“C11”).getValue()); //Gender datasheet.getRange(blankRow, 4).setValue(shUserForm.getRange(“C13”).getValue()); // Email ID datasheet.getRange(blankRow, 5).setValue(shUserForm.getRange(“C15”).getValue()); //Department datasheet.getRange(blankRow, 6).setValue(shUserForm.getRange(“C17”).getValue());// Address
// date function to update the current date and time as submittted on datasheet.getRange(blankRow, 7).setValue(new Date()).setNumberFormat(‘yyyy-mm-dd h:mm’); //Submitted On
//get the email address of the person running the script and update as Submitted By datasheet.getRange(blankRow, 8).setValue(Session.getActiveUser().getEmail()); //Submitted By
ui.alert(‘ “New Data Saved – Emp #’ + shUserForm.getRange(“C7”).getValue() +’ “‘);
//Clearnign the data from the Data Entry Form
shUserForm.getRange(“C7”).clear(); shUserForm.getRange(“C9”).clear(); shUserForm.getRange(“C11”).clear(); shUserForm.getRange(“C13”).clear(); shUserForm.getRange(“C15”).clear(); shUserForm.getRange(“C17”).clear();
} }
|
Step 21: Create the function listed below to search a record based on the user input entered in Cell C4 of the User Form Sheet
| 1
2 3 4 5 6 7 8 9 10 11 12 13 14 15 16 17 18 19 20 21 22 23 24 25 26 27 28 29 30 31 32 33 34 35 36 37 |
//Function to Search the record
function searchRecord() {
var myGooglSheet= SpreadsheetApp.getActiveSpreadsheet(); //declare a variable and set with active google sheet var shUserForm= myGooglSheet.getSheetByName(“User Form”); //delcare a variable and set with the User Form worksheet var datasheet = myGooglSheet.getSheetByName(“Database”); ////delcare a variable and set with the Database worksheet
var str = shUserForm.getRange(“C4”).getValue(); var values = datasheet.getDataRange().getValues(); //getting the entire values from the used range and assigning it to values variable var valuesFound=false; //variable to store boolean value
for (var i = 0; i < values.length; i++) { var rowValue = values[i]; //declaraing a variable and storing the value
//checking the first value of the record is equal to search item if (rowValue[0] == str) {
shUserForm.getRange(“C7”).setValue(rowValue[0]) ; shUserForm.getRange(“C9”).setValue(rowValue[1]); shUserForm.getRange(“C11”).setValue(rowValue[2]); shUserForm.getRange(“C13”).setValue(rowValue[3]); shUserForm.getRange(“C15”).setValue(rowValue[4]); shUserForm.getRange(“C17”).setValue(rowValue[5]); return; //come out from the search function
} }
if(valuesFound==false){ //to create the instance of the user-interface environment to use the messagebox features var ui = SpreadsheetApp.getUi(); ui.alert(“No record found!”); }
} |
Step 22: Create a function to eliminate the employee ID that is present in cell C4’s record.
| 1
2 3 4 5 6 7 8 9 10 11 12 13 14 15 16 17 18 19 20 21 22 23 24 25 26 27 28 29 30 31 32 33 34 35 36 37 38 39 40 41 42 43 44 45 46 47 48 49 50 51 52 53 54 55 56 57 58 59 |
//Function to delete the record
function deleteRow() {
var myGooglSheet= SpreadsheetApp.getActiveSpreadsheet(); //declare a variable and set with active google sheet var shUserForm= myGooglSheet.getSheetByName(“User Form”); //delcare a variable and set with the User Form worksheet var datasheet = myGooglSheet.getSheetByName(“Database”); ////delcare a variable and set with the Database worksheet
//to create the instance of the user-interface environment to use the messagebox features var ui = SpreadsheetApp.getUi();
// Display a dialog box with a title, message, and “Yes” and “No” buttons. The user can also // close the dialog by clicking the close button in its title bar. var response = ui.alert(“Submit”, ‘Do you want to delete the record?’,ui.ButtonSet.YES_NO);
// Checking the user response and proceed with clearing the form if user selects Yes if (response == ui.Button.NO) {return;//exit from this function }
var str = shUserForm.getRange(“C4”).getValue(); var values = datasheet.getDataRange().getValues(); //getting the entire values from the used range and assigning it to values variable
var valuesFound=false; //variable to store boolean value to validate whether values found or not
for (var i = 0; i < values.length; i++) { var rowValue = values[i]; //declaraing a variable and storing the value
//checking the first value of the record is equal to search item if (rowValue[0] == str) {
var iRow = i+1; //identify the row number datasheet.deleteRow(iRow) ; //deleting the row
//message to confirm the action ui.alert(‘ “Record deleted for Emp #’ + shUserForm.getRange(“C4”).getValue() +’ “‘);
//Clearing the user form shUserForm.getRange(“C4”).clear() ; shUserForm.getRange(“C7”).clear() ; shUserForm.getRange(“C9”).clear() ; shUserForm.getRange(“C11”).clear() ; shUserForm.getRange(“C13”).clear() ; shUserForm.getRange(“C15”).clear() ; shUserForm.getRange(“C17”).clear() ;
valuesFound=true; return; //come out from the search function } }
if(valuesFound==false){ //to create the instance of the user-interface environment to use the messagebox features var ui = SpreadsheetApp.getUi(); ui.alert(“No record found!”); }
} |
Step 23: Create the function listed below to modify the existing data for the employee id provided in cell C4.
| 1
2 3 4 5 6 7 8 9 10 11 12 13 14 15 16 17 18 19 20 21 22 23 24 25 26 27 28 29 30 31 32 33 34 35 36 37 38 39 40 41 42 43 44 45 46 47 48 49 50 51 52 53 54 55 56 57 58 59 60 61 62 63 64 65 66 67 68 69 70 71 |
//Function to edit the record
function editRecord() {
var myGooglSheet= SpreadsheetApp.getActiveSpreadsheet(); //declare a variable and set with active google sheet var shUserForm= myGooglSheet.getSheetByName(“User Form”); //delcare a variable and set with the User Form worksheet var datasheet = myGooglSheet.getSheetByName(“Database”); ////delcare a variable and set with the Database worksheet
//to create the instance of the user-interface environment to use the messagebox features var ui = SpreadsheetApp.getUi();
// Display a dialog box with a title, message, and “Yes” and “No” buttons. The user can also // close the dialog by clicking the close button in its title bar. var response = ui.alert(“Submit”, ‘Do you want to edit the data?’,ui.ButtonSet.YES_NO);
// Checking the user response and proceed with clearing the form if user selects Yes if (response == ui.Button.NO) {return;//exit from this function }
var str = shUserForm.getRange(“C4”).getValue(); var values = datasheet.getDataRange().getValues(); //getting the entire values from the used range and assigning it to values variable
var valuesFound=false; //variable to store boolean value to validate whether values found or not
for (var i = 0; i < values.length; i++) { var rowValue = values[i]; //declaraing a variable and storing the value
//checking the first value of the record is equal to search item if (rowValue[0] == str) {
var iRow = i+1; //identify the row number
datasheet.getRange(iRow, 1).setValue(shUserForm.getRange(“C7”).getValue()); //Employee ID datasheet.getRange(iRow, 2).setValue(shUserForm.getRange(“C9”).getValue()); //Employee Name datasheet.getRange(iRow, 3).setValue(shUserForm.getRange(“C11”).getValue()); //Gender datasheet.getRange(iRow, 4).setValue(shUserForm.getRange(“C13”).getValue()); // Email ID datasheet.getRange(iRow, 5).setValue(shUserForm.getRange(“C15”).getValue()); //Department datasheet.getRange(iRow, 6).setValue(shUserForm.getRange(“C17”).getValue());// Address
// date function to update the current date and time as submittted on datasheet.getRange(iRow, 7).setValue(new Date()).setNumberFormat(‘yyyy-mm-dd h:mm’); //Submitted On
//get the email address of the person running the script and update as Submitted By datasheet.getRange(iRow, 8).setValue(Session.getActiveUser().getEmail()); //Submitted By
ui.alert(‘ “Data updated for – Emp #’ + shUserForm.getRange(“C7”).getValue() +’ “‘);
//Clearnign the data from the Data Entry Form
shUserForm.getRange(“C4”).clear(); shUserForm.getRange(“C7”).clear(); shUserForm.getRange(“C9”).clear(); shUserForm.getRange(“C11”).clear(); shUserForm.getRange(“C13”).clear(); shUserForm.getRange(“C15”).clear(); shUserForm.getRange(“C17”).clear();
valuesFound=true; return; //come out from the search function } }
if(valuesFound==false){ //to create the instance of the user-interface environment to use the messagebox features var ui = SpreadsheetApp.getUi(); ui.alert(“No record found!”); }
} |
Now that we’ve finished writing the necessary functions, we can reset the form, validate user entries, move data from the user form to the database sheet, update existing records, and delete them. Let’s assign each of these functions to the appropriate user form sheet buttons.
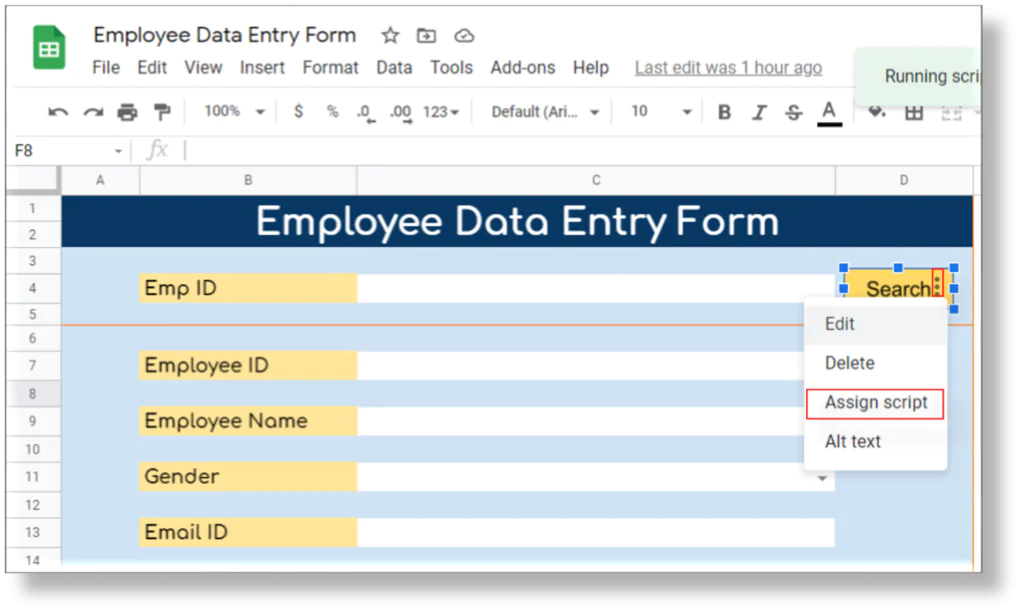
Step 24: Let’s right-click the search button, then select the ellipsis (three dots) on the button’s right side, and then select “Assign script.”
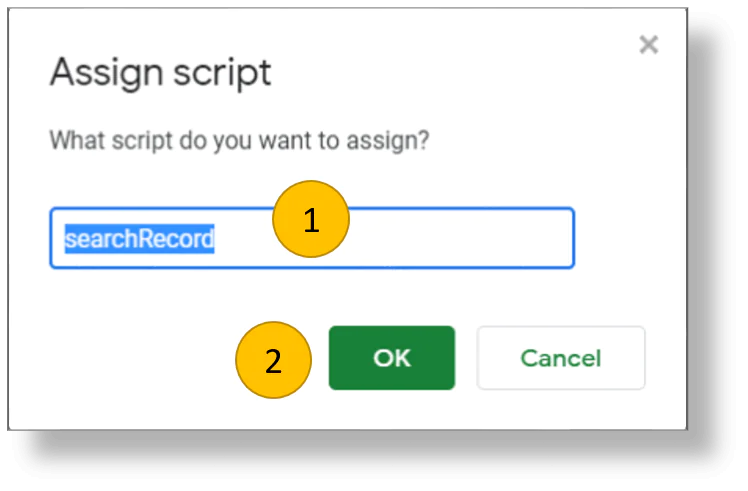
Step 25: Simply type the function name into the “Assign script” field and then click the “OK” button.
Step 26: To assign the Apps Script functions (such as submitData, edit record, deleteRow, and clearForm) to the appropriate buttons, follow steps 24 and 25. (e.g. Save, Modify, Delete and Clear).
So, using Apps Script, we were able to create an automatic data entry form in Google Sheets.
Conclusion
Data entry automation tools have made data entry tasks easier for businesses and data entry services. In this post, we discussed how one can create a data entry form in Google Sheets with the help of Apps Script. We hope, this tutorial will help you out in creating data entry forms.
