How to Create a 360 Degree Image?
Photos have become an essential part of our day to day life. And if you are a professional photographer then the importance of learning all the pros and cons to develop different wide-angled images can’t be neglected. There is unique Photo Editing Software like Photoshop, available in the market and online, which can provide you all the necessary applications to edit and render images in any way you want!
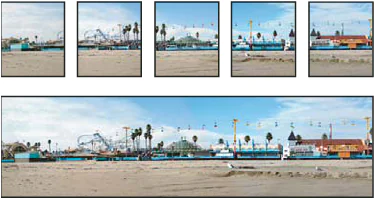
In this blog, Photomerge, an Adobe Photoshop application is used to render images for the creation of a panorama view. The application combines many photographs into forming one complete photograph. Such as, you can take any five separate images of a skyline and afterward, can merge them into a single panorama shot making the image look wide and of the 360-degree view. Photomerge provides numerous advantages of shifting images of any size and shape (vertical or horizontal) into an amazing panorama image.
Take pictures for Photomerge
Photographs play a significant role in drawing and composing panoramas. To avoid any recurring malfunction, the following mentioned guidelines can serve of great use.
Overlapping
Images should not overlap while taking photos with Photomerge. The approx overlapping ratio should not exceed up to 40% or more. If your images overlap around 70% then in this case these images will not be suitable to be blended in Photomerge. It is advised to keep the images overlapping distinctive and synchronic.
One Focal Length
While using a zoom lens, don’t change the focal length, while taking your pictures.
Camera Level
Photomerge can easily process rotation between pictures. A simple tilt from any angle can result in a large placement error during the assembling process of Panorama Image. A tripod with a rotating head can efficiently align every angle of the image.
Stable Position
Do not intend to change places while taking pictures, as this can make the images deviate from the central viewpoint which needs to be highlighted within the panorama image. Optical Viewfinder helps to keep the viewpoint in place and focused.
Creating a Photomerge composition
- Choose File > Automate > Photomerge.
- In the Photomerge dialog box, choose any function that you wish to run. Likewise as mentioned below:
Files
Photomerge generates different compositions using individual files.
Auto
It can easily detect and analyze many sources of images and apply different formats to make it look even better. These formats include Perspective, Cylindrical, and Spherical layout.
Perspective
With a perspective tool, you can transform images accordingly from repositioned, stretched, or even skewed to match images during layout.
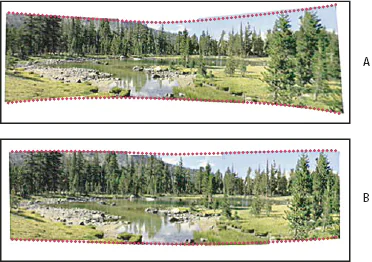
Cylindrical
The tool effectively reduces “bow-tie distortion” which might take place in the perspective layout. Here the reference is placed at the center and the tool best suits the creation of wide panoramas.
Spherical
Alignment and transformation of images is the uniquely main aspect that makes them stand out from the competition. Spherical layout assists in the creation of a 360-degree panorama.
Collage
You might have used your phone’s built-in apps for creating a collage of a bunch of images. You are aware of the fact that t requires careful alignment and overlapping of content images. Rotation and a scale are set according to the images.
Reposition
Alignment of layers within the content is transformed through sketches and skew, you can find such features in reposition layout.
Create 360-Degree Panoramas
Many well-known devices like Ricoh Theta V and Insta360One, enable you to capture full panoramic images with a 360-degree view in a single take. However, you can also combine Photomerge with such amazing built-in 3D features to create a 360-degree shot. At first, it is essential to stitch together images that you want to merge and create a panoramic image off. Afterward, you can employ the Spherical Panorama command to wrap the panorama so it’s continuous. Follow the above rules to get an excellent panoramic image:
- Choose File > Automate > Photomerge.
- In the Photomerge dialog box, add the images you want to use.
- Select Spherical for the Layout.
- If needed you can select Vignette Removal or Geometric Distortion for the Lens Correction.
- If needed you can select Content-Aware Fill Transparent Areas to avoid transparent pixels on the edges of the panoramic image.
Edit Panoramas
The panoramas that you have just created can be further glorified with the help of equirectangular spherical panoramas in Photoshop. By importing the panorama assets you can set a panoramic viewer by simply clicking, 3D > Spherical Panorama > New Panorama Layer From Selected Layer. Also, you can easily download it to your system by running the action, 3D > Spherical Panorama > Import Panorama.
Rotate the Camera View
Photoshop lets you adjust the camera view for your panoramic image.
Adjust the field of view
For adjustment of the field view, you can choose panel properties, which displays the camera properties. Adjustment is done in mm such as a 35mm camera. Drag the axis by simply selecting widget controls in the lower upper left corner of the window. This helps to rotate the camera without the need for the Move tool.
Paint on the Panorama
Adjustment and painting tools help to edit the panorama image more precisely by providing effective tools such as the Healing Brush and the Spot Healing Brush. Filters work fine on the clearer and more highlighted areas of the panorama. Also, you can isolate an image outside the 3D view and edit it by applying numerous filters. How to use the Spot Healing Brush tool as an example.
How ITS Can Help You With Image Manipulation Service?
Information Transformation Service (ITS) categorizes Image Editing Services in many variants such as Image Manipulation Service and Image Restoration Service. Our Professional Image Editors have an advanced state of the art editing studios that are fully equipped to give your images lives a boast. ITS Team has served many business giants and individual start-ups in the line to make their products look more appealing and focused.
There are tons of Image Editing Services in town but we are above and beyond all such companies because of the list of professional services we provide under the same roof. ITS, is 24/7 available to transform your un-translated vision into a personalized product image that can get your business running. If you are interested in ITS Image Manipulation Services, you can ask for a free quote!
