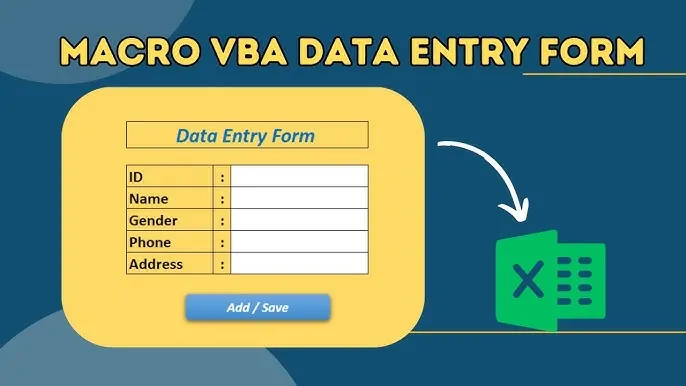
How To Automate Data Entry With VBA Macros
Data entry is a crucial task for various businesses and individual-level workflows, though it demands a lot of time. From working on vast datasets to common repetitive tasks, entering data through manual ways could be tiresome and error-prone. On the other hand, data entry automation can be streamlined, time-saving, and less prone to errors. One of the effective data entry automation techniques in Excel is with the help of VBA (Visual Basic for Applications) macros. This tool enables users to write small programs straight in Excel, which helps in automating a range of tasks, specifically in data entry. Via VBA code recording and writing, the users can automate data entry from various sources, including user forms, external files, and other Excel workbooks, directly onto their preferred output structure. It makes the process fast and more consistent, making sure that data input is accurate each time. This blog will proceed with the step-by-step process to enlighten users on how to automate data entry with VBA macros.
Step 1: Defining The Purpose Of Your Data Entry Task
Before getting into the details of VBA automation, it is fundamental to define the purpose of your data entry task. Determinate the type of data being input, its source, and the target structure. For example, in the event that you are automating data entry in Excel, find out if the input data arrives from a user form, another spreadsheet, or an outside file such as a CSV. Distinctly outline the specified format and area where the data ought to be entered.
After that, map out the workflow for data entry. Look into the sequence of tasks:
Was the data approved before entry? Should particular areas auto-populate per conditions? An explicit workflow aids in organizing the macro viably.
It is also important to understand the frequency of the task on a daily, weekly, or ad-hoc basis and whether it includes dynamic variables like dates or user-specific data. That clarity lowers coding blunders later and guarantees the macro accommodates the final objective. Documenting this step will act as a reference during the coding stage.
Step 2: Activating The Developer Tab In Excel
To start writing or recording macros, you have to activate the Developer tab in Excel because it isn’t empowered by default. Take the following steps to set it up:
Load Excel and press on File > Options.
Within the Excel Options dialog box, click on Customize Ribbon.
On the right side, find the list of tabs. Locate the box for Developer, and press Ok.
Once the Developer tab is seeable within the ribbon, get to the VBA editor:
Head to the Developer tab.
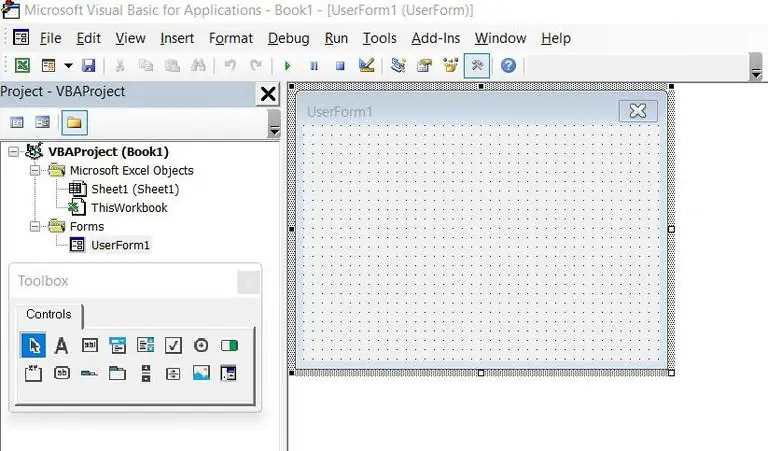
Press on Visual Basic to unlock the VBA editor. On the other hand, use Alt + F11 to initiate it instantly.
The VBA editor is the domain where you’ll compose, edit, and oversee your macros. Acquaint yourself with its essential elements including the Project Explorer, Properties Window, and Code Window. That setup makes sure that you are prepared to write or record macros within the following phases.
Step 3: Creating And Recording Macro
After that, the Developer tab is empowered and you have gotten to the VBA editor, it is time to make your macro. Based on the intricacy of the task, you can choose between recording the macro for basic operations or writing custom VBA code for refined functionality.
To Record a Macro follow the following steps:
Proceed to the Developer tab and press on Record Macro.
Within the dialog box, provide your macro with a significant title like DataEntryAutomation. Allot a shortcut key as required.
Indicate the location to store the macro:
This Workbook will make it exclusive to the current workbook.
Personal Macro Workbook will make it accessible in all workbooks.
Press Ok to begin recording. Conduct the data entry steps manually. Excel will catch your activities as VBA code.
After you are accomplished, tap Stop Recording on the Developer tab.
To write a Macro:
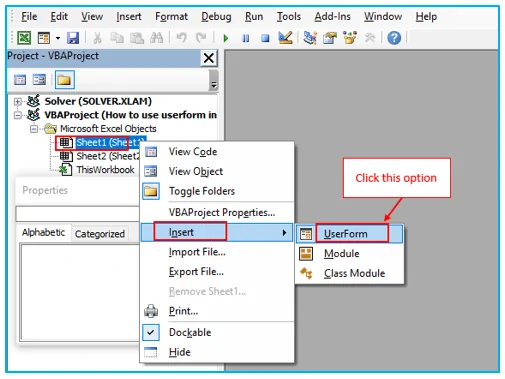
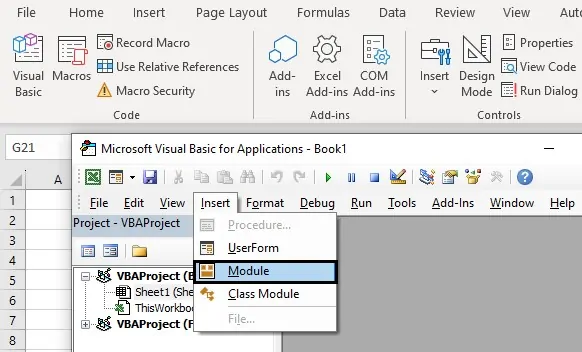
Initiate the VBA editor using Alt + F11.
Within the Project Explorer, right-click on the workbook and choose Insert > Module.
Type in your VBA code, just like as follows:
Sub DataEntryAutomation()
Sheets(“Sheet1”).Range(“A1”).Value = “Automated Entry”
End Sub
Experiment with the recorded or written macro to guarantee it operates the task as predicted.
Step 4: Designing The Logic To Regulate Information Input And Output
In the fourth step, you will design the logic to regulate information input and output. It includes making VBA code that processes input information from a user form, file, or range of cells and sets it within the preferred format or area.
To write Input Logic:
Determine the source of the data. For instance, you can enter data from:
Particular cells (Range(“A1”)), Whole ranges (Range(“A1: A10”)) or External files such as a CSV or text files.
The example code to read data from a range is as follows:
Dim inputData As String
inputData = Sheets(“InputSheet”).Range(“B1”).Value
To write Output Logic:
Determine where the data should go, like a particular cell or dynamically calculated range.
The example code to compose data is mentioned here:
Sheets(“OutputSheet”).Range(“D1”).Value = inputData
To add Loops for Dynamic Ranges:
To deal with multiple rows of information, utilize a loop. Using the following code:
Dim i As Integer
For i = 1 To 10
Sheets(“OutputSheet”).Cells(i, 1).Value = Sheets(“InputSheet”).Cells(i, 2).Value
Next i
At last test the logic step by step to confirm that data flows accurately from input to output without any error.
Step 5: Testing And Debugging The Macro
The fifth step is about testing and debugging which guarantees that your macro executes the data entry task as expected and handles potential blunders effectively. This step is significant for polishing your VBA script.
To test the Macro:
Save your workbook as a Macro-Enabled Workbook (.xlsm) to protect the VBA code.
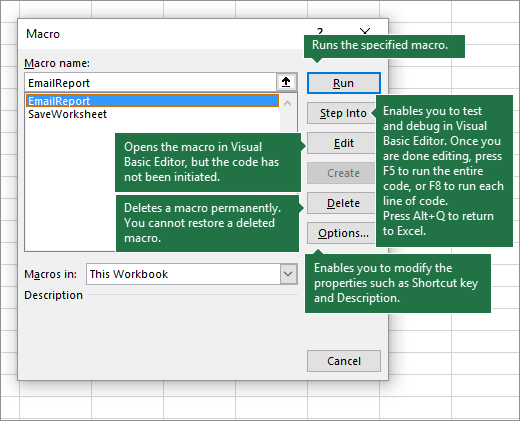
Drive the macro by using the assigned shortcut key. Head to the Developer tab > Macros, select your macro and click Run.
Test the macro with diverse scenarios, such as:
Empty input cells, Large data sets and Edge cases including invalid or lost data.
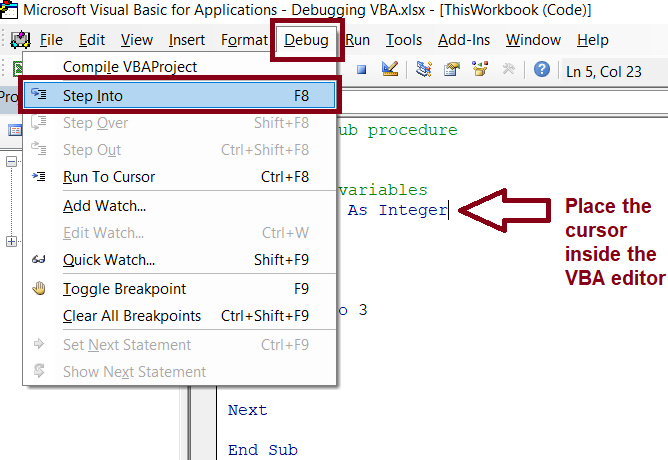
To debug the Macro:
Tap on F8 within the VBA editor to run your code line-by-line. It will help in distinguishing the accurate location of errors.
Include breakpoints (F9) to stop execution at particular lines and inspect the values of variables utilizing the Locals Window.
Include error-handling code to avoid crashes. Look into this example:
On Error Resume Next
If Err.Number <> 0 Then
MsgBox “Error: ” & Err.Description
Exit Sub
End If
Keep polishing your code until the macro handles all scenarios dependably and yields the anticipated results.
Step 6: Saving And Running The Macro
Once done with thorough testing and debugging of your macro, the ultimate step is to save your work and run the macro as required for data entry automation.
To save the Workbook:
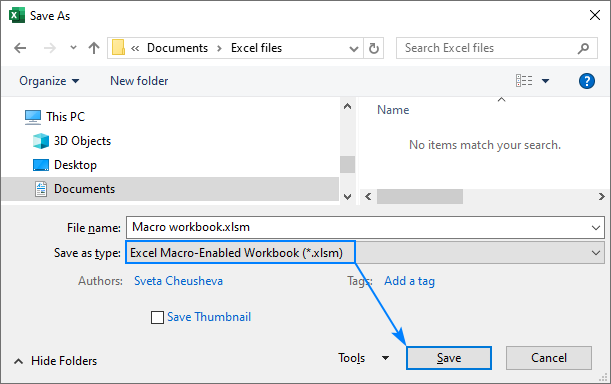
Save as a Macro-Enabled Workbook by moving to File > Save As.
Select the location where you need to save the file.
Within the Save as type dropdown, choose Excel Macro-Enabled Workbook (*.xlsm). It will make sure that your macro is protected.
And finally, press Save.
Optionally you can include a Button for simple access:
If you intend to operate the macro as often as possible, you can include a button to your worksheet for simple implementation:
On the Developer tab, press Insert and select the Button “Form Control”.
Drag the button on your sheet, and assign the macro by picking it from the list when prompted.
To run the Macro:
In the event that you assign a shortcut key in Step 3, you’ll basically press it to run the macro.
Or you can head to the Developer tab, tap on Macros, specify your macro, and tap Run.
If using the button if you made any, you can tap the button on your sheet to run the macro.
Your macro is presently ready for utilisation and can be run as required to automate data entry tasks proficiently.
Conclusion
In summary, data automation provides accurate and timely data entry, facilitating real-time analysis and well-informed decision-making. Excel’s built-in automation features, such as macros and VBA scripting, allow users to automate repetitive processes and concentrate more on making strategic decisions. It offers a practical and effective remedy for issues related to manual data entry. Automation is particularly helpful in minimizing time and removing human errors. However, before you proceed with data entry With VBA macros, it is advisable that you possess a basic familiarity with the VBA programming language and Excel functions such as worksheets, cells, and ranges to go through complex tasks smoothly.
