
How To Add Linear Perspective In Images
Introducing linear perspective in your photographs is a powerful editing technique that prevails in various forms of visual art. It lifts the authentic attributes of images by giving plane 2d shots an illusion of three-dimensionality, thus transmitting depth and naturalism. This approach vividly generates a delusion of depth by employing specific geometric codes to illustrate. In the resultant images, the varying proportion of sizes and distances are exhibited: the objects in the foreground look more prominent and sharper, while those in the background look downsizing with the distance. The linear perspective technique is based upon vanishing points; these points are on the horizon where parallel lines emerge to connect. The linear perspective can be a one-point, two-point, or three-point perspective based on the number of vanishing points. With the increase in vanishing points count, the complexity and dimensionality of the scene also enhanced. This article will continue debating the linear perspective image editing approach while moving on to the practical steps involved.
Step 1: The Viewpoint Identification
Assume the preferred focal point and perspective of the picture. Assess the point from which the scenario will be seen to set up a consistent story or visual influence.
Think about the context of the chosen perspective with the onlooker and pass on the specified message or feeling. For instance, each perspective offers a mesmerizing narrating possibility, whether a bird’s-eye view, eye-level viewpoint, or ground-level point.
Survey the scene’s composition from the picked perspective, checking that critical components are successfully surrounded and adjusted inside the picture. Check out the arrangement of central points, leading lines, and negative space to direct the gazes and evoke observable charm.
Imagine how the scene will spread in terms of profundity and spatial connections from the chosen perspective. Consider how objects and components will be connected inside the frame to form a sense of point of view and engrossment for the viewer.
Expect the enthusiasm and story effect of the chosen perspective on the general message or topic of the photograph. Look to inspire interest, sympathy, or sensibility by intentionally choosing perspective and surrounding strategies.
Step 2: Horizon Line Definition
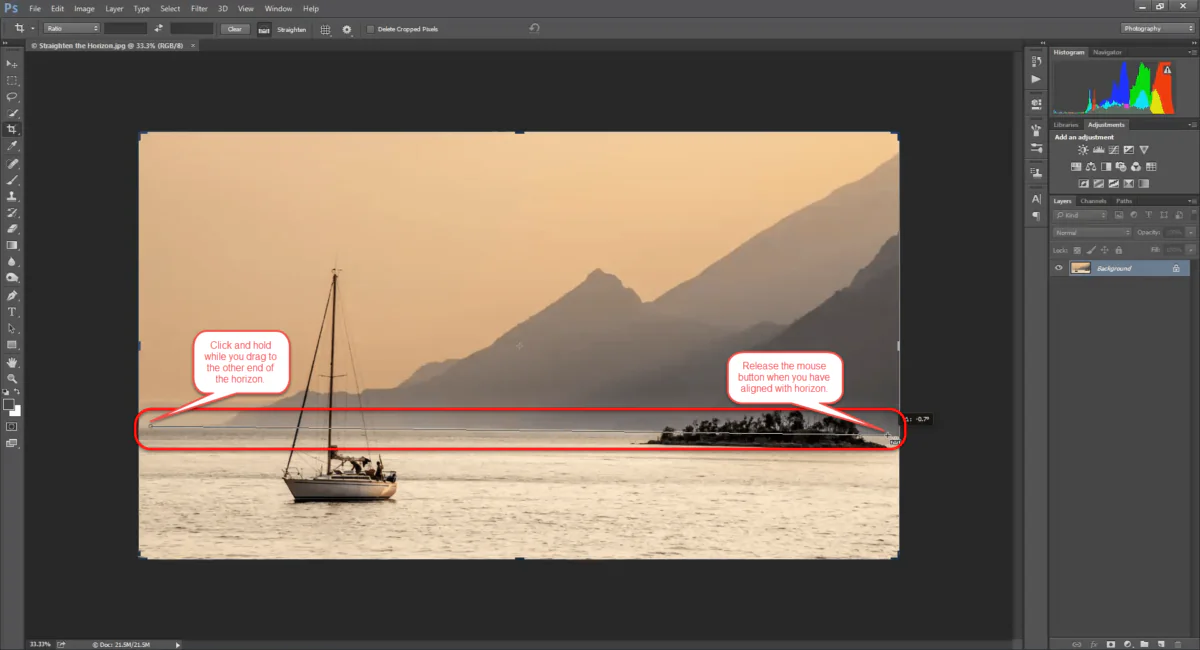
Decide the ordering of the horizon line inside the picture, which complies with the viewer’s eye level. That sets up the essential reference point for the arrangement of objects and the merging of lines within the scene.
Use tools like rulers, guides, or grid overlays to precisely illustrate the horizon line and keep consistency across the composition. These features can make viewpoint effects connect efficiently and with accuracy.
Assess the horizon line influences and play with different positions to attain wanted styles and story accentuation.
Regulate the situation of the horizon line to reinforce the story or enthusiastic tone of the picture. A higher horizon line can pass on a sense of immensity or extensiveness, whereas a lower horizon line can inspire closeness or profundity.
Discover myriad perspectives and viewpoints to decide the foremost compelling arrangement of the horizon line for the specified visual outcome. Examine the link between the horizon line, vanishing points, and focal focuses inside the composition to construct energetic symbolism.
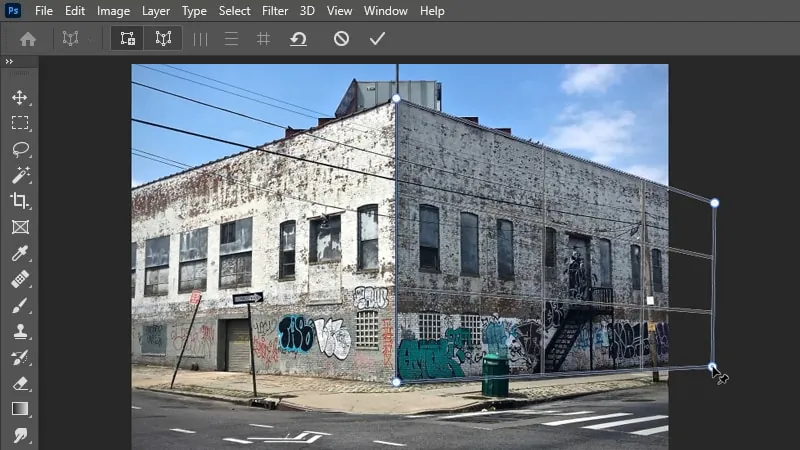
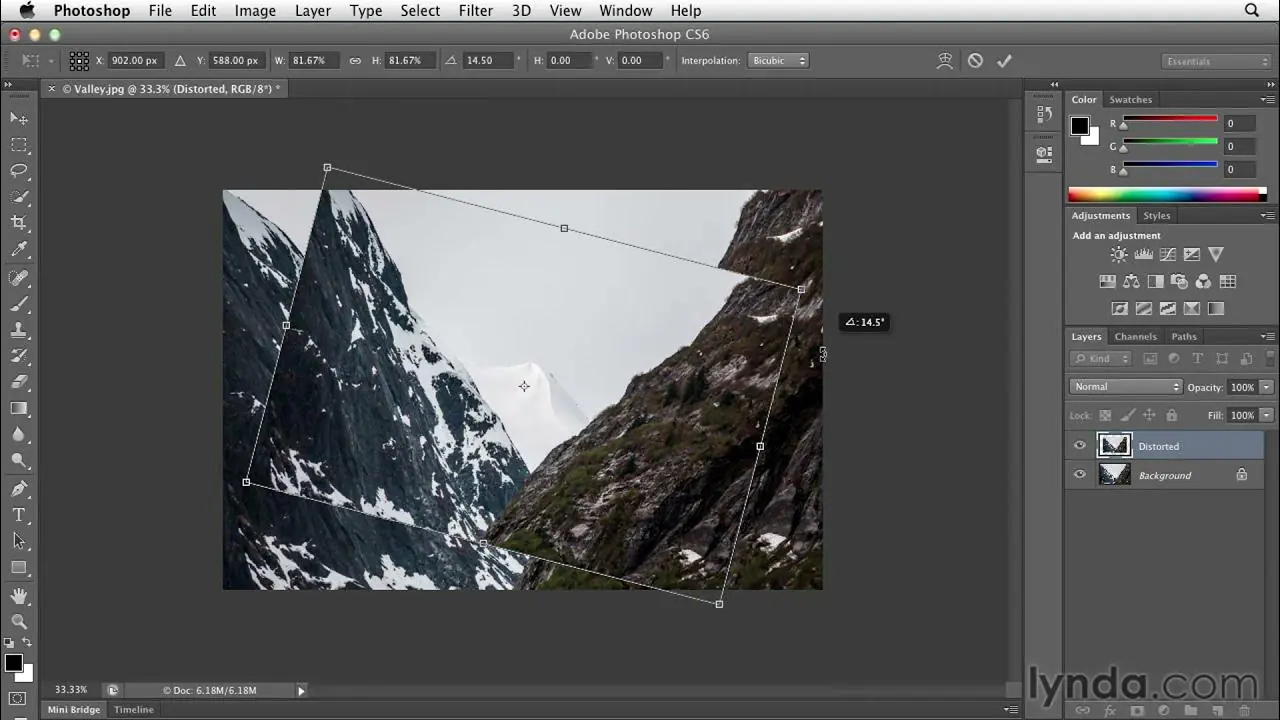
Utilize perspective adjustment tools accessible in your software to refine the arrangement of the horizon line and alter perspectives as needed.
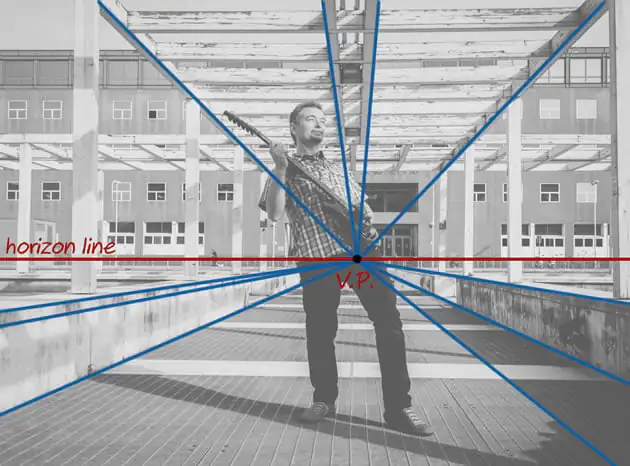
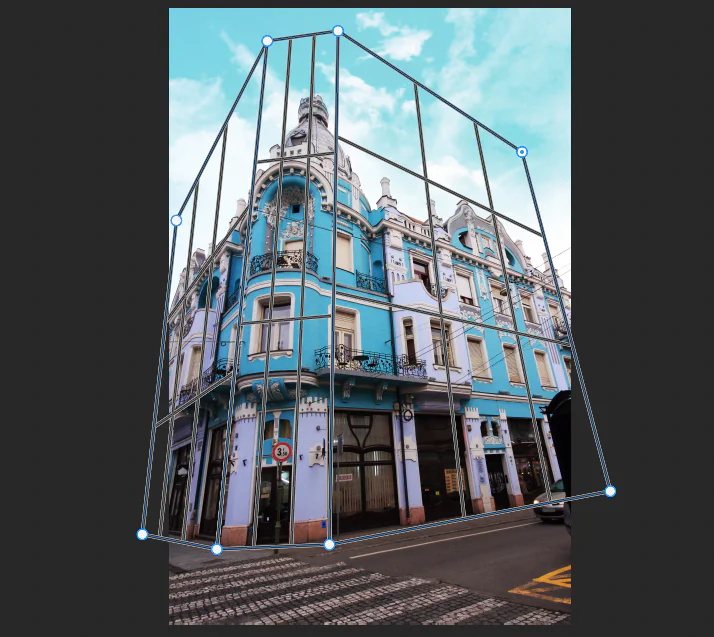
Step 3: Inclusion of Vanishing Points
Specify the number and arrangement of vanishing points according to the required point of view effect. In a one-point perspective, a single vanishing point is set on the horizon line. A two-point viewpoint includes two vanishing focuses; likewise, a three-point perspective consolidates a third vanishing point.
Access options like perspective grids, guides, or rulers to precisely put vanishing points inside the composition.
Survey the elaborateness of the atmosphere and the temporal connections between objects when fixing the arrangement of vanishing focuses. If you have perplexing compositions, extra vanishing points may be vital to speak to perspective effects precisely.
Call to mind how parallel lines inside the setting unite towards the vanishing focuses to make the figment of depth and space. Try with distinctive vanishing point placements to get the desired flow.
Bring consistency within the arrangement of vanishing focuses all through the composition to preserve a compatible sense of viewpoint. Conform lines and objects with suitable vanishing points to strengthen the figment of profundity and distance coherence.
Modulate the array of vanishing points as required amid the formatting process to upgrade the authenticity and visual effect of the picture.
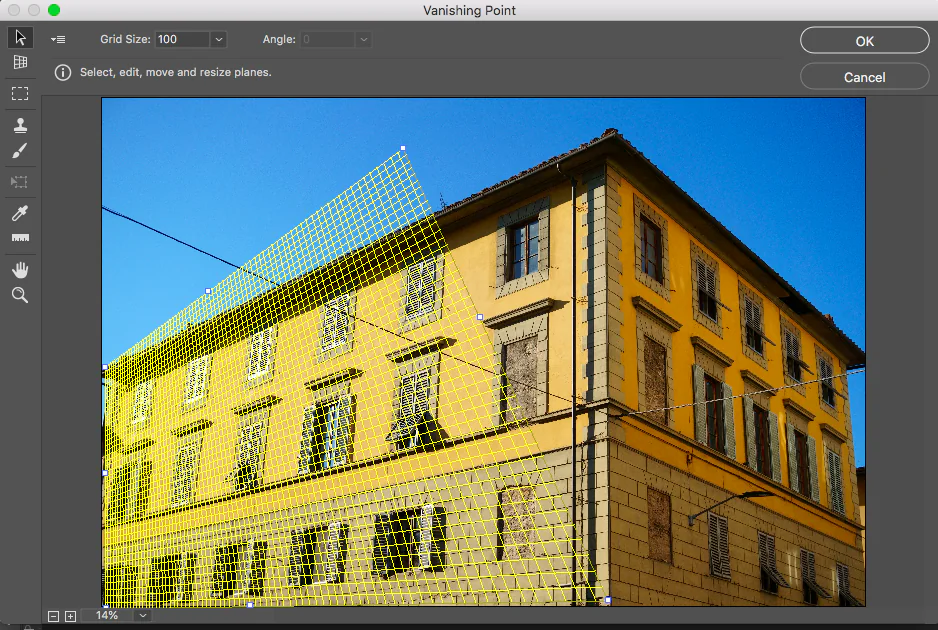
Step 4: Working on Perspective Grid
Assemble a perspective grid utilizing the vanishing focuses as reference focuses. That grid will be a framework for planning components inside the scene agreeing to the linear point of view standards.
Employ the perspective grid to control the positioning of objects and lines inside the scene. Set up components along the grid lines to preserve exact perspective connections and make a persuading sense of profundity.
Revise the density and dispersing of grid lines to fit the scale and complexity of the scene.
Polish the grid settings to guarantee that they successfully speak to the spatial flow of the setting and encourage precise perspective rendering.
Observe how the viewpoint grid charms the stream and composition of the scene. Organize elements within the grid to make outwardly leading plans.
Utilize the perspective grid to join profundity signals such as overlapping, scale variety, and atmospheric perspective. Play with distinctive grid arrangements to spotlight profundity and improve the figment of three-dimensionality.
Ceaselessly refine the viewpoint framework as you complete the composition and audit the framework structure for accuracy within the delineation of perspective impacts.
Step 5: Organizing the Objects’ Positions
Put objects inside the scene concurring with their spatial connections and the standards of linear point of view. The objects closer to the viewer should show up more extensively, whereas those farther away will be more diminutive and less characteristic.
Place the objects along the viewpoint lines assembled by vanishing points to preserve visual coherence and profundity.
Recheck that objects take after the direction of perspective, merging to form a practical sense of space.
Involve strategies such as overlapping and foreshortening to improve the discernment of profundity and space inside the composition. Overlapping objects make profundity signals that strengthen the fallacy of spatial ties, whereas foreshortening alters the visile length of objects based on their gap from the viewer.
Examine the scale and ratio of objects corresponding to the general scene and each other. Alter the dimensions and situation of objects to preserve consistency with the built-up viewpoint and amplify the significance of depth within the composition.
Play with distinctive courses of action and arrangements of objects to discover the maximum outwardly tempting structure.
Step 6: Creating Proportional Harmony
Evaluate the appraised profundity and spatial connections inside the composition. Observe if objects and components precisely pass on their gap from the viewer based on their measurement and situation inside the scene.
Utilize foreshortening strategies to set objects as they diminish into the distance practically. Alter the ratios of objects to correct for the distortion caused by viewpoint, making distant objects show up shorter or smaller.
Add atmospheric perspective to escalate the dream of profundity and distance inside the composition. Slowly decrease the level and saturation of colors as objects subside into the backdrop, mirroring the natural fog and climatic effects.
Alter objects’ level of detail and clarity based on distance from the viewer. The front area Objects can display sharper subtle elements and surfaces, whereas the foundation ones may show softer.
Recheck consistency within the application of scale and proportion all through the composition. Objects ought to follow the setup viewpoint and keep up practical spatial connections relative to each other and the scene.
Discover further visual effects and techniques and play with lighting, shading, and surface to form profundity signals that direct the viewer’s eye and fortify the figment 3D.
Persistently audit and refine the scale and ratio of objects as you create the composition.
Step 7: Making Finalizing Tweaks
Keenly survey the overall composition of the picture, attend to the situation of objects, the precision of perspective, and the symmetry of visual components.
Assess the adequacy of the linear perspective in passing on profundity and dimensionality inside your artwork. Guarantee that objects subside practically into the remove which the spatial connections between components are coherent.
Monitor the visual cohesion of the composition given variables such as color concordance, contrast, and central points. Watch that the components inside the scene work together agreeably to make a bound together and likeable visual encounter.
Perform gradual alterations to touch up the situation of objects, adjust perspective effects, and regulate visual components to get the specified narrative objectives.
Assess the composition in corresponding if the visual narration successfully communicates the aiming message or enthusiastic reverberation to the viewer.
After concurring with the composition, conclude the photo and plan it for representation or distribution.
Conclusion:
In closing, using linear perspective in photographs is indispensable for developing depth, genuineness, and spatial harmony in graphic art and design. Using techniques embedded in geometric directions and getting the basics of perspective, you can glorify your illustrations and enthrall viewers in exquisite and tempting compositions. You need to grasp the linear perspective approaches, including vanishing points, horizons, and converging lines, and you can depict the nature of spatial connections witnessed within an actual scene. Being adept at linear perspective concept not only helps in image enhancement but can also integrate it into digital artworks and share your inventiveness with exactitude and a tinge of naturalism.
