
How To Connect Salesforce To Your WordPress Forms?
Do you want to connect Salesforce to your WordPress forms? If this happens to be your plan then this is the right blog to teach you how to create easy WordPress Salesforce Integration to get new leads, store important customer information, track customer purchase records, and much more. In this blog, we will focus on how to connect Salesforce to your WordPress forms, but before diving into the process let us understand why it is essential to build this connection in the first place.
Why Integrate Salesforce with WordPress?
There are various reasons why it is important to create WordPress Salesforce integration that proves beneficial for your business. To begin with, Salesforce helps to manage your company’s stronger lead interactions and relations with customers. It is a leading Customer Relationship Management (CRM) tool available in the market at this time. You can easily store, organize and put user data to use in a way to promote your business sales. Companies offer personalized support to their customers using Salesforce.
In addition, WordPress is a worldwide sensation in content management and is termed a trustworthy Content Management System (CMS) for business website owners. With WordPress, you can create your very own professional blogs, publishing sites, online stores, and more. This platform is both simple to use and light on the pocket. In short, you do not need much to begin your WordPress journey right away!
When you combine these two phenomenal tools then a powerful technology breakthrough is created for marketers and business owners to reach their market objectives without stressing so hard. If you are not a technology scientist then don’t worry you can create a website without all those fancy codes and technical know-how, just stick around until the very end of this blog to learn how it’s done!
How to Create WordPress Salesforce Integration?
In this section, we will use Salesforce and WordPress Forms Salesforce add-on to connect these two applications. This add-on will make things easer for us to manage by forming a direct connection between your forms and Salesforce this will create objects without needing any form of code. Although it might sound a bit unrealistic it is as easy as it sounds. So let’s get started!
Step 1: Verify The Salesforce Plan
Before you plan this, make sure that your Salesforce account has incredible API access. Therefore, you do not need to deal with other issues right now. You can accomplish this task by checking which edition you have.
With Salesforce, you can select the following plans according to your business style:
Essentials
Professional
Enterprise
Unlimited
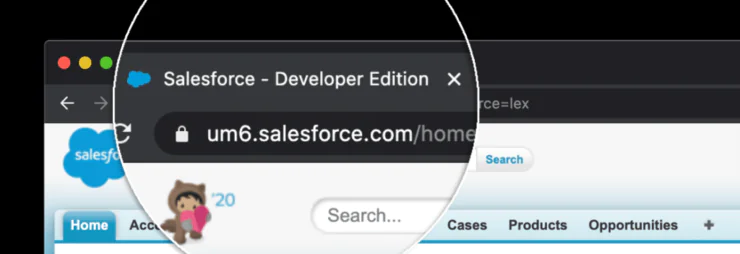
As long as you stick to any of these three plans then everything will be fine. However, if you fail to cover any of these plans then you must switch your plans before the integration process starts. To check your plan, just log into your Salesforce account and look for Salesforce Developer Editon in the browser tab as shown below:
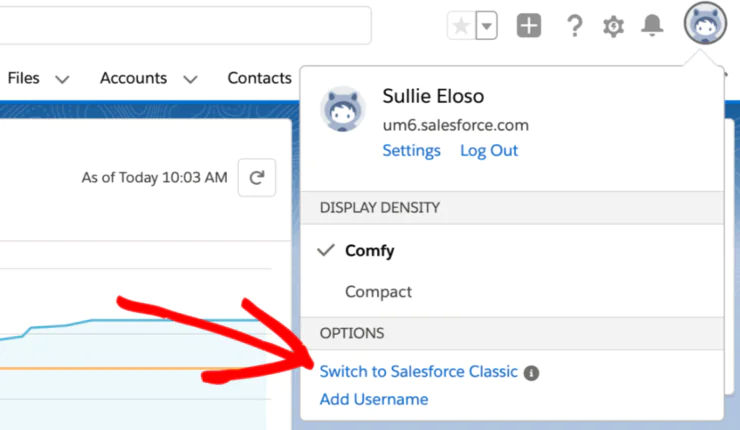
In case you are unable to find it then there is another method that you can use. Click on the Lighting Experience Mode icon and opt for the ‘Switch to Salesforce Classic’ option:
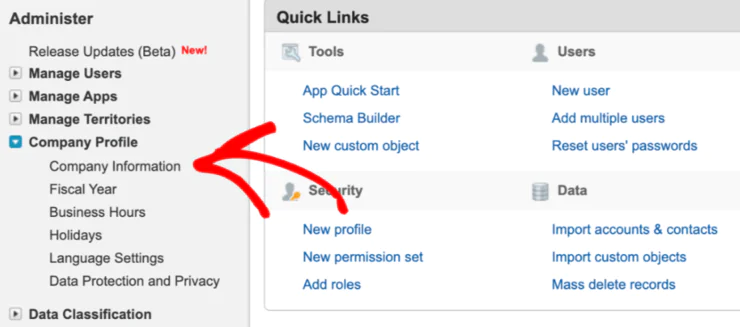
Afterward, you can proceed from this action by selecting Setup on the topmost navigation menu and clicking on the Company File » Company Information as shown below:
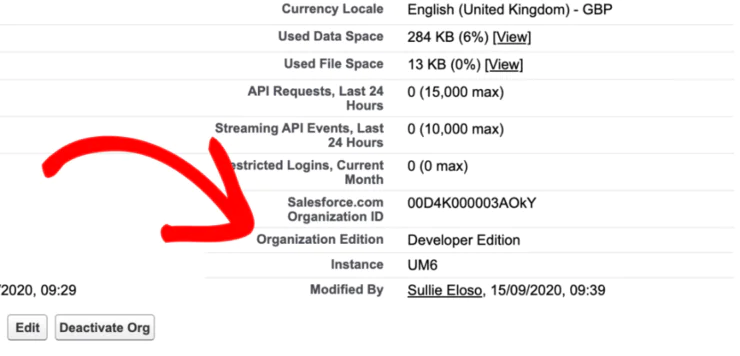
You will next encounter your edition type present next to Organization Edition:
When you have successfully set up your edition with API next in line is to begin the integration procedure.
Step 2: Install & Activate WPForms
WP Forms is a reliable contact form plugin specially designed for WordPress. It consists of many powerful features like entry management, templates, payment integrations, and many others. The good part is that this tool is beginner friendly which means that all those planning to connect Salesforce to WordPress Forms can easily operate this tool needless to learn extensive codes. You only have to download and then install followed by one click activation of WP Forms before moving ahead in the process.
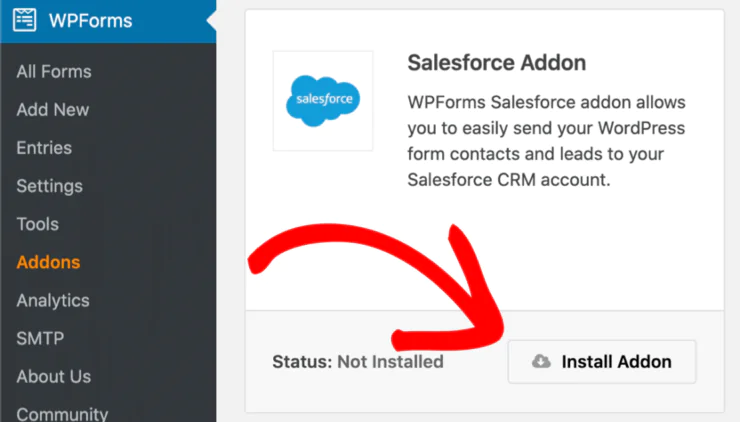
Now it is about time to begin the download action of the Salesforce add-on for WP Forms. To do so, simply click on your WordPress dashboard, and press on WPForms » Addons in the left-hand sidebar. Later on, install the Salesforce add-on by right-clicking the Install Addon button as shown below:
Now that you are done with the initial installation phase you can start the real process to integrate Salesforce with WP Forms.
Step 3: Set Up The Salesforce WordPress Integration
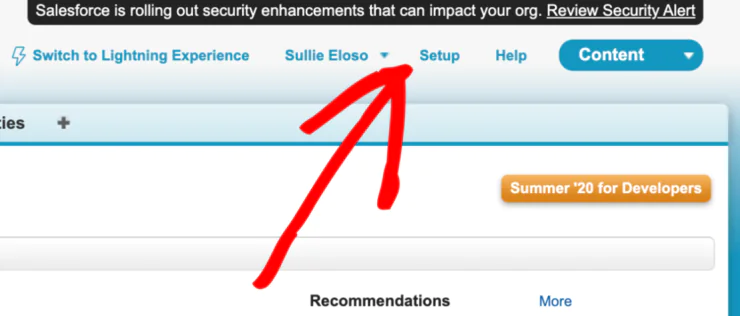
In this step, you are required to set up your Salesforce app to easily connect the site with your WP Forms. To do this, go to your Salesforce account and enable the Salesforce Classic Mode if you haven’t done this already:

On the next page, click Setup located on the top right navigation menu:
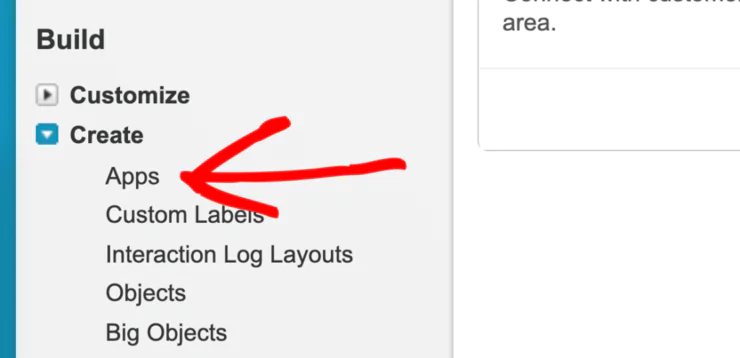
You can now scroll down to look for ‘Build Menu Item’ (left sidebar) and perform Create » Apps action:
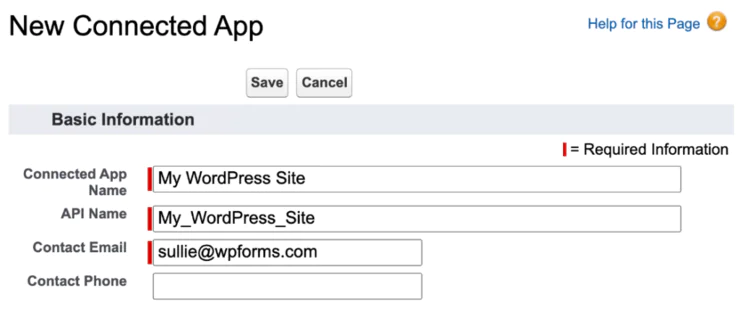
Navigate your way to ‘Connected Apps’ and Hit the ‘New’ button as shown below:

Doing so will open up a brand new screen where you will be required to fill in certain blanks for information. Fill in the spaces for your desired app name which is easy to identify and type your email in the required field.
Step 4: Authorize The Salesforce App Permissions
It is very essential to authenticate the app that you create. In this step, we will show you how it is done skillfully. Simply scroll down to the API section and select Enable Oauth Settings by checking the small-sized square box:

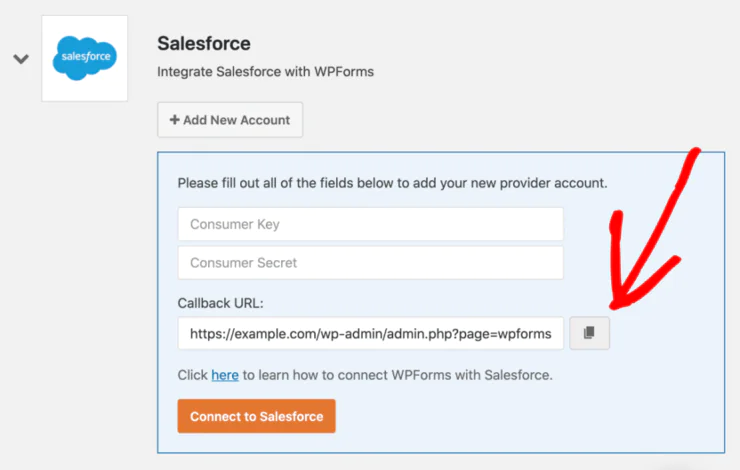
To proceed, you will come across the WP Forms callback URL you need to paste this URL into Salesforce. In another tab go to your WP dashboard and perform WPForms » Settings action:

Click on Integrations (top-left corner of the menubar):

Now, select ‘Add New Account’ and copy the Callback URL to your clipboard and paste it into the OAuth settings box:
Now you need to scroll down to the Selected OAuth Scopes and discover the below mentioned 2 items:
Access and manage your API which is your data.
Perform requests on your behalf at any time (refresh_token, offline_access)
Click on the ‘Save’ option to save all the changes made during this time.
Step 5: Connect Salesforce to WordPress
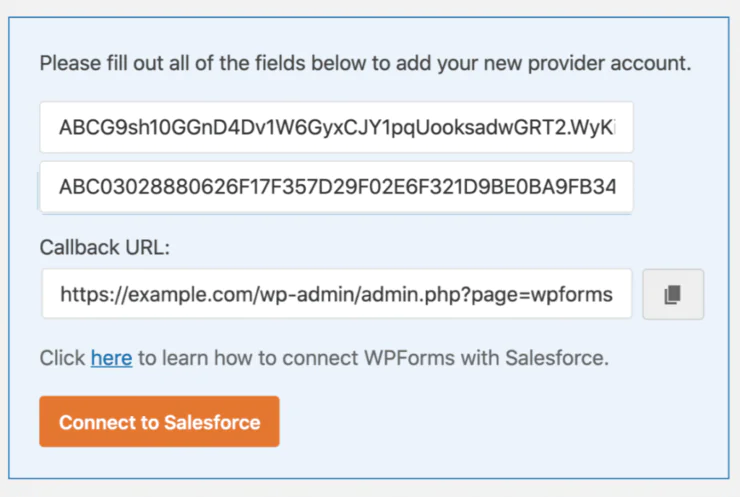
To connect WordPress to Salesforce you will have to copy and paste the API keys directly into WordPress. Once you have WP Forms and Salesforce in separate tabs side by side then it becomes much easier to fulfill this action by quickly switching between the two tabs.
To copy the API keys you will have to carry out the following two steps:
Open your Salesforce browser and from there click copy right next to the consumer key. Next switch to your other tab ‘WPForms tab’ and simply proceed by pasting this key.
Now go back to your ‘Salesforce tab’ and on the right side ‘Click to Reveal’. Repeat the first step by copying this key and pasting it into the WP Forms tab.
At last, click ‘Connect to Salesforce’:
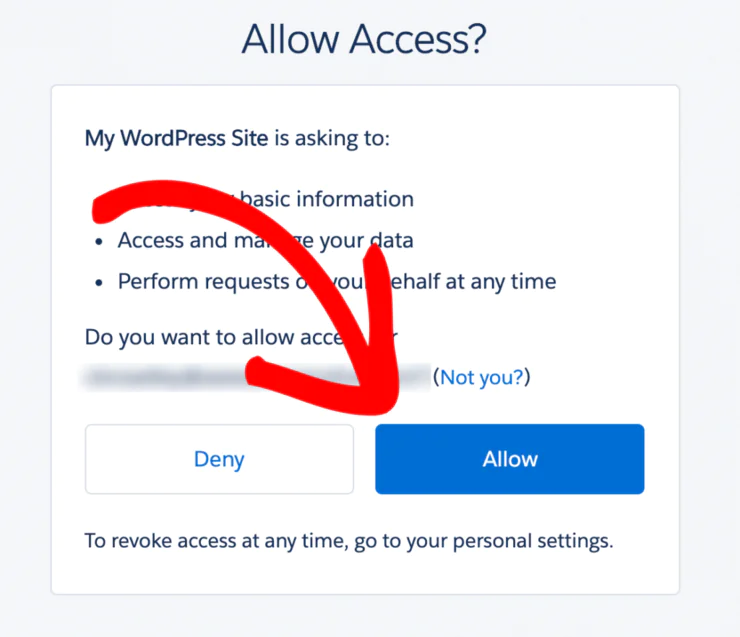
Give Salesforce access to your forms by clicking on the ‘Allow’ button:
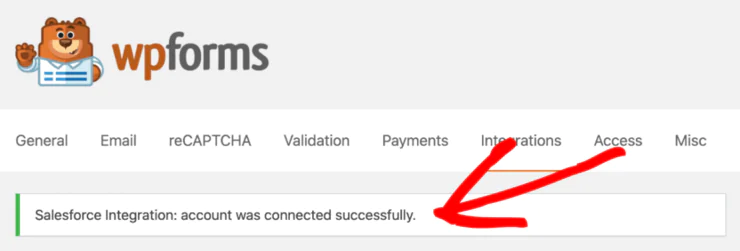
Now your Salesforce account is successfully and officially connected to your WordPress site and you will be notified via a confirmation connection message at the top of your screen:
Step 6: Create Your Own Salesforce WordPress Form
If you are not at home with creating new contact forms then this tutorial will certainly help you a lot in this matter, WP Forms make it easier to connect any form to Salesforce. You can create many different objects using it that include:
Contacts
Campaigns
Products
Leads
Accounts
Cases and more.
Let us create a lead form from our contact form and show you how it is done. In your form builder select the Marketing option:
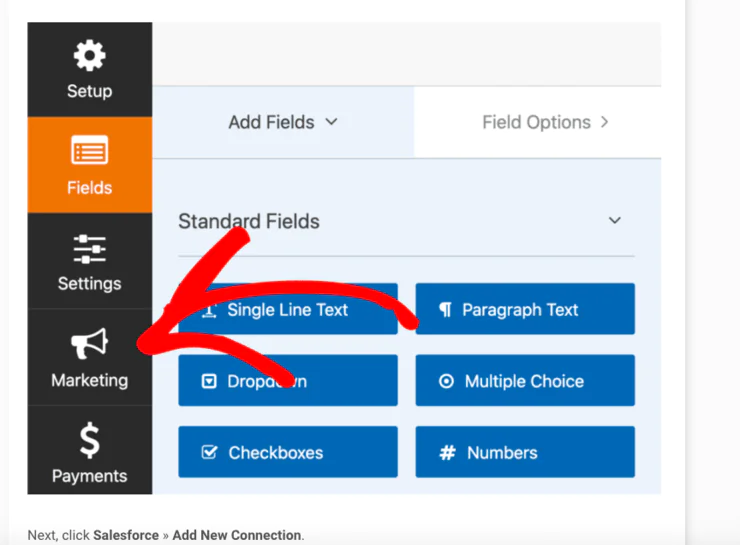
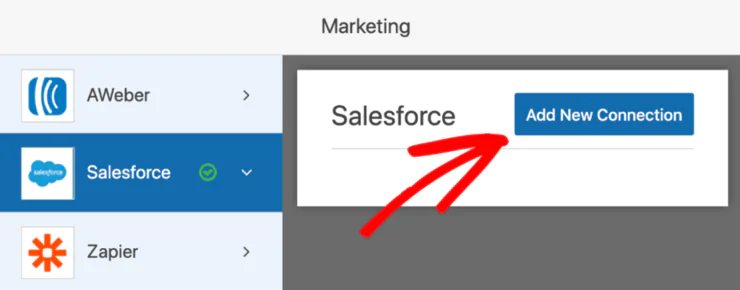
Then execute Salesforce » Add New Connection action in this section:
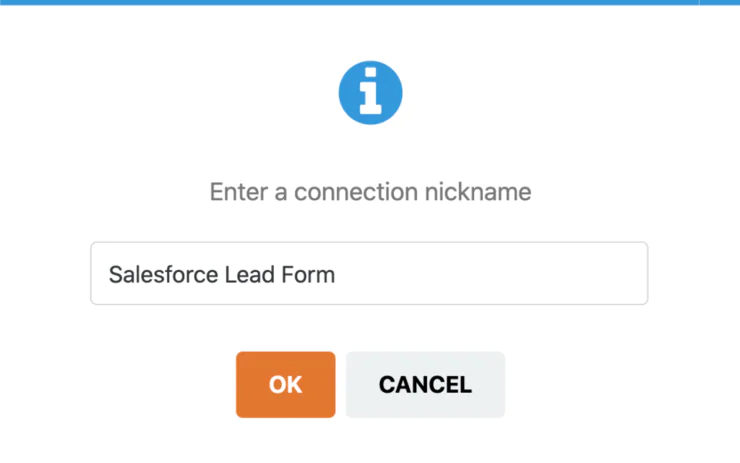
Now that you are done with this step, you are required to propose a suitable name that is easier to comprehend and identify later on:
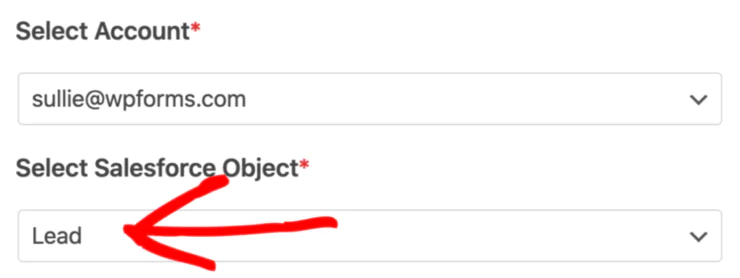
Go to the Salesforce account and click on the ‘Lead’ option:
Carry on by mapping all the fields of the contact form with the leads area fields of your Salesforce account:
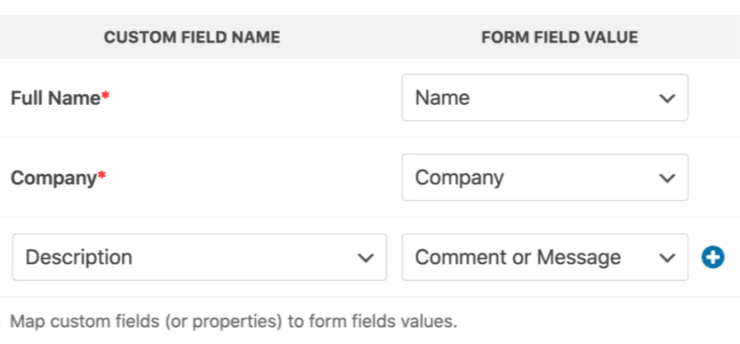
Click on the ‘Save’ button to complete this task.
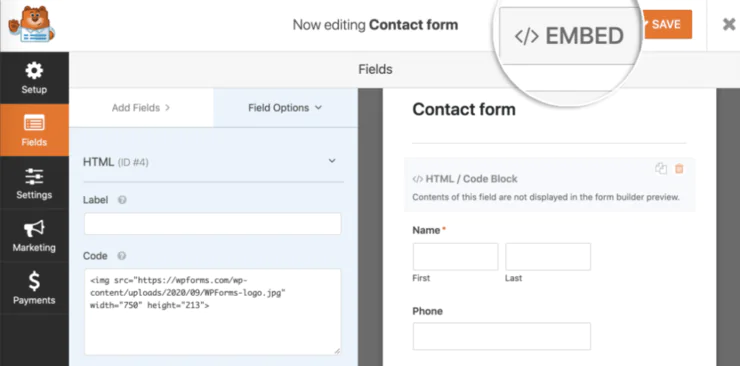
Step 7: Publish The Salesforce WordPress Integration
In this step, we are down to the most exciting step which is the publishing of the integration on your WP site and it can be achieved in merely a few minutes. You will have to click on Embed (top-right corner of the form builder):
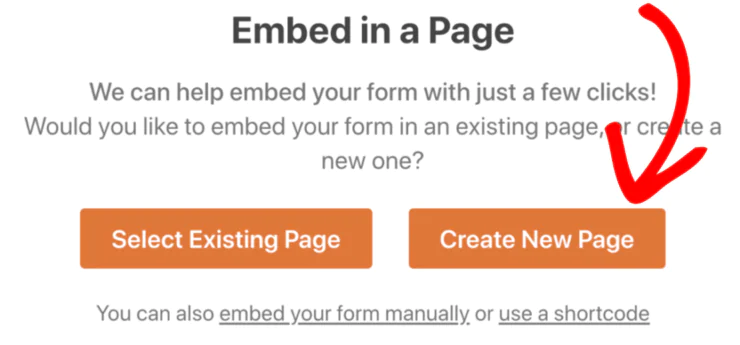
Next, move forward by selecting Create New Page:
Type in the name you have selected for your page in this section:

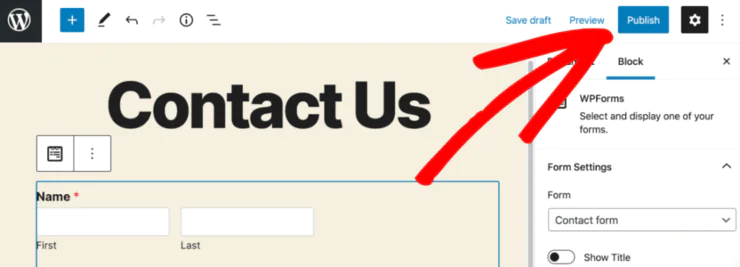
Double-click on the ‘Let’s Go button which is proof that you have now created your very own WordPress webpage embedded with your form. By hitting the ‘Publish’ button your efforts pay off as the WordPress Salesforce Integration gets published:
Congratulations! Now you have successfully created a WordPress Salesforce Integration. We hope that this tutorial was easy to comprehend and useful for creating a smooth connection between WordPress Forms and Salesforce. If you have enjoyed reading through this tutorial cum blog make sure to check out other our other list of blogs on WordPress solutions for your business. They will help you focus on customer relationship management software that suits your project needs and business design as a whole.
