How To Move Your Blog From WordPress.com To WordPress.org?
Do you wish to move your blog content from WordPress.com to WordPress.org? If Yes! Then this blog post is your gateway to carry out smooth content transfer without losing any valuable information in the process. Beginners often begin their journey with WordPress.com as soon as they evolve, they realize its limitations and switch to a self-hosted platform i.e. WordPress.org. By closely following this step-by-step guide, you can properly move your blog from WordPress.com to WordPress.org with one eye closed!
Why Should You Move From WordPress.com to WordPress.org?
Anyone can start their blog by creating an account on WordPress.com. However, there are certain limitations affiliated with the free WordPress.com blog due to lower limit to monetizing your blogs, third-party ads made to be watched by your users, no plugin installation grant, and other features which you get to enjoy on other platforms. We recommend using WordPress.org because it gives you freedom and ownership to control all its functions. Let us dive straight into the migration process of your blog directly from WordPress.com to WordPress.org.
Things To Know Before You Start
To start right now, you must have a WordPress hosting account and a domain name. It is recommended, to use Bluehost because it is one of the biggest hosting companies out there nonetheless, it is an official WordPress hosting provider. They also provide WPBeginner users with a 60% discount and a free domain name on web hosting. You can get started for $2.75 per month. This package includes SSL. If your WordPress site has a custom domain name, you will still require web hosting to get started. For this reason, it is essential to get your login to Bluehost and set up your blog domain. In this tutorial, we will show you how to keep the same domain name while shifting your blog from WordPress.com to WordPress.org without lowering your blog search rankings later. Apart from the hosting account, you will also need access to your WordPress.com account such that you can easily transfer your pages, posts, comments, images, and other available data to your self-hosted platform.
Step 1: Exporting Content from WordPress.com
First, you will have to sign in to your WordPress.com site and access your account dashboard. From the very left side of the column, you need to click on the Tools » Export menu and then right-click on the ‘Export All button.
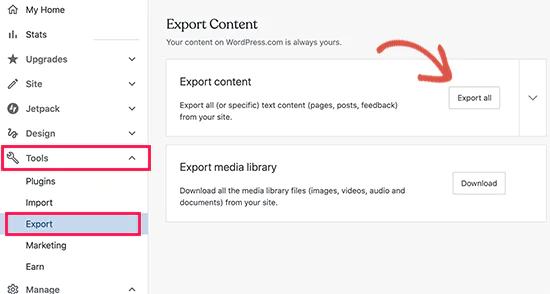
By doing so you can easily export all content to your WordPress site, as soon as your export file is ready you can instantly download the link. In case the link is not visible to you, WordPress also shares the link on your email address so you can access it from your email address.
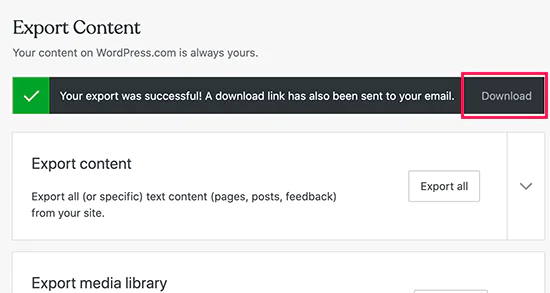
Once the export file is downloaded to your PC, you will have to unzip it. In this way, you can access the XML file which supports all your pages, posts, comments, images, categories, custom fields, tags, navigation menus, and other valuable data.
Step 2: Setting up WordPress Account
Now when your file is exported you will have to set up a brand new WordPress install on your web hosting. WordPress installation is an essential step that merely takes a few clicks. If you are already signed in with Bluehost then WP will automatically be installed on your PC. Otherwise, you can select various other different hosting services which you can install on your computer. After successful WP installation, you need to import your content into your fresh self-hosted WordPress site.
Step 3: Importing Your Content into Self Hosted WordPress Site
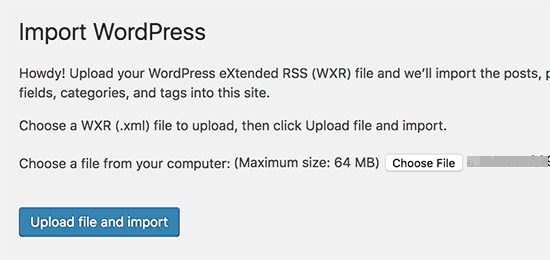
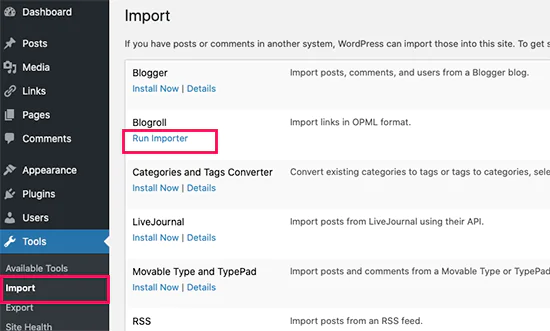
To import your old content from the WordPress.com site to your fresh WordPress.org site, you will have to plugin your installed WP admin site area. To do so, you can visit the Tools » Import page and click on the ‘Install Now’ button present below the WordPress.
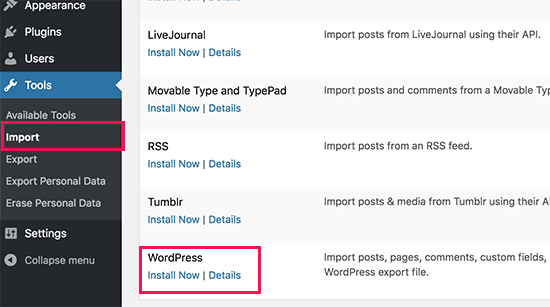
WordPress will automatically install the WordPress importer for you. Once it is done you can click on the ‘Run Importer link to proceed with this action.

A pop-up screen will appear to ask you to upload your WordPress.com XML file which you had downloaded earlier in the first step of this tutorial.
Note: If the size of your file is 2MB then you will have two options left with you, you can either ask your web hosting company to extend your limit temporarily and adjust with the process or you can break up your file by using WXR file splitter.
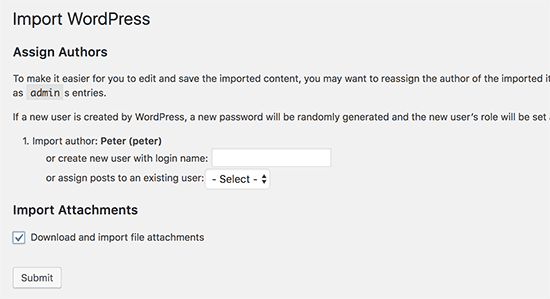
When you begin importing your files you will have the option to assign the imported data to an existing user or you can create a brand new user to complete the task. You can import all your file attachments hassle-free. It is in your best interest to check this box so all your image files are completely imported.
Step 4: Importing Blogroll Links
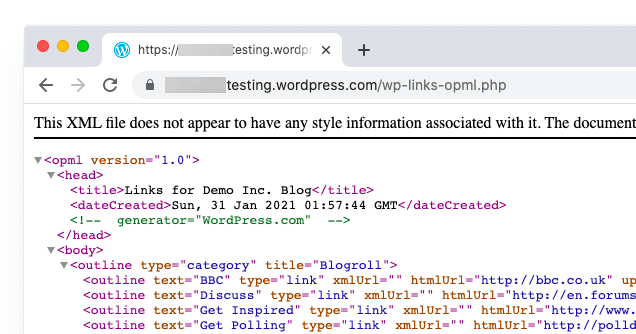
If you’re an avid WordPress user, you can relate to various features on your WordPress.com blog to effectively store your blogroll or other links. You can follow all these instructions to import them. Users who are not using this feature can leave this step and directly move to Step 5. WordPress does not provide back-end support for your blogroll feature. If you do not own multiple links in your blogroll, then you can add a blogroll link in WordPress even without a plugin. However, if you have multiple links you would like to keep the blogroll functioning and then continue reading. Blogroll links are easily exported in OPML format however if you use an XML format you can readily export or import your links and other categories. Your WordPress.com links have an OPML file which is present at this address;
http://example.wordpress.com/wp-links-opml.php
You can easily replace an example with any of your WordPress.com blog’s subdomain. If you are using a custom domain then your OPML file can be accessed by visiting a URL like the one given below for your reference;
http://www.example.com/wp-links-opml.php
Your OPML file will automatically open in your browser window, and you can also save changes to your desktop. Press CTRL+S (Command+S on Mac) to save this file on your PC.
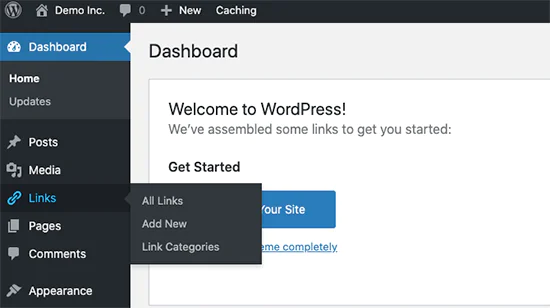
Now that you have a stored backup of your WordPress.com links your next step is to import this back-up into WordPress. However, your self-hosted WordPress does not have a link manager by default. You have to set it up eventually. You can install it and activate the ‘Link Manager plugin. The plugin does not need updating, and you can install it confidently. Upon activation, the plugin will open a new admin bar in your WordPress account named ‘Links’.
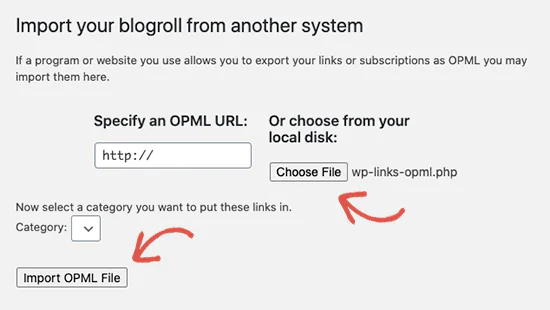
You must download and activate the ‘OPML Importer plugin. As this plugin will provide a new importer tool that will allow you to import blogroll links. Then you can open the Tools » Import page and click on the ‘Run Importer’ present underneath the Blogroll Importer.
On the blogroll importer page, you must upload the OPML file which we saved earlier, to complete the loading action click on the ‘Import OPML File’ button.
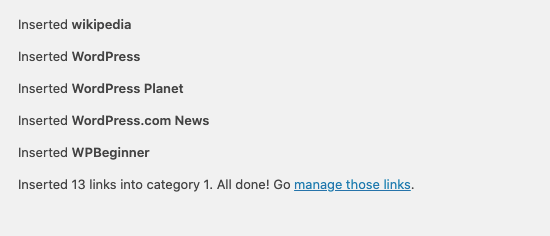
WordPress will import all your content links and categories links from the OPML file that you just uploaded. You must also consider seeing the progress of this action and on completion, you will be notified with the action success notification.
Step 5: Setting up your WordPress.com blog to private
Now if you do not want to redirect existing users to your new website then this is your process ends with this final step. Simply visit your old blog’s WordPress.com dashboard. From the left menu, you will have to right-click on Manage » Settings menu and find your way to the ‘Privacy’ domain.
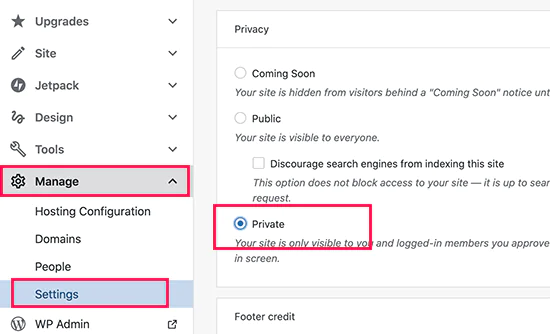
From here you can easily navigate your way to the ‘Private’ option, which you can select and click on the ‘Save settings button. This will make your existing WordPress.com blog private by following these instructions. In this way, your blog will only be visible to you and your logged-in users and others which you approve.
If you have been in the writing field for quite a long time and have a wide audience then it makes no sense to leave them on hold for some time. If your blog is out there its chances of getting a Google index or by any other search engines double. You can also keep a good check on all the search engine rankings and smartly redirect them towards your new blog.
Step 6: Redirecting Users & Preserving SEO
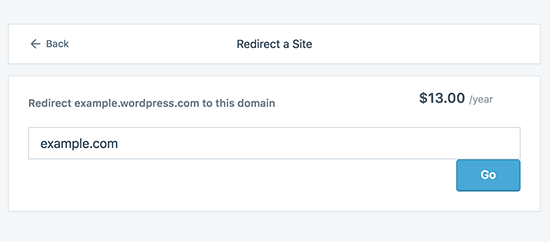
To keep your search rankings going, it is important to redirect users to a new location with the 301 header which is a standard solution when we move a site from one place to another. To make and retain changes made to search engine rankings you require access to .htaccess on WordPress.com. The paid version of WordPress.com offers this upgrade feature under the name ‘Site Redirect’ to fulfil this action. Go to the WordPress.com blog’s dashboard and click on the Manage » Settings menu item here. Just under the ‘Site Address’ option, you must click on the present ‘redirect’ link.
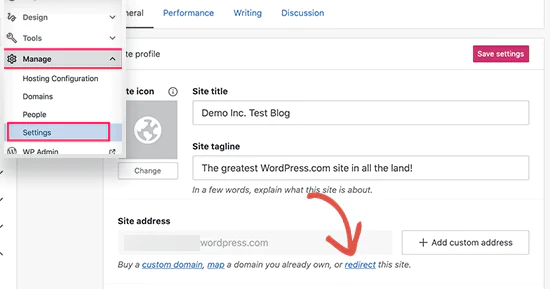
You will be asked to provide your custom domain name on the next screen to this domain name your visitors will be redirected. Enter your new WordPress.org site’s domain name and move forward with the ‘GO’ button.
Frequently Asked Question (FAQs)
Some of you must be thinking about how long it takes to keep paying for this offsite redirect feature. The answer to this frequently asked question is that you can stay as long as you want to. However, it is believed that 2 years is a good period for your old users to become familiar with your new domain name.
When changing domain names, you must keep in mind to update all your in-post URLs. When you inter-link your posts then all these links will be automatically updated. In case you had a custom domain on WordPress.com, then there is nothing much to be concerned about. You can alter the DNS record to your host and your SEO benefits will be retained. You can contact us directly for further inquiries or outsource ITS SEO and PPC service services!
