How To Create Orientalist Art
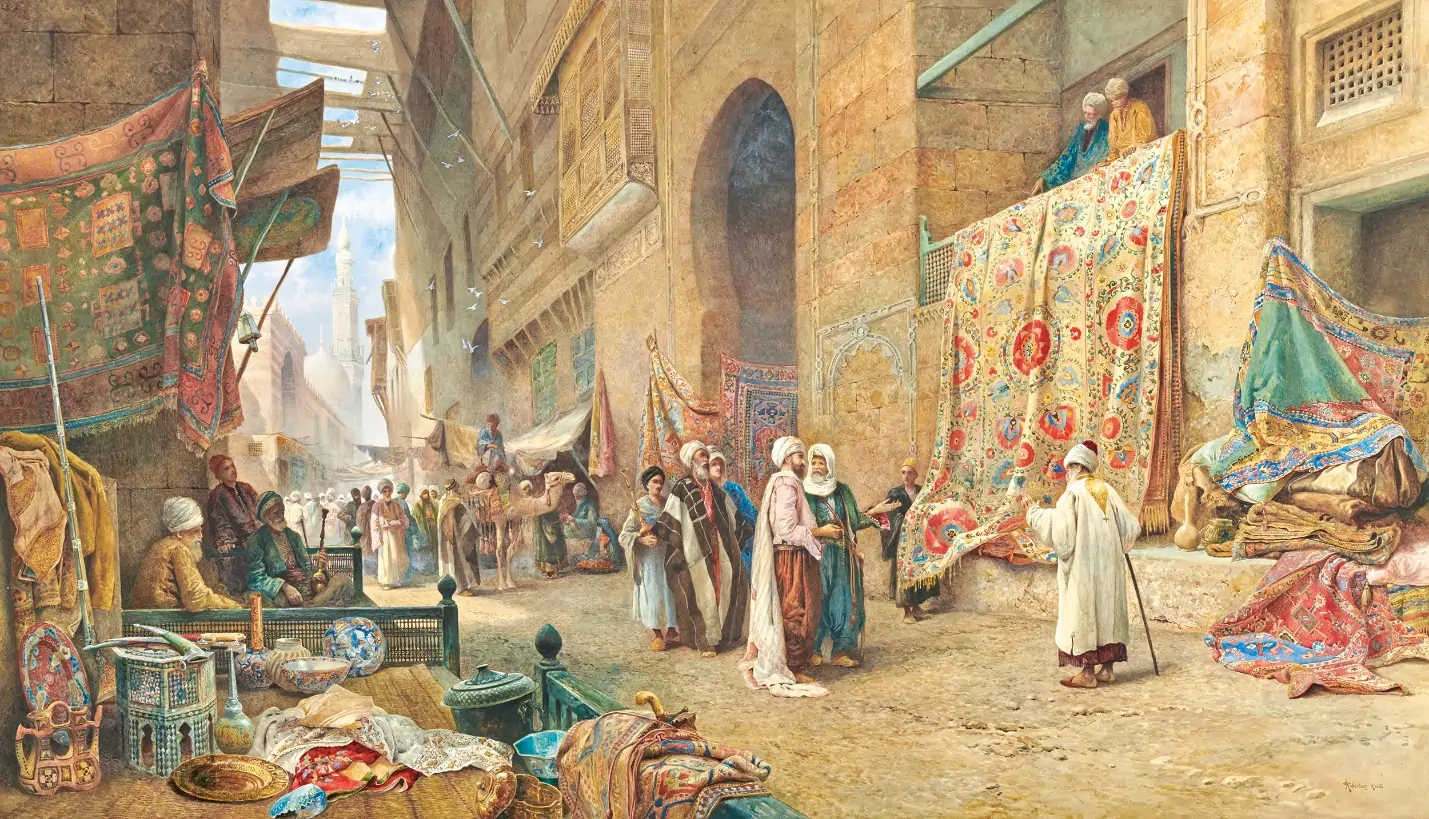
Orientalist art describes the Eastern world as portrayed through the Western lens, repeatedly integrating diverse facets of imagination and reality. Orientalism-based artworks rose in popularity during the 19th century as people in North America and Europe became more interested in foreign cultures. Opting for the Orientalism concept as a stimulant power, artists like Eugène Delacroix, Jean-Léon Gérôme, and John Frederick Lewis painted details of Middle Eastern, North African, and Asia societies at that time. The most preeminent themes that influenced Orientalist works included the depiction of plentiful harems, crowded markets, and enchanting desert landscapes, all indicating the sensuality, extravagance, and enigma traits of those cultures. Orientalist art played a noteworthy part in constructing Western discernments of Eastern societies, depicting them as unusual and, in a general sense, distinctive from the West. To create fascinating art pieces using the orientalism practice, you can get the help of contemporary software tools and image creation techniques and attain the ultimate incredible composition. This blog will deal with the strategies to use when editing or creating images concerning Orientalist themes.
Step 1: Collecting Orientalist References
Perform intensive research on Orientalist art. Look into paintings, photos, and chronicled references delineating Eastern landscapes, architecture, individuals, and social elements.
Seek renowned artists like Eugène Delacroix and Jean-Léon Gérôme, who specialized in Orientalism. Think about their compositions, application of colours, and portrayal of light and shadow.
Gather an assortment of high-quality images and artworks that represent Orientalist subjects. Concentrate on scenes like desert vistas, bustling bazaars, and intriguing cityscapes. Incorporate pictures of traditional clothing, lavish architecture like mosques and palaces, and ordinary objects like floor coverings, ceramics, and hookahs.
Distinguish common themes and subjects predominant in Orientalist art, such as harems, market scenes, and enchanted desert settings. Address the depiction of figures—both local people and Western travellers—and how they interrelate with their environment.
Analyze the creative techniques utilized by Orientalist painters, like brushwork, composition, and specific colours, to bring out a sense of exoticism and dramatization.
Reflect on how modern artists and photographers perceive Orientalist subjects, blending traditional themes with modern perspectives.
Step 2: Making Initial Outlines
Begin by drawing out rough thoughts for your Orientalist composition. Utilize pencil or any digital drawing tools to lay out key components such as figures, designs, and landscapes.
Strive to make a balanced composition that presents the subjects and themes of Orientalist art. Check out the rule of thirds and other compositional rules to guide the viewer’s eye through the scene.
Touch on to the visual references collected in step 1. Consolidate components such as conventional buildings, swarming market scenes, or broad desert scenes into your sketch.
Arrange the placement of foreground components (such as figures or objects) against the background, including landscapes or architecture. Make sure there’s a sense of profundity and perspective to improve the story and visual effect.
Outline how lighting will play a part in setting the temperament of your artwork. Give a thought to where light sources are coming from and how they light up distinctive parts of the scene to form sensational contrasts and shadows.
Revise your sketches, making composition, scale, and perspective alterations as required.
Step 3: Selecting The Background
Start by launching Adobe Photoshop and making a new document with dimensions appropriate for your artwork.
Select a high-resolution image or painting that acts as the backdrop for your Orientalist scene. It can be a desert scene, a buzzing marketplace, or a lavish palace interior.
Import the chosen background picture into your Photoshop document and position it as the base layer. Utilize the Transform (Ctrl+T) tool to alter the size and perspective if fundamental.
Utilize adjustment layers like Hue/Saturation, Levels, and Curves to adapt the colours and lighting of the background. Look into making a warm, dynamic climate typical of Orientalist art.
Guarantee the foreground components mix consistently with the background. Utilize layer masks and the Brush tool with delicate edges to blend edges and create natural transitions between components.
Enhance depth within the scene by adjusting the contrast and brightness of distinctive layers. Utilize atmospheric perspective strategies to recreate distance and improve the figment of profundity.
Step 4: Extracting Foreground Elements
Start by importing images of figures, architecture, and objects that will dwell in your Orientalist scene. Utilize images that reflect the subjects and themes recognized in your research.
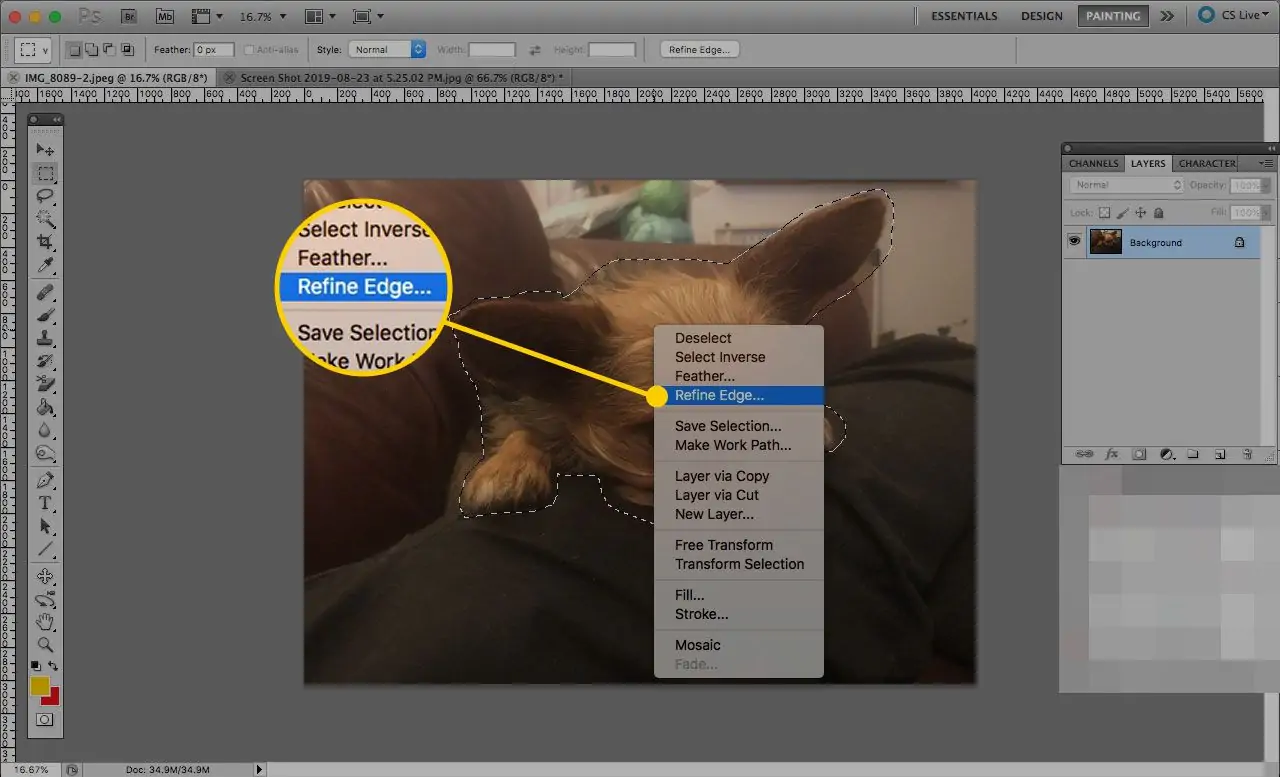
Utilize selection tools such as the Quick Selection Tool or Pen Tool to carefully remove each foreground component from its foundation. Keep clean edges and retain details like hair, clothing folds, and intricate architectural highlights.
Temper selections utilizing tools like Refine Edge or Select and Veil to fine-tune edges and improve transparency where required, particularly around complicated or semi-transparent components.
Paste each extracted component onto your Photoshop document as a new layer. Utilize the Move Tool (V) to position components inside your composition, considering perspective and spatial connections.
Alter the size and orientation of each layer to fit consistently into the scene. Utilize Edit > Transform or Free Transform to scale and turn components for appropriate integration.
Step 5: Using Special Filters
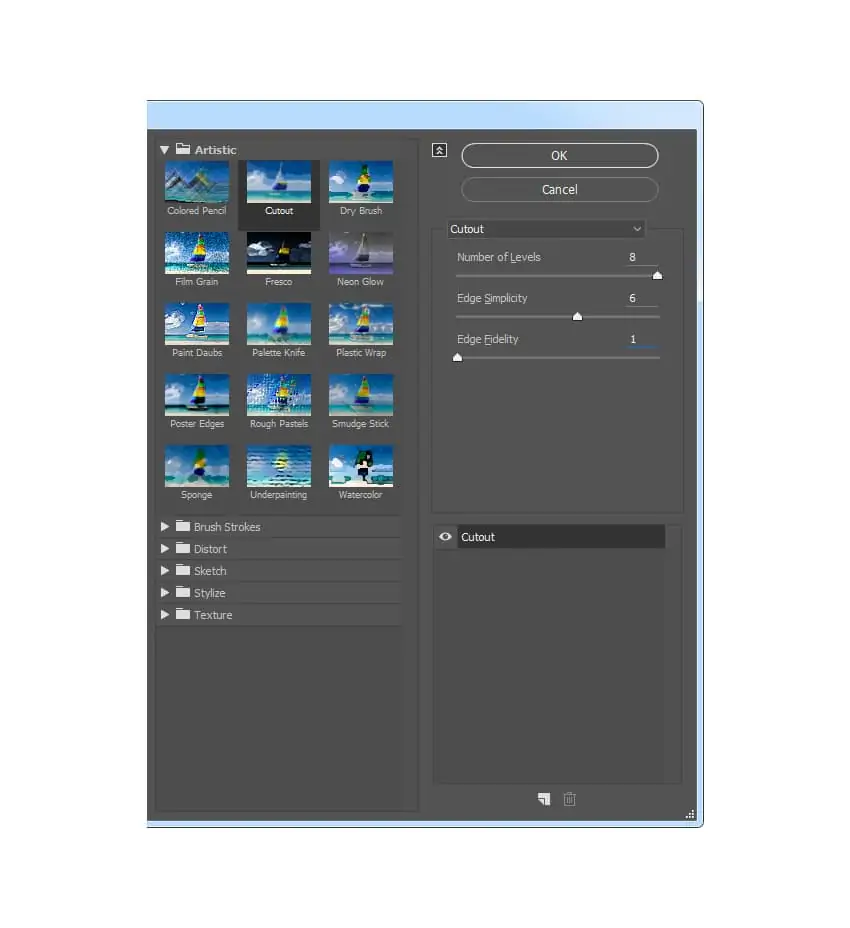
Start by experimenting with Photoshop’s aesthetic filters to attain a painterly effect that conforms to Orientalist aesthetics. Take a look at filters such as Oil Paint, Dry Brush, or Gaussian blur to add texture and profundity to your components.
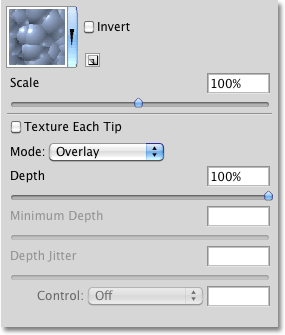
Utilize custom brushes or download brush packs that imitate conventional painting procedures. Using Brushes that have textured bristles or characteristic media impacts can improve the painterly feel of your work.
Alter brush settings like size, opacity, and flow to control how paint is connected to your canvas. Changing these settings can create different surfaces and strokes, including lavishness and detail in your Orientalist scene.
Focus on including intricate details in components such as clothing designs, architectural adornments, and natural surfaces like foliage or stone. Utilize smaller brushes or zoom in for accuracy.
Try layer styles like Inner Shadow, Outer Glow, or Bevel and Emboss to include profundity and dimension to particular components. These impacts can mimic light and shadow, improving authenticity.
Apply surface overlays to certain elements or the complete composition to make a vintage or aged look reminiscent of historical Orientalist canvases.
Frequently step back and assess the general balance of artistic effects. Guarantee that they complement the composition without overwhelming or diverting from the story and visual agreement of the scene.
Step 6: Revising The Colors
Start by utilizing adjustment layers such as hue/saturation, colour balance, and photo filters to harmonize colours with your Orientalist composition. Alter hue, saturation, and lightness to attain a cohesive colour palette that inspires warmth and energy typical of this genre.
Access Gradient Map adjustment layers to further address colour transitions and temperament in your artwork. Select warm colour gradients that boost the climatic and emotional components of the scene.
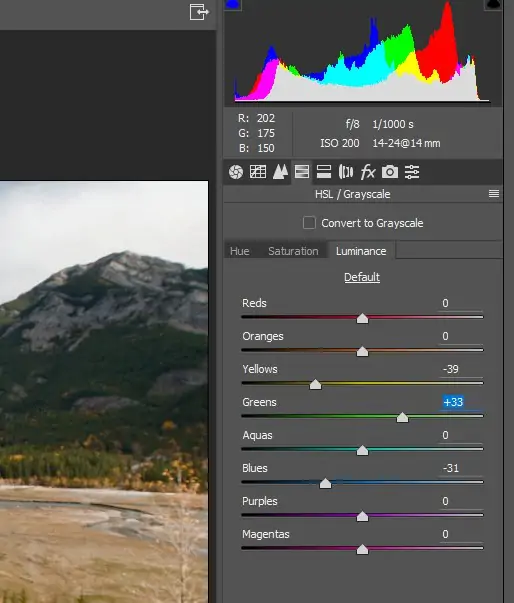
Utilize the Selective Color adjustment layer for particular colour ranges. Altering colours separately can help hoist or tone down certain components to reach desired effects.
Alter the general brightness and contrast using the Brightness/Contrast adjustment layer.
Temper tonal range and contrast with Levels and Curves adjustment layers. Editing shadows, midtones, and highlights can bring out details and make a more energetic composition.
Use layer masks to specifically apply modifications to particular parts of the composition.
Step 7: Finalizing The Artwork
Utilize blending modes options, including Overlay, Soft Light, or Multiply, to integrate diverse components finely inside your Orientalist composition. Test with opacity settings to reach the required harmony of colours and textures.
Use the Zoom feature to include concluding details of your work of art. Utilize small, textured brushes to improve clothing designs, architectural details, and natural components like foliage or surfaces on objects.
Include texture overlays specifically to certain components or the whole composition to include depth and a vintage feel reminiscent of chronicled Orientalist works of art.
Utilize soft brushes and gradients to refine light and shadow areas. Find areas where light sources interact with surfaces to form realistic highlights and shadows.
Look at including atmospheric effects like haze or soft glows to make profundity and improve the temperament of your Orientalist scene.
Commit the last adjustments to general contrast, brightness, and saturation. Utilize adjustment layers like Levels or Curves to tune the tonal range and ensure visual equilibrium.
Lastly, audit your artwork as an entire. Make any fundamental advances to composition, colours, or particulars to attain the specified aesthetic and narrative effect.
Conclusion:
In summary, by using orientalist themes in digital art and image manipulation, you can recreate the creativity and fiction embraced by Western artists in their orientalist artworks. Though Orientalist art is admired for its remarkable ability and dapper appeal, it is also observed for its position in shedding light on cultural stereotypes and reinforcing colonialist stories. In this era of technology and advancement, antique scenes and illustrations like orientalist art are fair enough to breed the viewers’ imagination, leading to unfathomable visual tales. It is not only about accentuating visual aestheticism but also representing distinguishing cultural contexts and lifestyles.
