How To Create A Naturalistic Effect
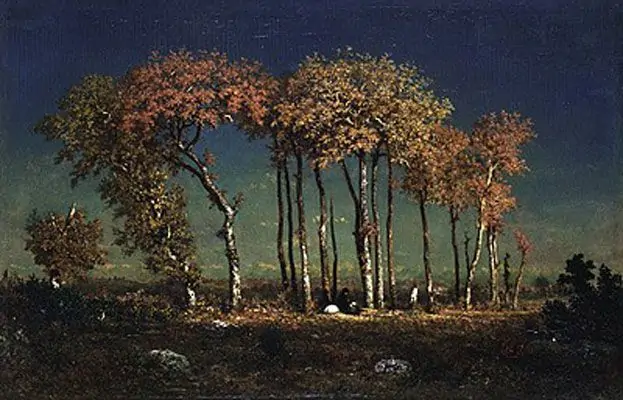
Naturalistic art refers to a realistic style that uses little distortion or interpretation to reflect or show the nature and lifestyle of commoners. The most naturalistic paintings have a character that is almost intrinsic, meaning that very little visual detail is needed to achieve this effect. The early 19th century’s prosperity and the literary trend toward authenticity had a big impact on the subjects of modern naturalism. Similar to all related genres, naturalism is relatively shaped by the artist’s aesthetics, culture, and inevitable subjectivism. Naturalistic concepts are constantly explored by contemporary artists to boost their imaginations and produce incredible works of art. Besides, digital platforms are making it easier to create realistic-looking, naturalistic compositions with less time and effort. Different editing techniques can potentially contribute to creating either a naturalistic piece from scratch or can modify existing photographs into naturalistic effects. This blog will go through a step-by-step process of introducing naturalistic effects into images.
Step 1: The Initial Edits
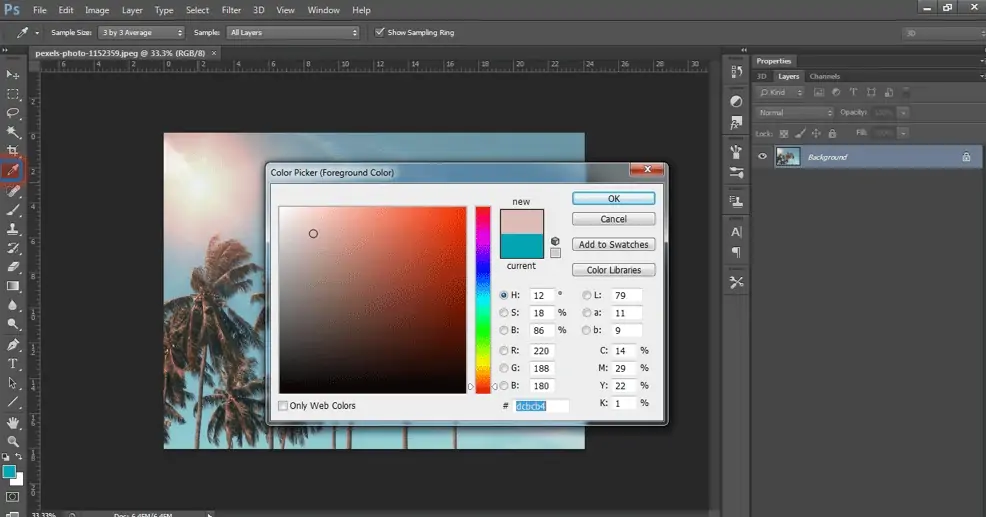
Begin by altering the white balance to make the colors in your image look natural and accurate.
Utilize the white balance option in your editing program to alter the temperature by considering warmth or coolness and the tint of the image.
On the other hand, utilize the eyedropper tool to tap on a neutral gray or white region within the image. It signals the software to automatically alter the colors according to that reference point.
If required, manually alter the temperature and tint sliders until the colors coordinate what you see as natural. Opt for colors that duplicate how the scene showed up in real life.
Address skin tones, guaranteeing they show up naturally and healthy. Edit the white balance to not have any unnatural color casts on skin or other key elements within the photograph.
Audit the complete image after modifications to ensure that colors are adjusted and harmonious over the whole composition.
Step 2: Brightness And Contrast Settings
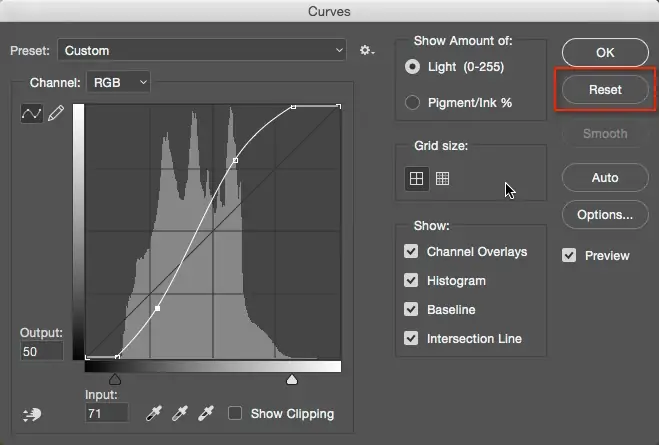
After altering the white balance, enhancing contrast includes profundity and clarity to the image while protecting natural shadows and highlights.
Utilize the tone curve tool to fine-tune contrast. Increment the contrast delicately by adjusting the curve to form a slight “S” shape. Lift shadows and slightly lower highlights to preserve detail in both bright and dull regions.
Alter the brightness and contrast sliders if your software offers their options separately. Increment contrast to form colors and details turn up without losing the natural appearance of the scene.
Be careful not to over-process the image, which can lead to unnatural-looking results. Strive for an equilibrium that upgrades the image’s characteristic contrast while keeping it visually engaging and realistic.
Apply contrast alterations, specifically utilizing masks or adjustment brushes. This permits you to upgrade contrast in particular regions while leaving others unaffected, keeping up a natural feel all through the image.
Frequently zoom out and view the picture at full size to survey the general effect of your contrast adjustments.
Step 3: Working On Exposure

After contrast alterations are made, fine-tuning exposure guarantees that the general brightness levels are proportional, uplifting the natural appearance of the image.
Begin by editing the exposure slider to direct the overall brightness of the picture. Increment exposure slightly to brighten shadows and midtones or lower it to darken highlights and create a moodier climate.
Allude to the histogram to gauge the conveyance of tones within the composition. Guarantee that the histogram amplifies over the total range from shadows to highlights without any loss of details.
On the off chance that it is fundamental, recoup highlights and shadows utilizing sliders or recovery tools in your program. It is to retain detail in bright and dark ranges, contributing to a more natural appearance.
Tune exposure further by altering levels or curves. Utilize these tools to control particular tonal ranges and improve overall balance in brightness and contrast.
During adjustments, keep up a natural look by dodging extremes that lead to overexposure or underexposure. Strive for an even exposure that reflects how the scene showed up in reality.
Step 4: Balancing Color Tones
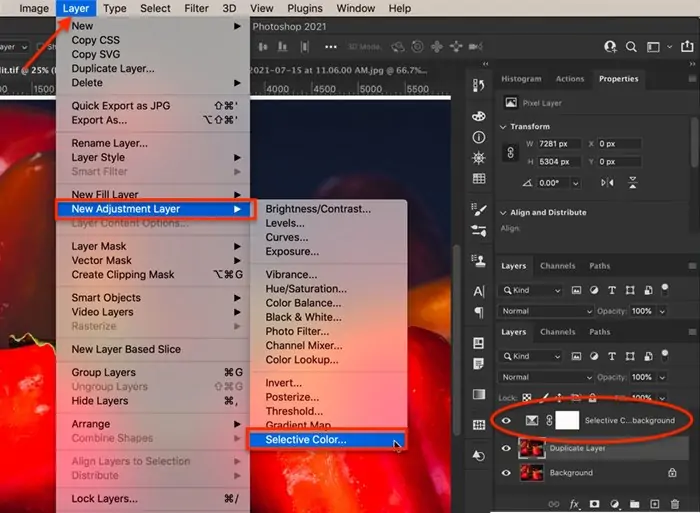
Start refining colors by altering color balance to fine-tune the general warmth or coolness of the image. Utilize sliders for highlights, midtones, and shadows to attain a balanced color palette.
Alter saturation to improve or diminish the intensity of colors within the image. Aim for vibrant, however natural-looking colors without oversaturation, which can make the image look fake.
Set individual tones if specific colors show up inaccurate or require improvement. Utilize targeted alterations to bring out natural tones in components like foliage, skies, or skin tones.
Utilize specific color editing tools to alter particular colors without influencing the whole image. This permits explicit control over how diverse hues show up, keeping up natural color connections.
Look into applying subtle color grading to bind together the overall color palette and upgrade disposition. Utilize gradients or adjustment layers to attain cohesive color tones while guarding natural color varieties.
Attend to skin tones and make sure they show up exactly and healthy. Alter color temperature and tint to dodge unnatural casts on skin or other key components.
Audit the picture at distinctive zoom levels and in different lighting conditions to ensure colors show up naturally and are unified over the whole composition. Aim for an adjusted color version that improves the image’s natural magnificence.
Step 5: Sharpening For Clarity
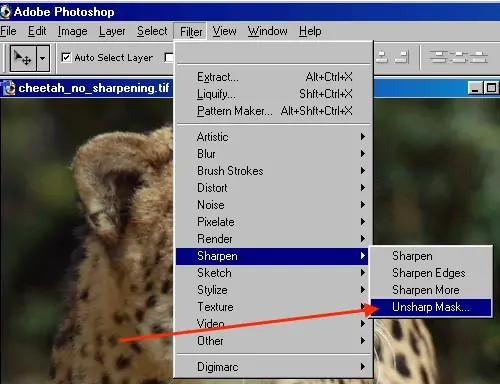
Sharpening amplifies the clarity and definition of details within the image, making it appear more realistic and refined without exaggerating it.
Begin with the Unsharp Mask or comparable option in your editing app. Alter the amount, radius, and threshold parameters to sharpen edges and fine points of interest viably.
Do not oversharpen, as it can present noise and artifacts. Keep a light touch and zoom in to check for any undesirable halos or unnatural sharpening effects.
Consider applying sharpening selectively utilizing masks or adjustment brushes. This permits you to sharpen particular zones of interest while leaving others untouched, keeping up a natural aura throughout the image.
On the other hand, utilize the High Pass filter procedure for sharpening. Create a Duplicate of the image layer, apply a High Pass filter, and set the blending mode to Overlay or Soft Light. Set the layer opacity as required for unpretentious sharpening.
Audit the image at 100% zoom to evaluate the sharpening impact accurately. Consider the textures, fine details, and edges to ensure they show up fresh and well-defined while keeping up a natural see.
Step 6: Reducing Noise And Distortions
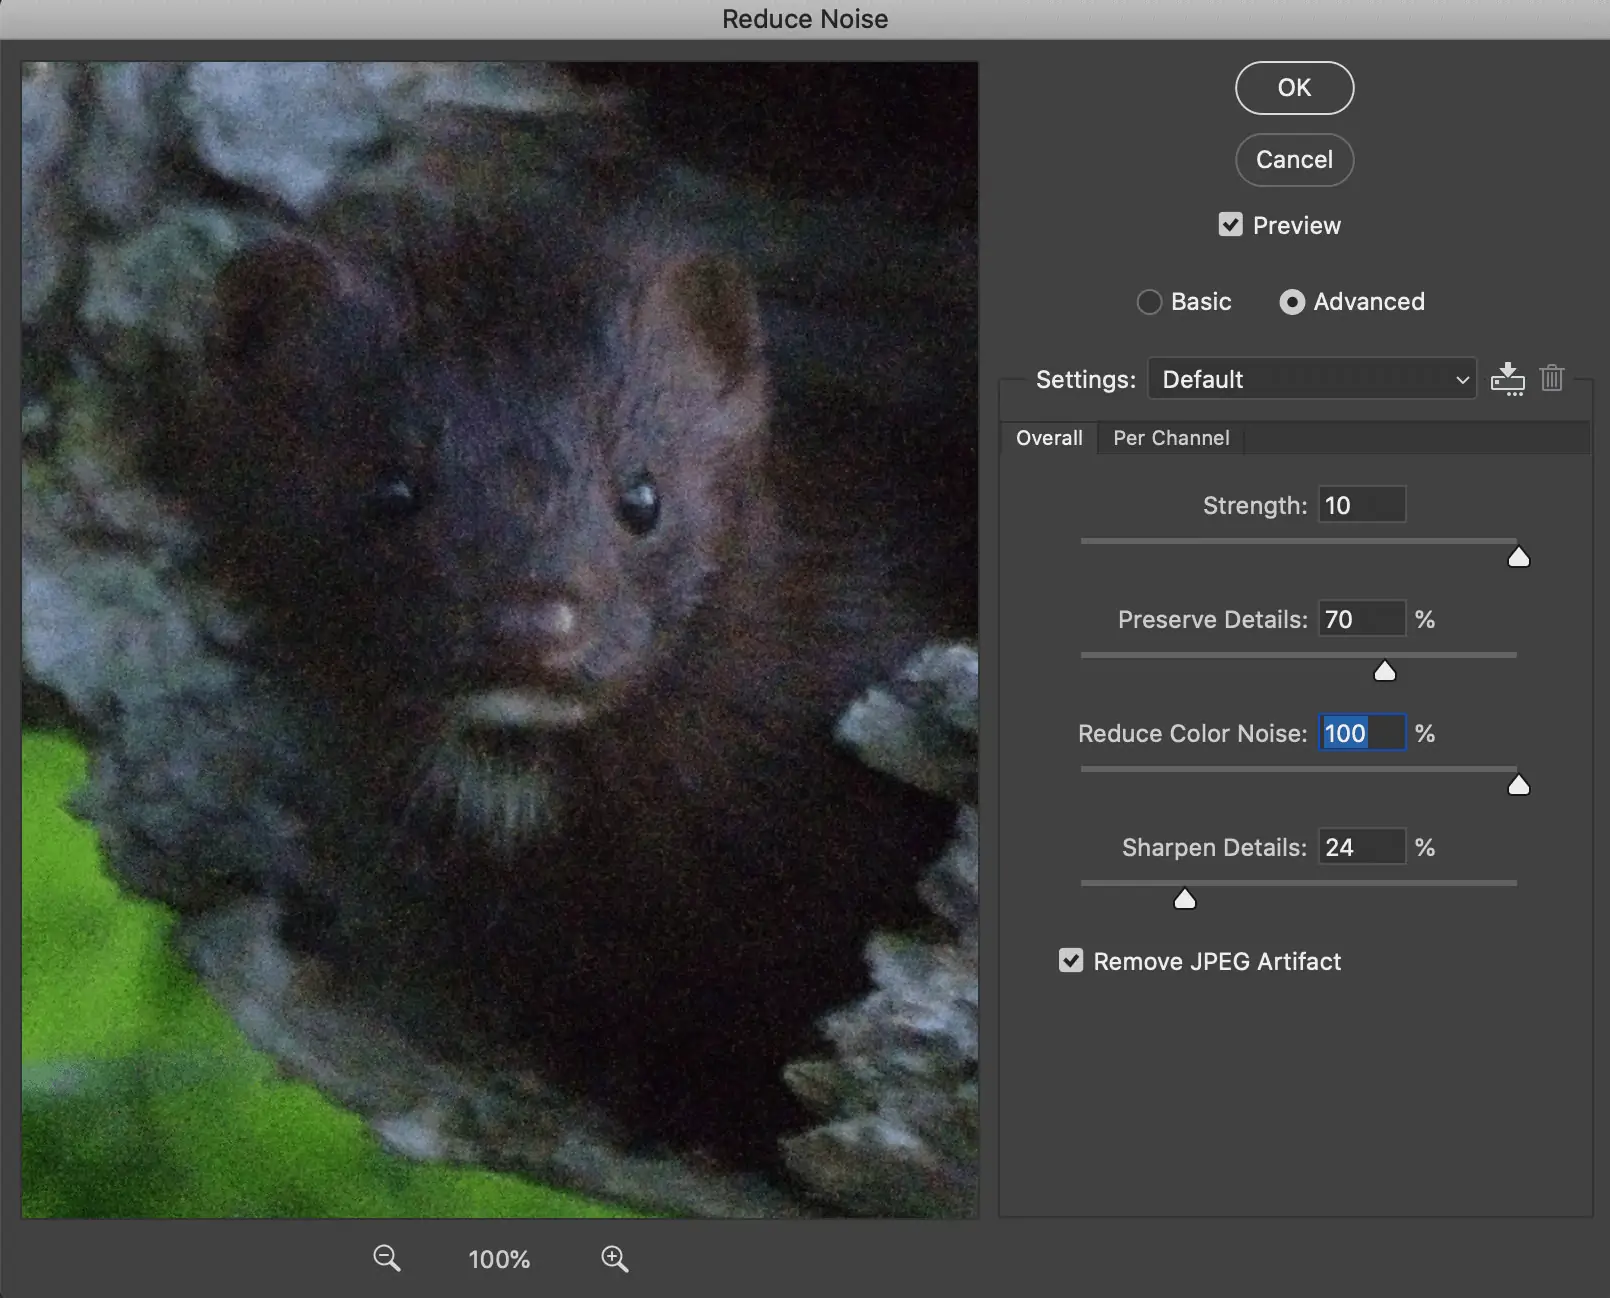
For noise reduction, first, identify areas of the image that show noise; it may show up as graininess or dots, particularly in shadows and darker zones.
Utilize noise reduction tools that are accessible in your editing program. Alter sliders for luminance (grain size) and color (chroma noise) to decrease clamor while protecting detail.
Attain a balance between noise reduction and detail conservation. Do not overdo noise reduction, which can lead to a loss of fine elements and a fake-like appearance.
Include noise reduction, specifically if certain regions require more or less noise reduction than others. Utilize masks or brushes to target particular areas while keeping up the natural surfaces in other parts of the image.
Evaluate the image at 100% zoom to assess the effectiveness of noise reduction. Guarantee that noise reduction settings make a smooth appearance without relinquishing overall image sharpness and detail.
Perform concluding alterations based on your assessment. Tune noise reduction settings as required to attain a natural-looking image with reduced noise levels over the whole composition.
Step 7: Finalizing The Modifications
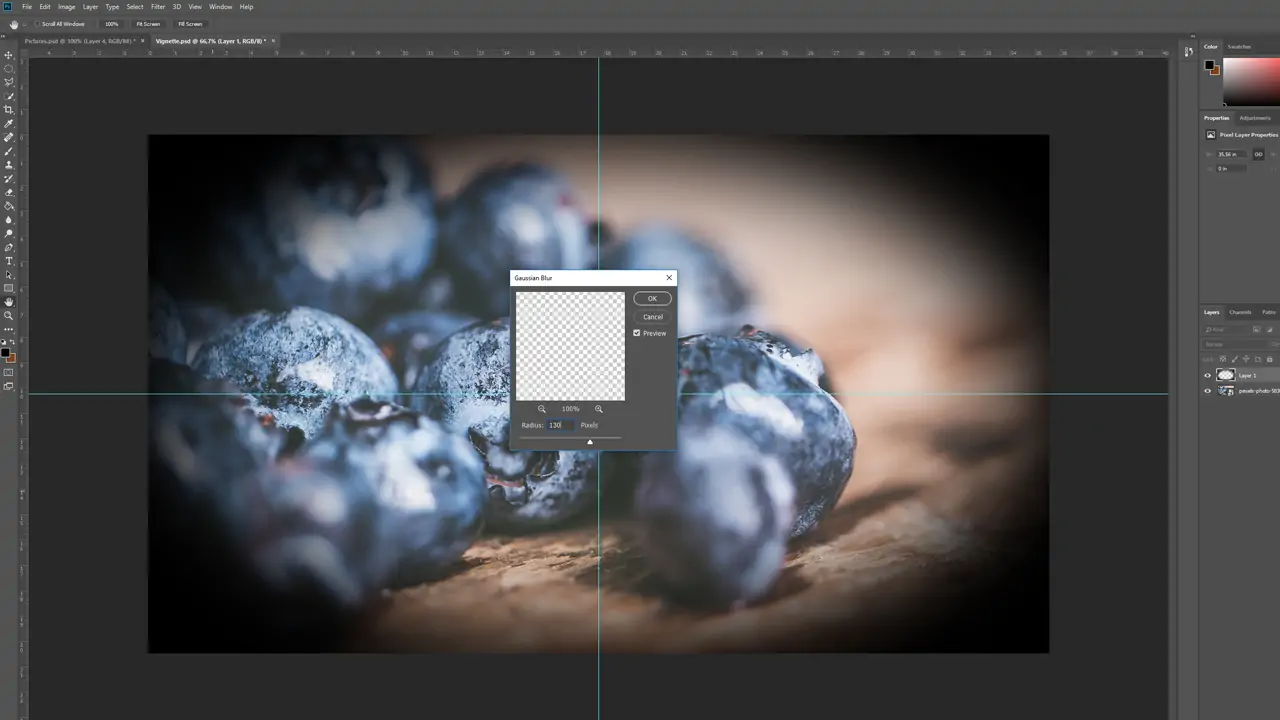
To bring significant focus to your main subject and recreate depth of field, consider including a mild vignette or blur.
Utilize a vignette to delicately obscure the edges of your image. It will bring attention to the center, emphasizing your subject.
Utilize the gradient tool or adjustment layers for a smooth move in your vignette impact. Alter opacity and feathering to make it blend naturally with the picture.
Alternatively, a subtle blur can be applied to background components to reproduce a shallow depth of field. It will isolate your subject and improve realism.
Make a copy of your image layer, and apply Gaussian Blur and mask to reveal the effect specifically. Alter the blur radius for a natural profundity effect.
Zoom out to audit the general effect. Reconfirm that the vignette or blur upgrades your composition without dominating your subject. Opt for an unobtrusive edit that complements your naturalistic editing.
Next to finalizing the adjustments, save your ultimate image in a suitable format. Keep up a high-quality duplicate for future use while protecting your naturalistic edits.
Conclusion
In summary, there are numerous applications for the concept of naturalistic effect creation. In its broadest depiction, you can add it to any artistic style that portrays real-world subjects rather than fictional or spiritual ones. Using naturalistic elements in images, you can accurately accentuate the subject in front of an audience without deliberately idealizing or embellishing. Using the strategies highlighted in this blog article, you can heighten the naturalism within your shots while working on the realistic facets. Ultimately, you can achieve the resultant compositions that look as analogous to genuine life and people as possible.
