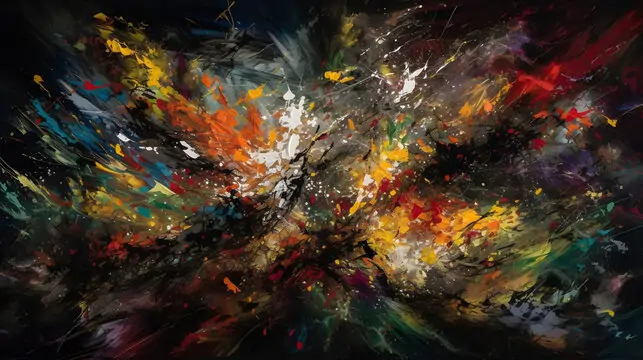
How To Create A Pollock Effect
In the classic Pollock art technique, paint is poured directly onto a horizontally lying canvas on the ground using a stick or straight out of a can. Pollock’s artworks include the spread of unbroken paint filaments that stretched over the canvas. Following the founder artist’s impulsive and exuberant paint-splattering technique, modern artists are experimenting with various digital brush strokes, splatters, and drips to create chaotic and dynamic compositions comparable to Pollock’s painting style. The pollock effect is often used to renovate digital artworks, images, or illustrations to provide visual inducement and a mania of activity. The images created using this unique approach evoke substantial responses from viewers, inciting them to mull over the shape, color, and surface exchange. The apparently irregular arrangement of components welcomes everyone to observe designs and meaning in the midst of clutter, empowering an immersive and intuitive encounter. This blog will address the essential steps and techniques to create emotive pollock effects in your common shots.
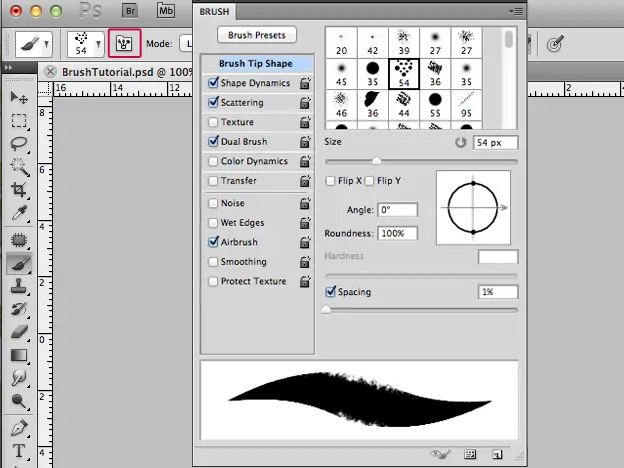
Step 1: Exploring Suitable Painting Tools
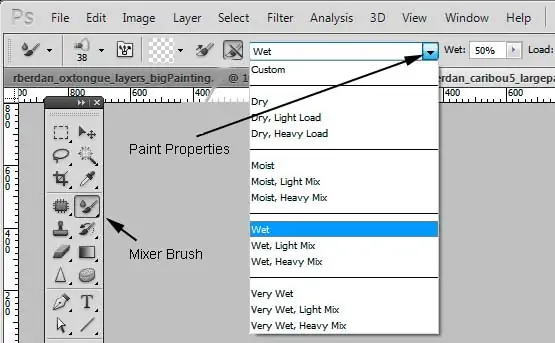
Investigate digital brushes accessible in graphic design programs like Adobe Photoshop, centring on those that imitate paint surfaces and behaviour.
Search for a variety of brushes, such as splatter brushes, drip brushes, and custom brushes with shifting shapes and surfaces.
Survey the quality and realness of brushes by testing with sample strokes on a test canvas to guarantee they precisely reenact the specified paint impacts.
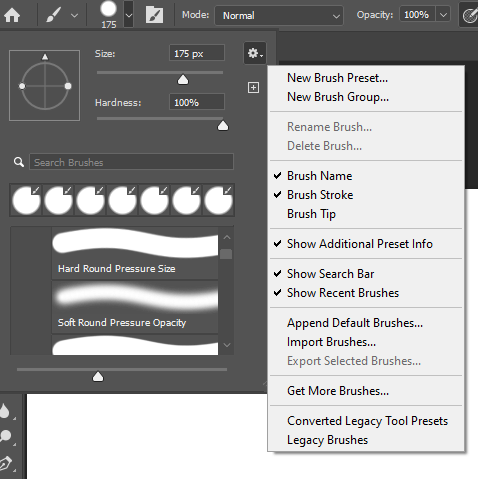
give preference to brushes that offer customization choices of size, opacity, and flow control, permitting adaptability and imaginative flexibility in application.
Investigate online communities and forums where artists share and suggest brushes particularly outlined for accomplishing the Pollock Effect.
Test distinctive brushes and combinations to get their exciting properties and how they add to the required aesthetic.
Select a choice of brushes that best align with the vision for the Pollock impact so that you get the flexibility and realness required to make energetic and expressive digital artwork.
Step 2: Creating Image Duplicate Layer
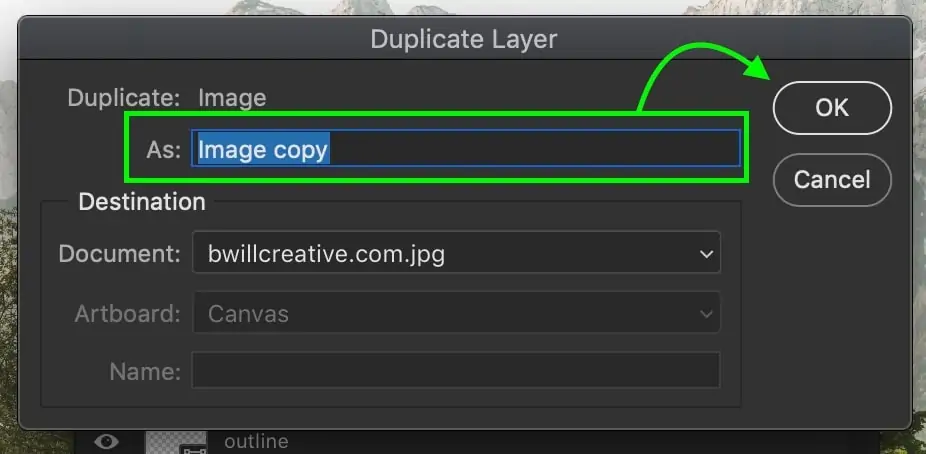
Open the image in your chosen graphic software and copy the foundation layer to protect the initial.
Make a new layer for each stage of the editing process, guaranteeing a non-destructive workflow that permits simple alterations and modifications.
Utilize clear and descriptive names for each layer to preserve the organization and encourage productive navigation amid editing.
Flip the permeability of layers as required to focus on particular components or stages of the editing process, lessening clutter and diversion.
Set related layers together utilizing folders or layer groups, streamlining the layer panel and workflow administration.
Use adjustment layers for non-destructive adjustments to color, brightness, contrast, and other picture properties, keeping up adaptability in editing.
Utilize layer masks to specifically uncover or conceal portions of person layers, permitting exact control over where effects are applied and getting consistent integration of edits with the initial picture.
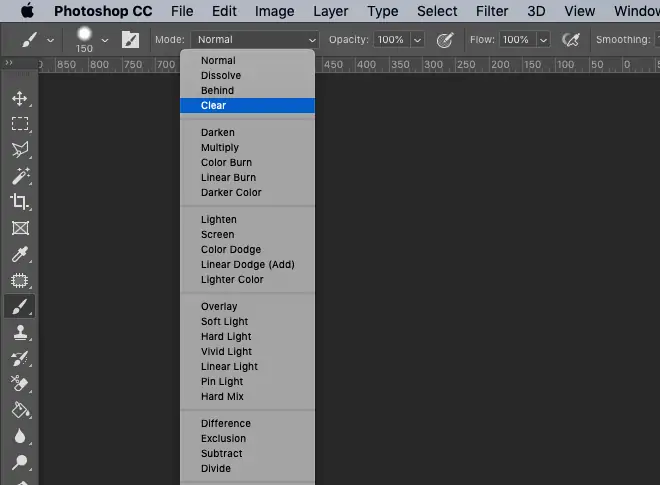
Step 3: Applying Brush Strokes
From the already-chosen set, select a brush that suits the required effect, such as a splatter or drip brush.
Alter the brush size and opacity settings according to the scale and intensity of the effect wanted.
If accessible, utilize pressure sensitivity settings to direct the thickness and density of brush strokes, mirroring the natural inconstancy of paint application.
Spread brush strokes directly onto the copied image layer, considering variables like brush angle, speed, and direction to achieve natural and spontaneous results.
Explore with brush elements and scrambling choices to present changeability and randomness into brush strokes, improving the naturalistic feel of the impact.
Layer numerous brush strokes of shifting sizes, colors, and opacities to produce complexity and profundity in the composition.
Ceaselessly survey the advancing image and make alterations to brush settings and application techniques as required, refining the general appearance until the specified Pollock Effect is accomplished.
Step 4: Setting Brush Parameters And Opacities
Regulate brush parameters like size, opacity, flow, and spacing to control the intensity and conveyance of brush strokes.
Select colors that complement or contrast with the initial picture, considering the specified temperament and aesthetic effect.
Try varied blending modes like Overlay and Multiply to consistently merge brush strokes with the fundamental image and improve color interactions.
Alter the opacity and stream of brush strokes to attain inconspicuous moves and blending impacts, permitting smooth integration with the initial picture.
Alter the opacity of person layers to control the overall visibility and noticeable quality of added brush strokes inside the composition.
Modify layers and alter their stacking arrangement to elevate the layering impacts and create depth or emphasis inside the composition.
Persistently assess adjustments while watching the image in real-time, making iterative refinements to attain the specified harmony and visual effect.
Step 5: Experimenting With Blending Options
Try different blend modes like Overlay, Multiply, or Screen to modify how layers connect with each other and the fundamental picture.
Tune the opacity of person layers to control the intensity of their role in the general composition.
Access layer masks to specifically uncover or stow away portions of layers, permitting exact control over blending impacts and moves.
Apply gradient maps to alter the tonal range and color conveyance of layers, making proportional mixing between components.
Alter the opacity and stream of brushes utilized for blending to attain smooth moves and consistent integration between layers.
Include layer styles like drop shadows, glows, or bevels to upgrade the visual profundity and dimensionality of blended components.
Persistently explore different mixing strategies and combinations, iterating on the composition to attain the required appearance and visual effect.
Step 6: Refining The Artwork
Bring your attention to particular zones of the image that require refinement, such as adding definition to edges or upgrading texture points of interest.
Utilize smaller brush sizes and lower opacities for fine-tuned alterations, permitting exact control over the refinement process.
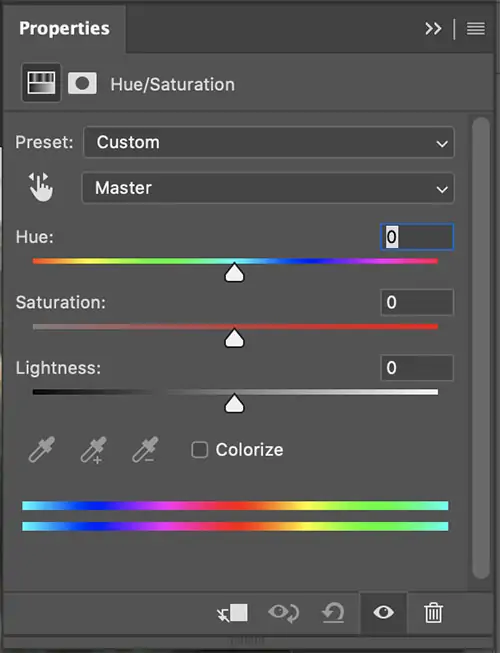
Address any color irregularities or inconsistencies between layers by altering hue, saturation, and brightness levels as required.
Pay consideration to the general texture and surface quality of the picture, refining brush strokes and layer effects to get a cohesive and outwardly satisfying result.
Amplify contrast levels to elevate visual effects and check that components inside the composition stand out successfully.
Assess the overall equilibrium and dispersion of components inside the composition, making edits to spacing, arrangement, and scale as needed for ideal visual agreement.
Look for input from peers or colleagues and making incremental changes until the required level of polish and professionalism is accomplished.
Step 7: Performing Final Tweaks
Conduct a final survey of color balance, saturation, and tonal adjustments to guarantee visual coherence and consistency throughout the composition.
Tune contrast levels to emphasize details and progress overall image clarity and profundity.
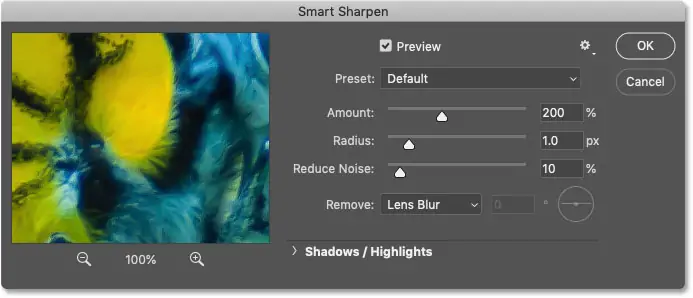
Apply sharpening procedures to improve the freshness and definition of edges and minute details, optimizing picture clarity.
Attend to any digital commotion or artifacts appearing within the image through noise-lessening filters or alterations, achieving a clean and proficient final appearance.
Execute global adjustments to general brightness, contrast, and color saturation to harmonize the final image and improve its visual impact.
Conduct an exhaustive survey of the whole composition, checking for imperfections or irregularities that require further refinement.
Save the ultimate composition within the wanted file format and resolution, guaranteeing compatibility with planning utilization and distribution stages. Furthermore, consider making numerous versions for diverse purposes, such as print and web presentations, if it is required to.
Conclusion:
In conclusion, alongside recognizing the originator’s efforts and creativity, the pollock effect flaunts the enduring potency of art to arouse strong feelings and prompt thought processes. Whether expressed digitally or on a conventional canvas, its dazzling spirit and raw emotion address Jackson Pollock’s significant mark on expanding artistic expression. This approach spotlights art’s power to cross barriers and connect with audiences of all ages by seizing Pollock’s lasting influence on the creative world. The Pollock effect glorifies the essence of inventiveness and fantasy that characterizes Pollock’s groundbreaking approach to art, which never fails to enthrall and inspire, owing to its deep-rooted pizzazz and spontaneous liveliness.
