How To Use Microsoft Azure Computer Vision For Image-Based Data Entry
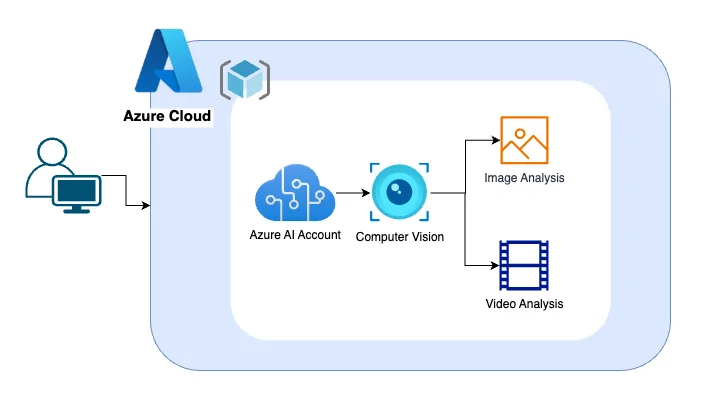
A variety of activities are usually included in image data entry with the goal of transforming visual data into an organized digital format. It includes activities like scanning hard copy documents or photos, utilizing necessary technology to extract text and numerical data, manually entering data into digital databases or spreadsheets, checking the accuracy of the data, performing quality checks, and arranging the digitized data for convenient access and analysis. Nevertheless, the manual data entry processes are often prone to errors and blunders with taking a lot of time and resources. Microsoft Azure Computer Vision Service, a cognitive service, automatically analyzes images and provides comprehensive information about them using its pre-trained computer vision abilities. It helps create models that, once photographs are analyzed, can immediately deliver relevant information. With the integration of Microsoft Azure Computer Vision in image-based data entry, users can extract data from scanned documents, photos and images; you will not require any human intervention. Also, you will have highly accurate and fast results with the help of an advanced image data entry. To facilitate your image-based data entry tasks via Microsoft Azure Computer Vision, here is a step-by-step process.
Step 1: Setting Up Microsoft Azure’s Computer Vision
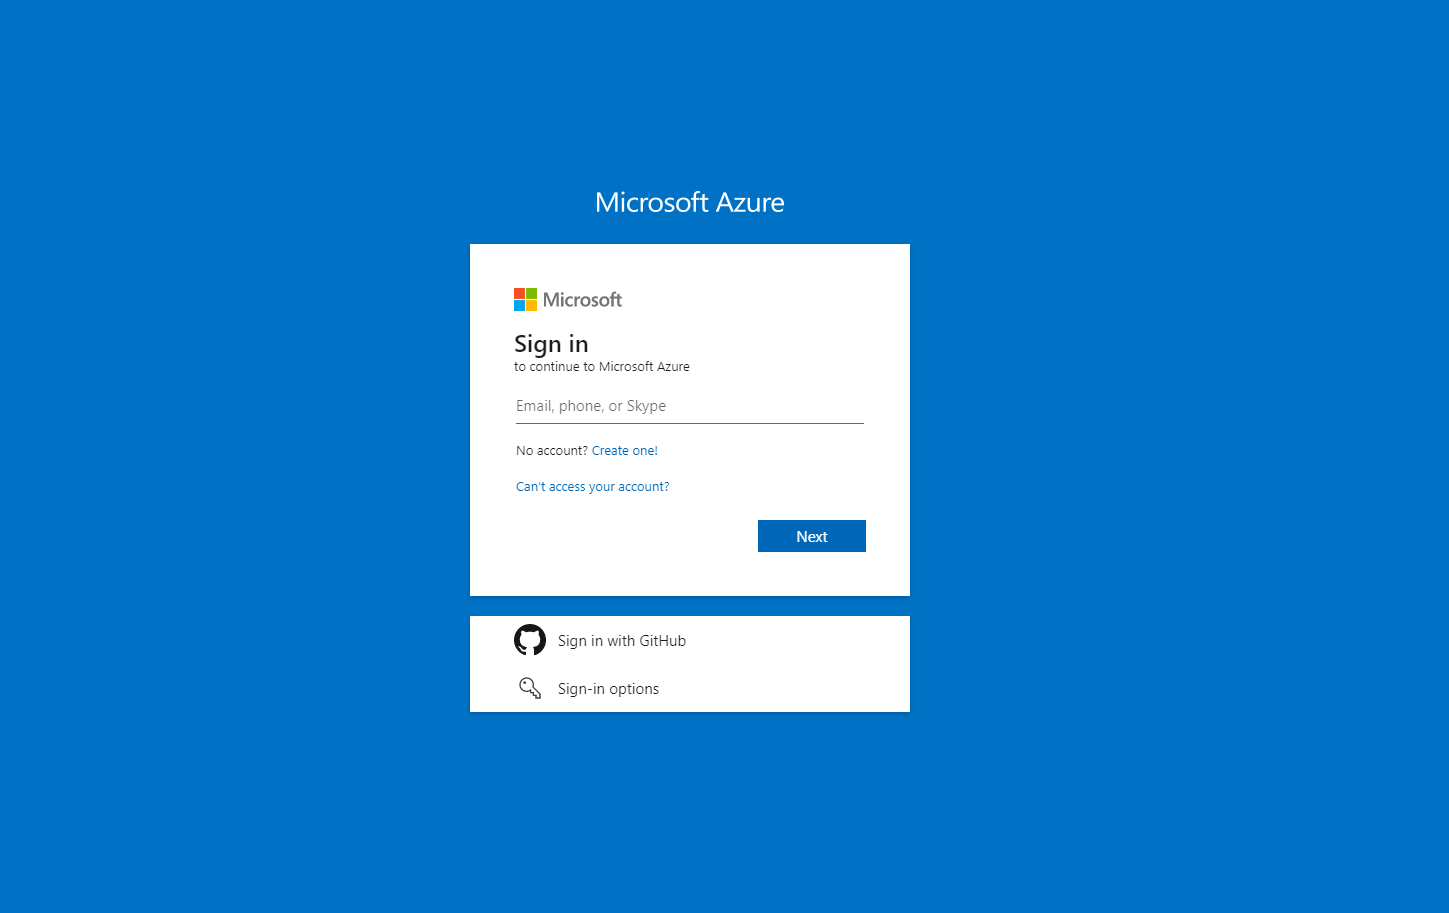
The first phase in utilizing Microsoft Azure’s Computer Vision for image-based data entry is to create and configure the vital resource within the Azure portal. Log in to the Azure Portal using your credentials.
Within the search bar, type Computer Vision and click on Create to start the setup process. Select your subscription, make or choose a resource group, and assign a distinctive title to your asset. At that point, select the suitable region closest to your user base for exemplar execution.
Beneath the pricing tier, the free tier F0 could be appropriate for small-scale testing, while for production, the standard tier S1 is stronger.
After the resource is deployed, head to the resource overview, where you will find the endpoint URL and one or two subscription keys. These credentials are fundamental for verifying API requests.
It is suggested to store them safely in a configuration file or a secrets management service. Presently, you can also install the fundamental SDKs or prepare your development environment utilizing Python, C#, or REST API, depending on your project. Once the Computer Vision resource is dynamic and your keys are prepared, you can now start processing images through Azure’s AI abilities.
Step 2: Accessing The Images You Need To Process
This step includes obtaining the images you need to process for data entry. These images can arrive from different sources, including scanned documents, photographs taken via portable gadgets, screenshots, or stored images in cloud storage. You must ensure the quality and clarity of the image. Be sure that the image has great lighting, minimal noise, and legible text. Blurry or low-resolution images can induce erroneous text extraction.
In case you have employed a camera or scanner, set up the settings to capture photographs in high-resolution and consistent formats such as JPEG or PNG. Be sure that the text on forms or documents isn’t skewed or distorted. Moreover, for automation pursuits, images can also be shot in real-time from applications or gadgets and sent specifically to Azure for processing.
Once you are done with capturing the image, you need to either transfer it to Azure Blob Storage or send it directly to the API as a binary stream or through a publicly accessible image URL. Azure’s Read API can support both strategies. Confirm that the image is available and properly formatted before triggering the API call.
Appropriate image handling at this phase develops the foundation for precise data recognition in future steps, minimizing mistakes and enhancing the proficiency of your data entry pipeline.
Step 3: Sending The Image To Azure’s Read API
After the image is ready, the following step involves sending it to Azure’s Read API, which conducts optical character recognition (OCR). That API is planned to extract printed and handwritten content from pictures and documents with high precision. To utilize it, you need to create a verified HTTP POST request to the Read API endpoint, using your subscription key and the image input as a URL or binary stream.
Once done with the request submission, the API responds with a 202 Accepted status and a special URL within the Operation-Location header. That URL is utilized to check the status of the OCR process. You must at that point poll that URL with a GET request till the status changes from running to succeeded.
After the operation is done, the ultimate response will incorporate a structured JSON result comprising the recognized text, besides data about the bounding boxes and text orientation. That output permits you to see precisely what text was detected and where it appears within the image.
Utilizing the Read API makes sure that even complex or handwritten documents can be processed reliably, shaping the essence of your image-based data entry workflow.
Step 4: Extracting The Relevant Text Data
Once you have got the JSON response from the Read API, head to extract the pertinent text data for processing. The response includes a structured hierarchy like pages, lines, and words, each with related coordinates and confidence scores. Begin by iterating through the response to gather the lines or words that are significant to your data entry requirements.
You’ll decide between extracting entire lines or individual words, per how the data is structured in your image. For instance, a form with labelled fields might require isolating text near particular labels, whereas a printed table might require row-by-row extraction. Text parsing can include string manipulation, regular expressions, or NLP methods to tend and format the output for downstream processing.
It is also vital to handle problems such as duplicate lines, undue whitespace, and broken words. In some cases, you will have to apply logic to combine content blocks or relate values with complementary field names.
On parsing the OCR output successfully, you convert raw text into structured data that reflects the format of the initial document. This phase step bridges the divide between unstructured image data and functional, machine-readable data for entry into databases or applications.
Step 5: Mapping The Extracted Text Data
The first step is about mapping extracted text data to predefined data entry fields. It includes adapting the recognized text with particular categories or labels utilized in your database or form structure, like Name, Date of Birth, Invoice Number, or Amount. The objective is to harmonize each piece of text with its corresponding field precisely.
There are a few procedures for mapping. In case the source documents follow a reliable format, you can utilize positional mapping according to the coordinates of the text blocks. For instance, if the Invoice Number always appears within the top-right corner, you can utilize bounding box data to find and assign that value.
On the other hand, keyword-based mapping is valuable when field labels show up near the values. You can look for labels such as Total or Phone and assign the following content to the suitable field. That strategy works well for semi-structured or printed forms.
Similarly, advanced contexts, machine learning models or rule-based logic can be utilized to infer field mappings in a dynamic way. The main element here is precision since the precise mapping guarantees that the data section system populates the proper fields, diminishing errors and making the output valuable for reporting, analytics, or further automation.
Step 6: Storing Or Utilizing The Mapped Data
The ultimate step is to store the mapped information in your target framework or utilize it for advanced processing. It all relies on the use case, which may include inserting the extracted values into a database, populating a form, activating a workflow, or coalescing with an ERP, CRM, or document management system. The objective is to form the data actionable and available where it is required.
Make sure the conformity of the structure with your extracted fields if you are using a database. To input information safely, you need to employ parameterized queries or ORM tools.
It is often seen that in automated workflows, data is prone to trigger some additional actions like approving entries, creating reports, sending emails and more. Also, you will have to log each operation and address exceptions like missing or wrong-format data.
Conclusion
To conclude, the use of images for data input enhances accuracy. We can observe that collecting information from photos improves the accuracy of the data. When making decisions, such accurate data is crucial. Moreover, modern tools like Microsoft Azure Computer Vision help reduce the amount of time spent on manual data entry chores by automating the process of obtaining useful information from photographs. It lowers the possibility of human mistakes while simultaneously speeding up data processing. Faster decision-making is also made possible by the smooth data retrieval and analysis through the digital transformation of image data. Eventually, automated image data input using Microsoft Azure Computer Vision is not just about ease but is a strategic decision that ultimately saves time and money, making it essential for progressive organizations.
