
How To Implement Automated Data Entry Using IFTTT
Staffers frequently have to enter data by hand, which leads to longer workdays. By gathering data automatically, data entry automation can eliminate their tedious jobs and increase output. Innovative solutions like IFTTT can productively automate data entry and accelerate productivity while saving cost and time. IFTTT provides millions of automation, or Applets, neatly wrapped in a bow for easy use even if users don’t know how to code. With the help of the comprehensive automation platform IFTTT or If This Then That, users can develop unique workflows across different applications and devices. It makes linking several services easier and allows them to function as a single unit. The employment of IFTTT offers a flexible and intuitive platform for task automation, service integration, and productivity enhancement. It could aid in accomplishing more with less work, regardless of whether for a tech enthusiast or a busy professional. Here are some practical guidelines to help you in automated data entry with IFTTT.
Step 1: The Identification Of Data Source

First of all, you have to identify the data source, which could be any digital stage or service from where the information emerges. The common considerations include web forms, emails, social media posts or even LOT gadgets.
To elaborate, let’s consider an example in which we suppose you want to extract data from incoming mail; your source can be Gmail or Outlook. Google Forms or Typeform can be the source if the information comes from an online survey. Additionally, if you’re following social media mentions, Twitter or Instagram may be the information source. Determining the correct service guarantees harmony with IFTTT and empowers consistent integration.
Also, look into the data format. A few sources give structured information, such as spreadsheet rows, whereas others require extraction, like pulling particular details from an e-mail. Comprehending these viewpoints will help in designing a successful workflow.
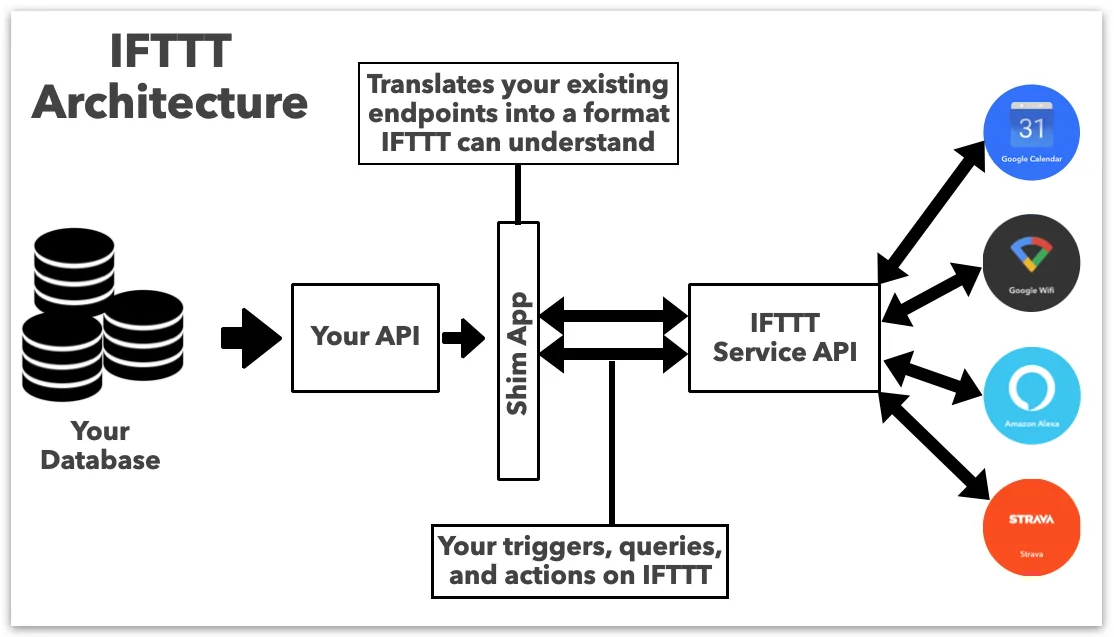
After you’ve pinpointed the data source, be sure that IFTTT supports it as a trigger. In case not, you will need to utilize webhooks or an intermediary tool such as Zapier for advanced customization.
Step 2: Choosing A Trigger Service In IFTTT
Picking a trigger service will offer a stage or application to identify new information and commence the automation procedure. IFTTT presents many trigger services, such as Gmail, Google Forms, Twitter, Slack, and RSS feeds. The selection of service depends on where the information originates.
For instance, if emails are your source, Gmail can serve as the trigger service. Similarly, if you’re collecting responses from an online form, Google Forms can act as the trigger. In cases where the data comes from social media, platforms such as Twitter or Instagram can be utilized to screen particular keywords, hashtags, and mentions.
As you select a trigger service, defining the precise condition that will initiate the automation is critical. That can be getting an e-mail with a particular subject line, a new form submission, or a social media post corresponding to specific benchmarks. A few services permit filtering alternatives to polish when the trigger ought to activate, guaranteeing that only pertinent information is grabbed.
Step 3: Defining The Specific Condition

Now, you will be defining the specific condition that will start the automation. The trigger condition is the event that points to IFTTT to commence the data entry process. It guarantees that only pertinent information is processed, anticipating pointless or inaccurate entries.
For instance, if your trigger service is Gmail, you’ll specify a condition to activate automation when an e-mail comes from a particular sender or includes certain keywords within the subject line. If you are utilizing Google Forms, the trigger condition can be the submission of a new response. So also, for social media automation, the trigger might be when a particular hashtag is mentioned in a tweet or post.
Numerous services in IFTTT permit additional filtering alternatives to fine-tune the trigger further. For example, in RSS feeds, you’ll be able to compose the automation to activate only when a post includes specific words. It helps eliminate insignificant data and keeps the process proficient.
After the trigger condition is appropriately assigned, IFTTT will scrutinize the chosen service and wait for the required event to happen. After the condition is satisfied, the automation continues to the next step, which is to transfer the information to the intended platform.
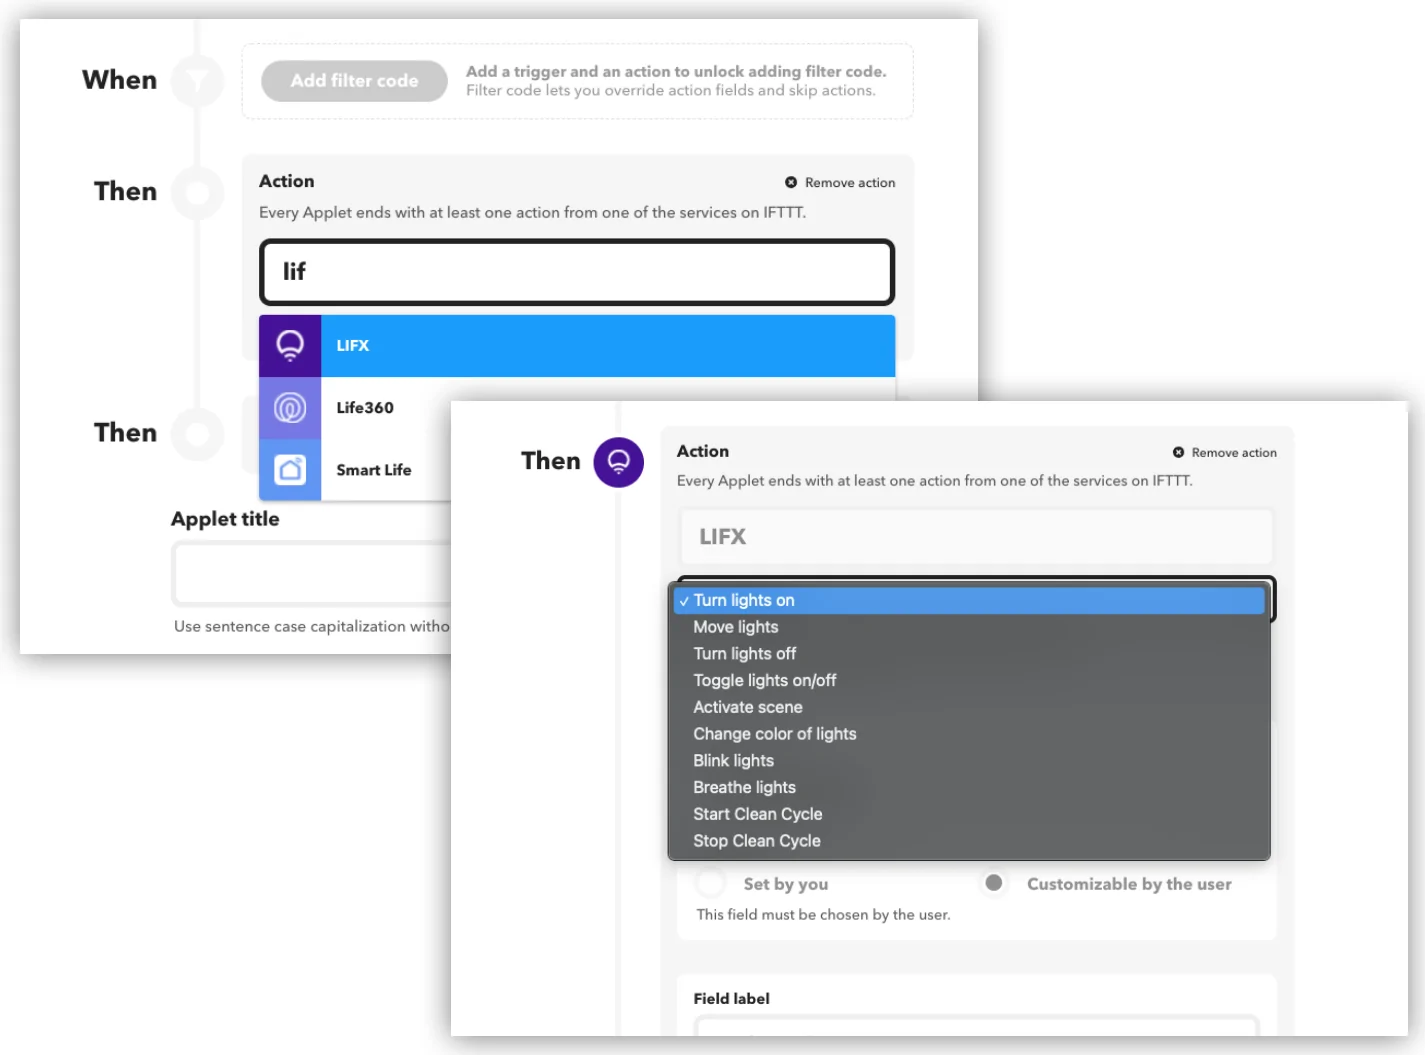
Step 4: Picking An Action Service
After the trigger condition is established, the fourth step is to select an action service where the extracted information will be stored or handled. The action service is the platform that obtains and records the information once the trigger event happens. IFTTT supports diverse action services, such as Google Sheets, Airtable, Trello, Slack, and databases like Notion.
In case you need to log e-mail details in a spreadsheet, Google Sheets could be the action service, on which each new row speaks to a new information entry. If you’re collecting social media notices, you might select Trello or Notion to arrange the data into lists or cards. In case of notifications, Slack or email alerts can be utilized.
The choice of the action service depends on how you utilize the data. In case further processing or examination is required, structured storage such as Google Sheets or Airtable is ideal. In case the data is for following or alerts, a task management tool or messaging app could be a more appropriate option.
After the action service is selected, you’ll configure how data will be organized and stored within the following step, which is to map the data fields for precise passing on.
Step 5: Mapping The Data Fields
Data fields mapping finds out the way the extracted data from the trigger service will be organized and input into the destination stage. Appropriate field mapping is vital to keeping up consistency and convenience.
Suppose that the trigger is an e-mail and the action service is Google Sheets; you must choose which e-mail components, like the sender, subject, timestamp, and body, should be recorded and in which columns. Additionally, if you are logging social media mentions in Airtable, you will outline areas for the username, post content, and date.
IFTTT offers predefined data fields according to the trigger service. You’ll be able to select the pertinent fields and indicate where they ought to be set within the action service. A few services also permit minor alterations, including the inclusion of static content, timestamps, or formatting adjustments.
Appropriate field mapping guarantees that automation advances are made smoothly without data irregularities.
Step 6: Testing And Deploying The Automation
Finally, it’s time to run the data automation process with IFTTT to test and deploy the automation. It is essential to be sure about the performance of the trigger action as well as data mapping per your anticipations.
Proceed with the manual triggering of automation. Let’s assume an instance of triggering a new e-mail with a particular subject line: you will send a test mail to see if the data is perfectly captured within the action service, such as Google Sheets. In case employing a form, submit a sample response and observe whether it shows up within the destination platform as expected.
As testing goes on, look for issues such as missing or inaccurately organized data, duplicate inputs, or delays in undertaking. Modify the trigger conditions, field mappings, or filters to polish the method as required. A few services include execution logs that can offer assistance in interpreting issues.
After a successful test, you will activate the automation for persistent operation. Screen the workflow periodically to make sure that it remains dependable, particularly in case the data source changes or if IFTTT introduces updates.
After the automation is thoroughly deployed, your data entry process will be streamlined, minimizing manual work and improving proficiency.
Conclusion
In summary, the use of tools like IFTTT to automate data frees up time for more valuable, strategic tasks. This idea is revolutionizing how organizations run, from handling consumer data to automating communications. Time savings isn’t the only goal; consistency and mistake reduction are equally important. The goal of automating data input is to streamline and increase the effectiveness of your data management procedures, not only to put technology into place, and this tool effectively serves this purpose. IFTTT provides a flexible solution for both personal and business usage, whether it’s monitoring emails, sending notifications, or managing social media.
