How To Create Low Poly Art Images
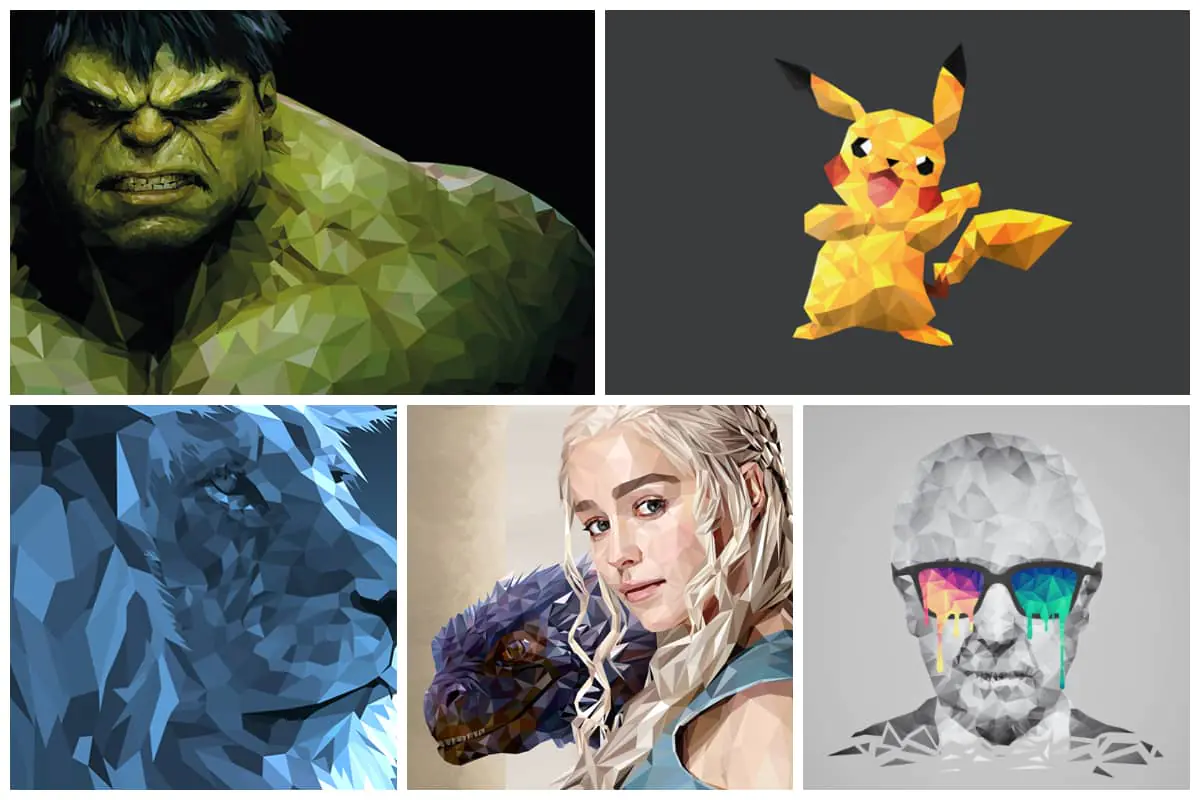
Low poly art’s geometrical minimalism lets images be reduced in detail, challenging conventional art concepts while allowing spectators to take an interest in the collaborative event. Low-poly images feature geometric shapes, often triangles, squares, and polygons, baroquely arranged to produce intricate patterns. This symmetrical composition cultivates order and balance, drawing the viewer’s eye into the image. The art achieves a delicate balance between abstraction and representation, with individual polygons merging to form recognizable subjects. The bold use of color palettes enhances the visual impact, while shading creates an illusion of depth and dimensionality. Engaging textures within the polygons add an extra layer of visual interest. Low poly art represents reality in a simplified and elegant manner, allowing room for interpretation. The art also invites viewers to engage in visual puzzles as they connect dots between polygons to reconstruct the complete image. This modern fusion of traditional artistic techniques with digital tools resonates with traditional and contemporary sensibilities.
Step 1: Selecting Everyday Images for Low Poly Art
The first step in creating captivating low poly art from everyday images is selecting suitable photographs. Choose images that resonate with you and hold personal significance, as this will infuse your artwork with a sense of authenticity. These images could range from landscapes and objects to portraits and scenes that evoke emotion.
Consider the composition and visual elements of the chosen images. Look for subjects with distinct shapes and features that can be effectively transformed into geometric forms. Keep in mind that the success of your low poly art hinges on the initial image selection. Aim for a balance between simplicity and complexity, ensuring that the chosen subject can be broken down into recognizable geometric components.
Step 2: Analyzing and Deconstructing the Image
After selecting your everyday image, the next step in crafting compelling low poly art is to analyze and deconstruct the image’s visual elements. Take time to closely examine the photograph and identify prominent shapes, lines, and features that stand out. This analytical process is crucial for effectively translating the image into the low poly style.
As you identify these elements, envision how they can be represented using basic geometric shapes such as triangles, rectangles, and polygons. Break down the image into its fundamental building blocks, considering how each element contributes to the composition. This process requires both creative intuition and a keen eye for detail.
By deconstructing the image into its essential geometric components, you’re setting the stage for transforming from a conventional photograph to a dynamic low poly artwork.
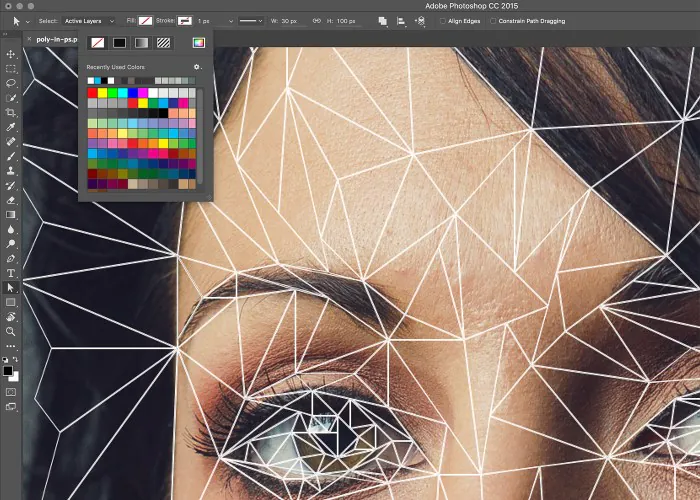
Step 3: Choosing Software and Importing the Image
With your everyday image deconstructed into its fundamental shapes, the next practical step in creating low poly art involves selecting appropriate graphic design software and importing your chosen image.
Opt for software that supports vector graphics and offers tools for creating and manipulating geometric shapes. Adobe Illustrator, Photoshop, or dedicated low-poly software are excellent choices for this process.
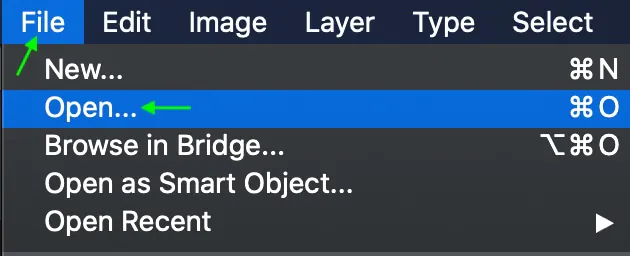
Once you have chosen your software, import your selected image into the workspace. Depending on the software, you can usually achieve this by selecting “File” > “Open” and navigating to the location of your image file.
Position the imported image within your workspace, ensuring it is large enough to work on comfortably while allowing room for the upcoming polygon placement and color application stages.
Step 4: Creating Basic Geometric Shapes
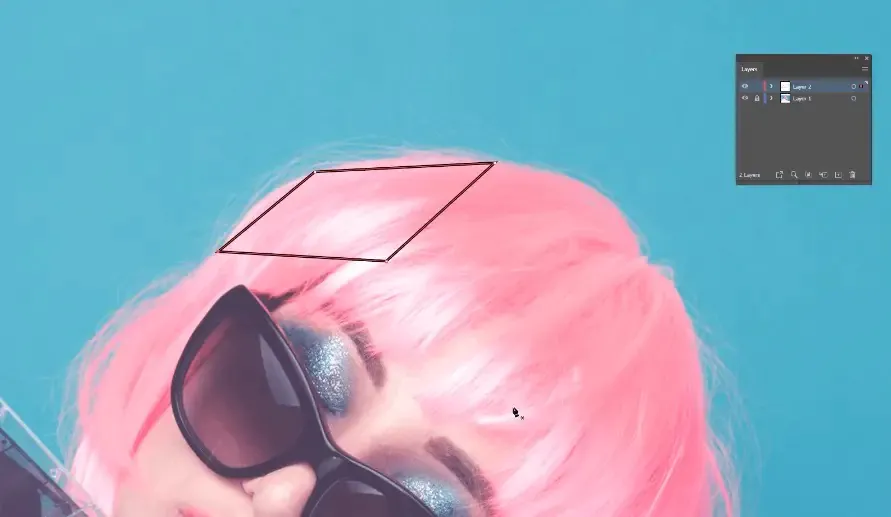
After importing your chosen image into the graphic design software, the next practical step in crafting your low poly art is to start creating the basic geometric shapes that will form the foundation of your artwork.
Using the shape tools available in your chosen software, such as the pen or shape tools, begin tracing and drawing the simplified geometric forms corresponding to the prominent elements you identified during the image analysis. In later steps, these shapes will be placeholders for the more intricate polygon placement.
As you create these basic shapes, focus on maintaining the proportions and relationships between them, ensuring they accurately represent the simplified version of the image’s features. This phase requires a balance of precision and creativity as you translate the visual elements into a language of shapes.
Remember that these basic shapes will provide the framework upon which your low poly art will be built. Take your time to ensure their accuracy and alignment, as they will guide the subsequent steps of polygon placement and color application, transforming your concept into a visually engaging piece of low poly artwork.
Step 5: Placing and Manipulating Polygons
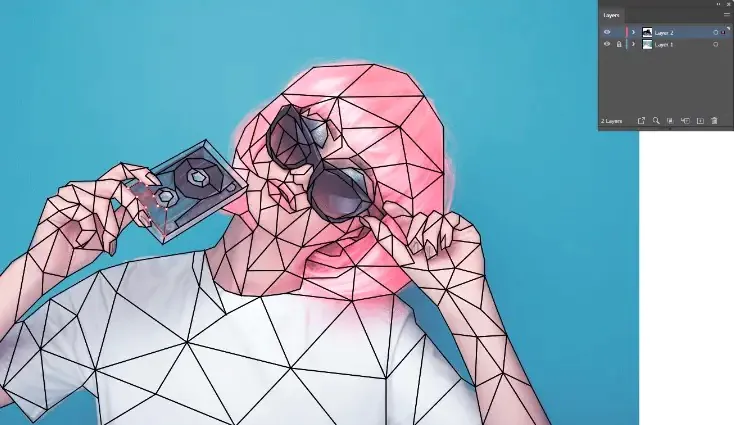
With the foundation of basic geometric shapes, the next practical step in creating your low poly art is to begin placing and manipulating polygons over these shapes.
Using the polygon or shape tools in your graphic design software, start creating polygons that fit within the boundaries of the basic shapes you’ve drawn. Begin by placing larger polygons over the less detailed areas of your image and smaller polygons over more intricate sections.
Pay attention to the distribution of polygons and their sizes. The goal is to balance simplicity and complexity while accurately representing the visual elements of the original image.
Experiment with the arrangement of polygons to create a sense of movement, depth, and composition. You can rotate, scale, and adjust polygons to achieve the desired visual effect. This phase allows you to infuse your low poly art with a unique artistic perspective.
Step 6: Applying Color and Depth
Once you have strategically placed and manipulated polygons to shape your low poly artwork, the next practical step involves applying colors and depth to bring your creation to life.
Select a color palette that resonates with the mood and theme of your image. Low poly art often employs vibrant and contrasting colors to enhance visual impact. Choose colors that harmonize with each other and complement the overall composition.
Begin by assigning colors to the polygons you’ve placed. Use lighter shades for areas that appear closer to the viewer and darker shades for areas that should recede into the background. This technique adds elegance and profoundness to your artwork, creating a three-dimensional illusion within the two-dimensional space.
Experiment with gradients and shading to emphasize depth further and enhance the realism of your low poly art. Consider the play of light and shadow on the geometric surfaces, adjusting colors to capture these nuances.
By applying color and depth, you transform your previously monochromatic arrangement of polygons into a visually captivating artwork that engages the viewer’s senses. This step marks a pivotal transition from the technical aspects of creation to the aesthetic choices that define the final look of your low poly masterpiece.
Step 7: Refining and Fine-Tuning
After applying colors and depth to your low poly artwork, the next practical step involves refining and fine-tuning the details to create a polished and cohesive composition.
Carefully review your artwork and assess the placement of polygons, the distribution of colors, and the overall balance. Make any necessary adjustments to ensure the image remains recognizable and visually pleasing.
Zoom in on your artwork to examine it closely. Refine the edges of polygons, ensuring they align neatly and contribute to a clean overall appearance. Pay attention to any areas that might need extra attention, such as transitions between colors or the arrangement of smaller details.
Experiment with different color variations and shading options to find the most effective combination that enhances the visual impact of your artwork. Make subtle tweaks to achieve the desired level of realism and depth.
This phase is an opportunity to add your personal touch to the artwork, refining it to match your creative vision. Investing time in this step ensures that your low poly art reaches its full potential, captivating viewers with its intricacies and attention to detail. Once you’re satisfied with the refinement process, your low poly artwork will be ready to be shared and appreciated by others.
Step 8: Exporting and Sharing Your Low Poly Art
As you complete the refinement phase of your low poly artwork, the final practical step involves exporting your creation from graphic design software and sharing it with the world.
Choose a suitable file format for exporting, such as PNG or JPEG, to ensure your artwork retains its quality and colors when viewed on various devices. Consider adjusting the resolution to match the intended use, whether it’s for online sharing, printing, or other purposes.
Before exporting, take a moment to review your artwork one last time to ensure that all details are in place and that you’re satisfied with the final result.
Once exported, you can showcase your low poly art on various platforms. You can show it on your blog, social media accounts, online galleries, or even print it to display in physical spaces. Be sure to include a description highlighting your creative process, the inspiration behind the artwork, and any insights you gained during the creation journey.
Conclusion
To sum up, low poly art sharpens the features of the subject and gives the images a composed and sharply defined demeanor. This shaping aesthetic accentuates shape contours, particularly in the context of portraits destined for low poly conversion. The resultant geometric forms gracefully fill the subject, akin to a sketch meticulously filled with a palette of colors. The calculated reduction of detail in low poly art paradoxically leads to a more elegant and engaging representation. Through the tectonic placement of polygons, the artwork takes on a puzzle-like quality that invites observers to indulge in assimilating the photograph.
