How To Create Arabesque Art Images
Arabesque art is an artistic expression related to design and decor. It is built on an elaborate and detailed geometric, linear, and repeating pattern with displays of plants, flowers, and occasionally animals or geometric objects. Traditionally, arabesque patterns feature floral or plant motifs with geometric shapes laid out and interwoven in a repeated pattern rather than representations of human or animal forms. An arabesque composition’s essential components are the perpetual spiral, symmetry and structure, and rhythm and balance. These elements are conveyed by complex curves, shapes, and lines that mimic continuous geometric patterns, organic features like plant leaves or flowers, or a combination of the two. Arabesque art is used in vast industries, such as furniture, metalwork, illuminated manuscript ornamentation, walls, and ceramics, where the intricate and repeating patterns accentuate a sense of stir and vitality. Creating digital Arabesques becomes a persuasive move before driving toward their application on the materials. This blog will represent the steps to create intricate and fascinating Arabesque patterns that can be used for different purposes.
Step 1: Exploring Arabesque Themes
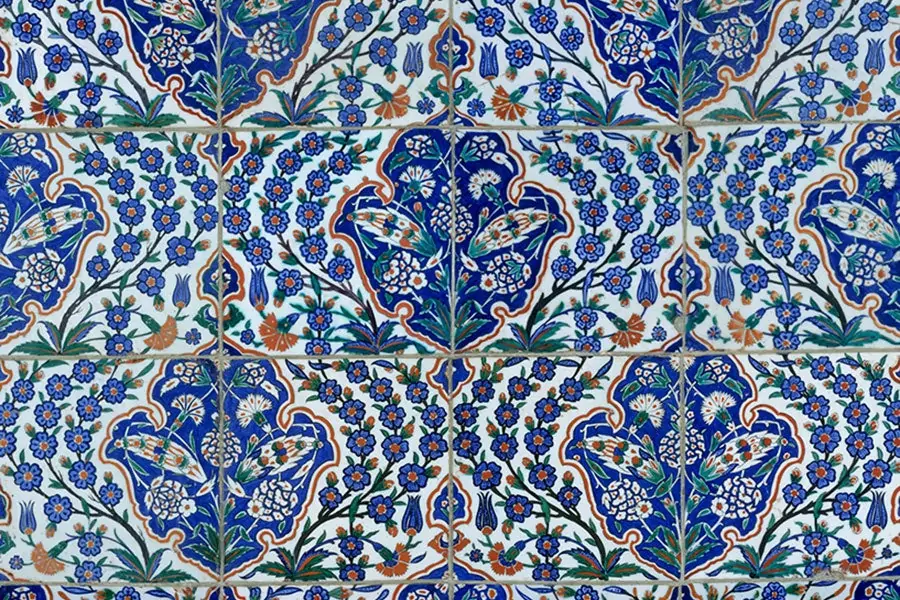
Investigate the history and social significance of arabesque plans in Islamic art.
Concentrate on conventional themes, like floral designs, geometric forms, and calligraphic components.
Collect a variety of arabesque plans from books, online displays, and galleries.
Search for high-resolution pictures that grandstand the attributes and complexities of the patterns.
Look at the standard components utilized in arabesque designs, like symmetry, recurrence, and intertwining.
Look how various shapes and themes are conjoined to form a concordant and flowing design.
Attend to the complex highlights that characterize arabesque art, like smoothness, symmetry, and multifaceted nature.
Get the significance of negative space in improving the visual captivation of the designs.
Organize your gathered reference images and notes into an inspiration board.
Utilize this board as a visual directory to illuminate your design process and guarantee consistency in fashion and theme.
Step 2: Making Primary Layout
Gather fundamental drawing tools, like pencils, erasers, rulers, and sketch paper, or you can also create a sketch using digital tools. Consider utilizing grid paper or a grid system in case of digital outlining to sustain symmetry and alignment in your outlines.
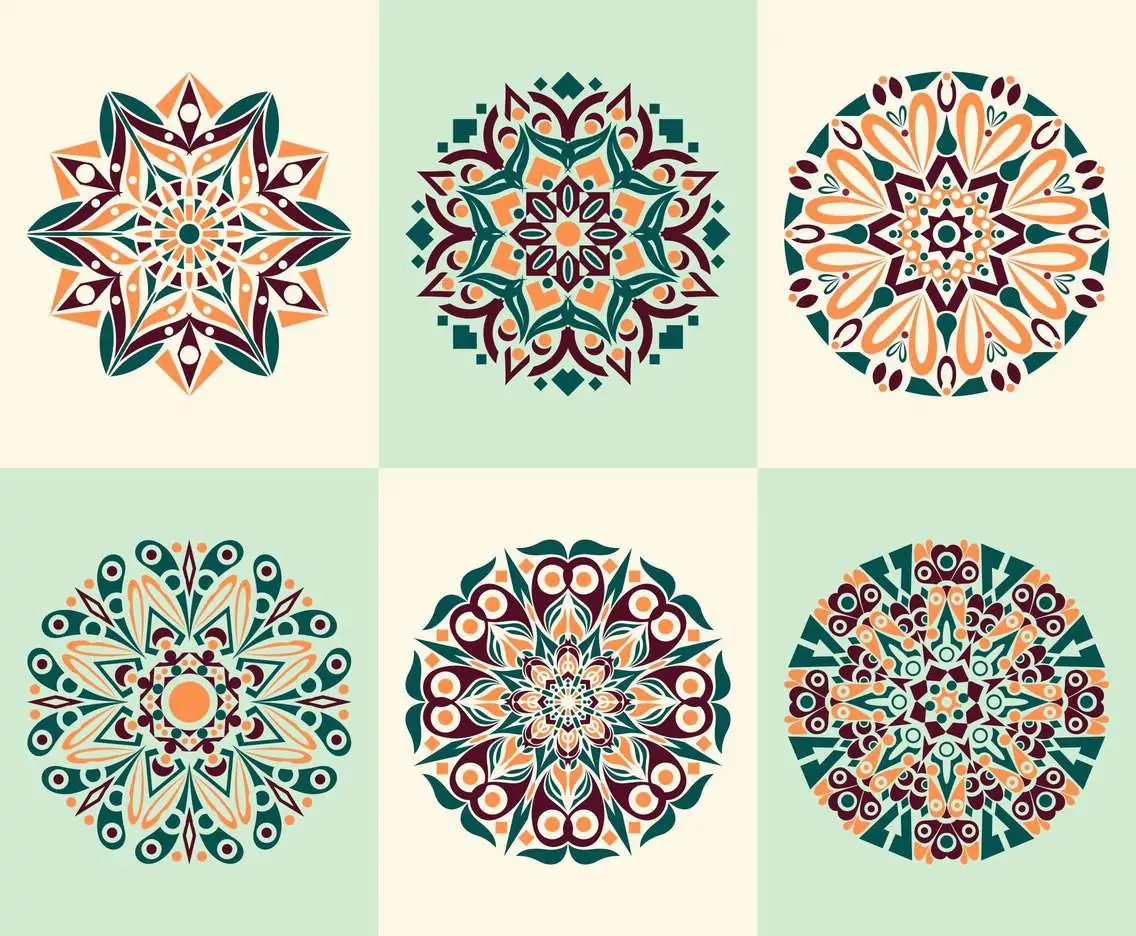
Begin by sketching basic geometric figures like circles, triangles, and squares.
Utilize these essential shapes as constituents for more complex themes.
Blend and adjust fundamental shapes to create stylized themes, like leaves, vines, and blossoms.
Concentrate on fluid lines and exquisite bends to recall the characteristic fashion of arabesque plans.
Organize your themes in different configurations, investigating different designs and interlacing strategies.
Experiment with consonance and reduplication to form balanced and agreeable designs.
Reconsider your starting sketches, denoting regions for change and modification.
Enhance details and alter proportions to attain a cohesive and complicated design.
Create different forms of your themes and compositions to explore distinctive plans and credible outcomes.
Test with diverse levels of elaborateness and complexity.
Assess your sketches, picking the most favourable and outwardly attractive plans.
Utilize these polished sketches as the establishment for your computerized arabesque designs.
Step 3: Deciding The Software
Inquire about well-known vector illustration programs like Adobe Illustrator, CorelDRAW, or Inkscape.
Also, take note of tools like Affinity Designer, Sketch, and Gravit Designer for particular highlights or budget priorities.
Seek for characteristics fundamental to making Arabic designs, counting precise drawing tools, grid frameworks, and design creation credentials.
Inspect for avant choices like symmetry tools, pathfinder operations, and layering stuff.
Evaluate the user interface and ease of operation for each program.
Go for instructional exercises, documentation, and community back that can assist you in learning the program viably.
Make sure that the chosen software is compatible with your PC.
Confirm that it keeps the file formats you would like for exporting your conclusive layouts, such as SVG, PNG, or PDF.
Compare the costs of distinctive software alternatives, gauging one-time buys, memberships, or free options.
Select the program that best meets your prerequisites for highlights, ease of utilization, compatibility, and expense.
Download the chosen program and get acquainted with its interface and features.
Step 4: New Document Settings
Initiate the chosen vector illustrations software and create a new document.
Designate the canvas size according to your design prerequisites.
Boost the grid and snap-to-grid features to assist with exact placement and arrangement.
Alter the grid spacing to correspond to the scale of your plan.
Utilize shape tools to make circles, squares, triangles, and other geometric shapes.
Press down the Shift key to make ideal forms if needed.
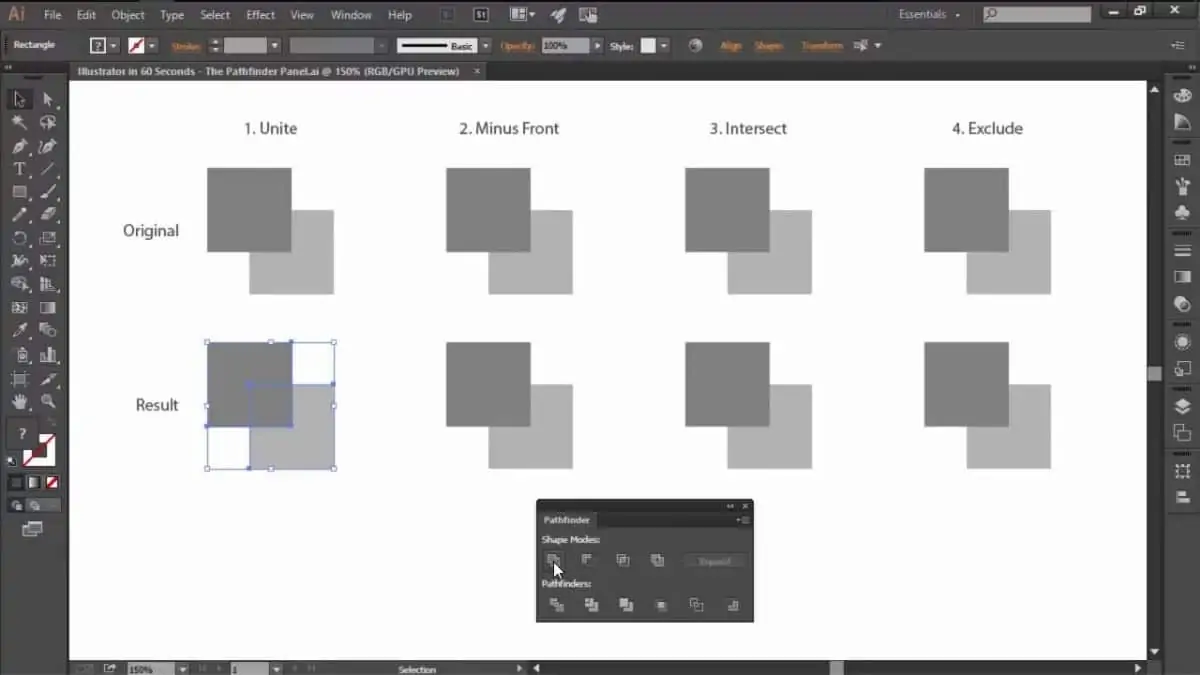
Utilize the pathfinder or shape builder tools to integrate and bisect shapes, forming more complex compositions.
Play with unusual medleys to create interesting components.
Operate the symmetry tools to reflect and reproduce shapes, guaranteeing proportional and agreeable designs.
Turn and mirror shapes to reach different symmetrical designs.
Accommodate the stroke weight and manner to improve the visual enticement of your motifs.
Give thought to utilizing dashed lines, dotted lines, or variable widths for added interest.
Recast your fundamental shapes and motifs into reusable images or objects.
Systematize these images in a folder for simple get-to and ongoing utilization during your design.
Step 5: Arranging The Design
Select one of your made themes from the image library or design components.
Set it as the opening point of your design.
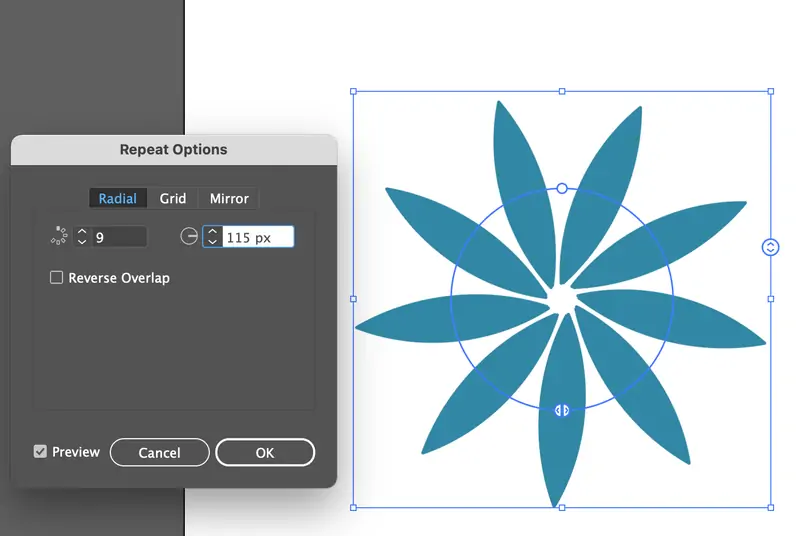
Utilize the duplication tools to form numerous duplicates of your theme.
Organize these duplicates in a grid or radial layout, depending on your pattern creation.
Access alignment options to guarantee motifs are equitably divided and appropriately aligned.
Spread motifs evenly to preserve consonance and proportion.
Join motifs with streaming lines, curves, or extra shapes to form a nonstop, intertwined arrangement.
Confirm that the ties are smooth and outwardly satisfying.
Add clipping masks to restrict your pattern inside a particular shape or boundary.
Alter the pattern to conform flawlessly inside the masked zone.
Test with various repeat types like grid, brick, or hexagonal to attain the specified look.
Experiment with the design by copying it over the canvas to check that it consistently repeats.
Elevate the sequence and connections of motifs. Include or dismiss components to improve the overall plan and guarantee a groomed, complicated pattern.
Step 6: Fine Tuning Patterns
![]()
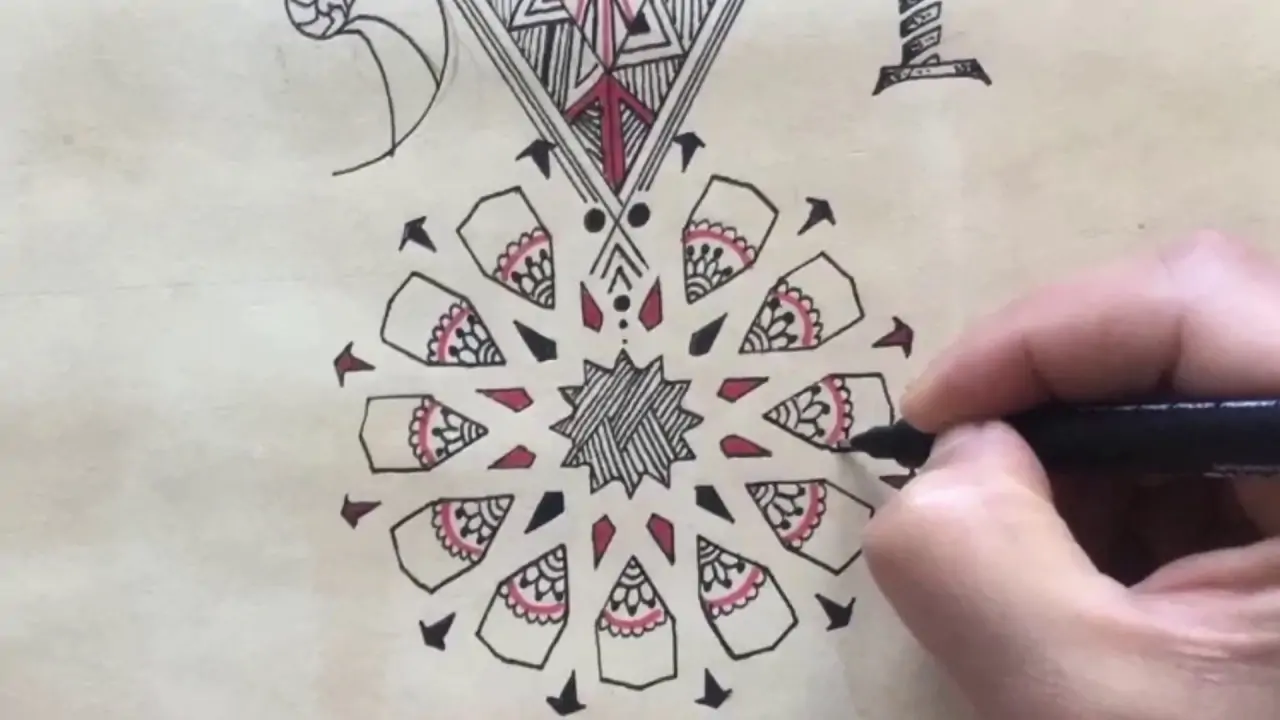
Audit the complete design plan and indicate zones that require refinement or improvement.
Use the zoom feature of your software to create individual motifs and include complex details such as fine lines, filigree, or surface.
Bear out that details harmonize the widespread design without overpowering it.
Polish the symmetry and proportion of the design by adapting motif arrangement and structure.
Utilize alignment alternatives to preserve consistency and agreement throughout the plan.
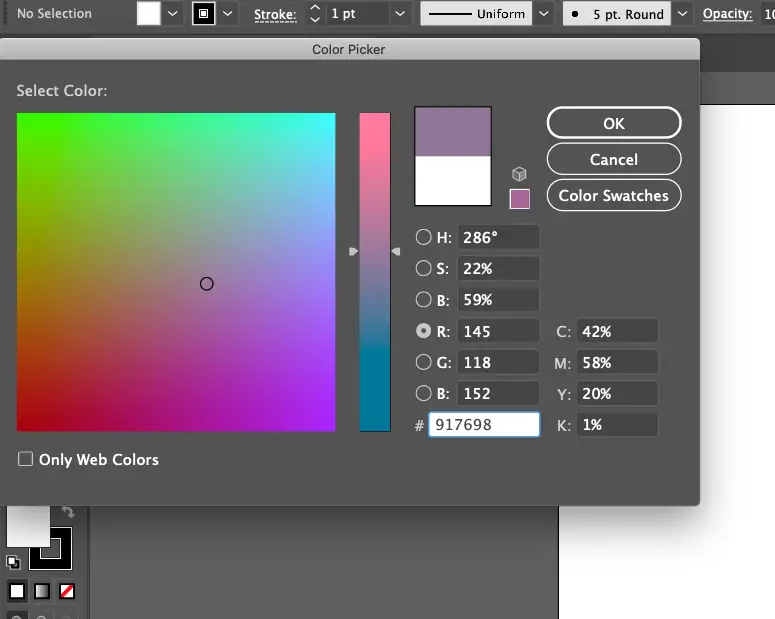
Fill colours in your pattern to uplift its visual development.
Try diverse colour plots, gradients, or shading actions to get the specified look.
Present depth to the design by altering line weights, including shadows, or applying transparency options.
Utilize gradients or patterns to make a feel of texture inside the design.
Guarantee that your design retains magnificence and detail at differing scales.
Assume how the pattern will look when scaled up or down to affirm its flexibility.
Step 7: Making Final Tweaks
Perform an intensive audit of the completed design plan, checking for any peculiarities, arrangement problems, or areas that need further alterations.
Make improvements in details, colours, and general composition as required.
Confirm that the design fulfils specialized necessities such as resolution or file format.
Alter settings for print or digital utilization, making sure that they are compatible with aiming applications.
Clear up your workspace by managing layers and gathering components.
Retitle your layers and objects for translucency and ease of route.
Save your final work within the native format of your design program.
Export the design within the needed file format that is valid for your project prerequisites.
Keep duplicates of your finalized plan in secure areas, including cloud storage or outside drives.
Guarantee you have backups to avoid the casualty of work and encourage future corrections as essential.
Conclusion:
The Arabesque art goes beyond the apparent embellishment or visual aesthetics. It defines the boundless essence of creativity and imagination through its continuously expanding patterns. Arabesque motifs address different aspects of spirituality, including faith, illumination and light, nature’s presence, modesty, and coherence of content. It represents a familiar sense and serves as a common language across all of the artists’ works. The trend towards Orientalism in design and the romantic revival architectural styles of the 19th century were two examples of how the style enlightened and impacted people throughout that time. Correspondingly, this art style inspires modern artists and architects to enrich their illustrations with harmony and continuity.
