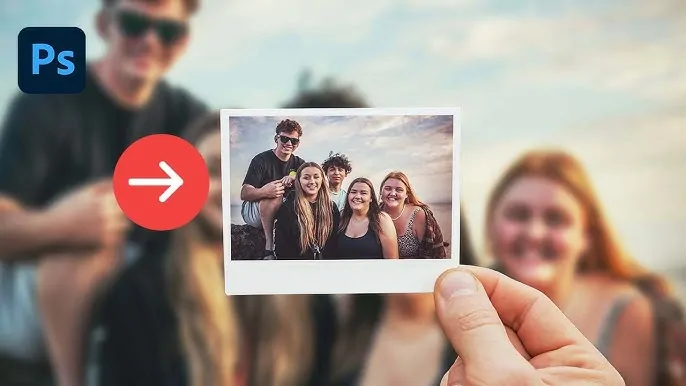
How To Create A Snapshot Effect
The snapshot effect refers to a visionary visual style that indicates an arbitrary or candid scene. It stimulates feelings of nostalgia and warmth with a glimpse of realism. To achieve a snapshot effect in the images, the common approaches are lighting modifications, the use of framing techniques, and the use of particular filters and effects offered by various image editing applications. Mimicking the way an actual snapshot looks, the image is turned into a mini shot or a freeze frame, which is further enhanced with elements such as timestamps, white borders and a subtle tilt. Furthermore, the image is blurred a little to further add to the impression of an authentic candid snapshot. The essence of this image enhancement approach is the sense of immediacy and aesthetic imperfection, which is the hallmark of real-life moments. The in-depth details of all the tools and techniques required for creating a snapshot effect will be further discussed in the following steps of this blog post.
Step 1: Preparing The Image

Begin by loading your original photograph in any photo editing program. That image acts as your base layer for the snapshot effect.
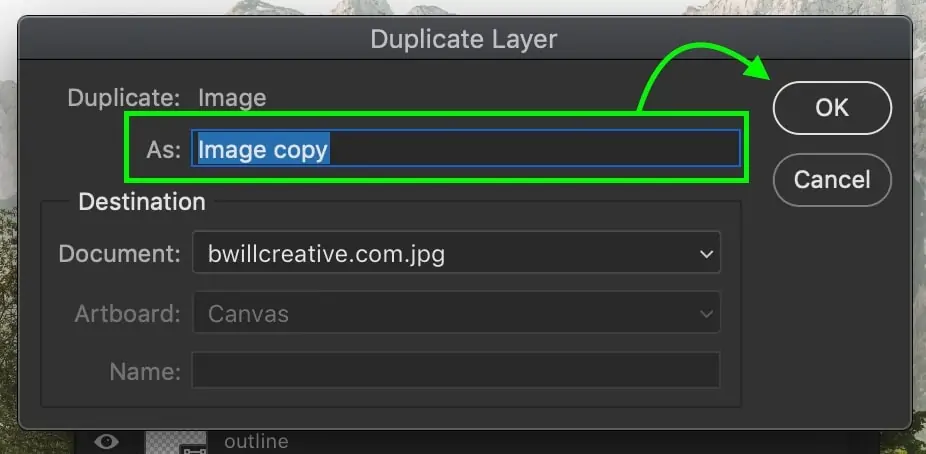
Create a duplicate of the initial photograph by duplicating the layer. It will guarantee that any modifications made do not influence the initial picture directly. If using Photoshop, you can do it by right-clicking the layer and choosing the Duplicate Layer option.
Give a new and descriptive title to the duplicate layer, like Snapshot Overlay, to keep your layers managed. It will help later when managing edits and effects.
Make sure that both the initial and the duplicate are visible. You will be editing the duplicate while utilizing the initial as a background.
Do not resize the duplicate at this point. You will be required to use the full-size version to crop the highlight within the following step without giving up resolution or clarity.
Lock the base layer to avoid accidental changes while working on the duplicate snapshot overlay.
Step 2: Cropping The Key Zone
Examine the duplicated picture and choose which part you need to highlight. That can be a person, object, or moment that represents the story or feeling of the image.
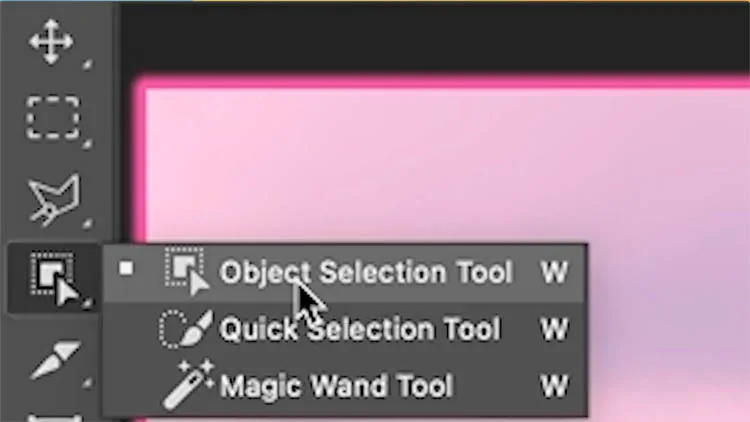
Specify the chosen range utilizing features like the Lasso Tool, Marquee Tool, or Object Selection Tool. The more precise your selection, the neater the snapshot effect will seem.
After selecting, you will crop the region from the duplicate layer. Prevent scaling or stretching during the crop to preserve natural proportions and sharpness.
If your cropped region looks too tight, spread the canvas slightly around it to offer it a little more breathing room. It will help when including borders or effects later.
Before you crop, make a duplicate to provide you with a retreat in case you need to alter the crop range afterwards without reprocessing everything.
Put the cropped range in its own partitioned layer. It will make it simpler to position, stylize, and layer it independently of the original and blurred foundation.
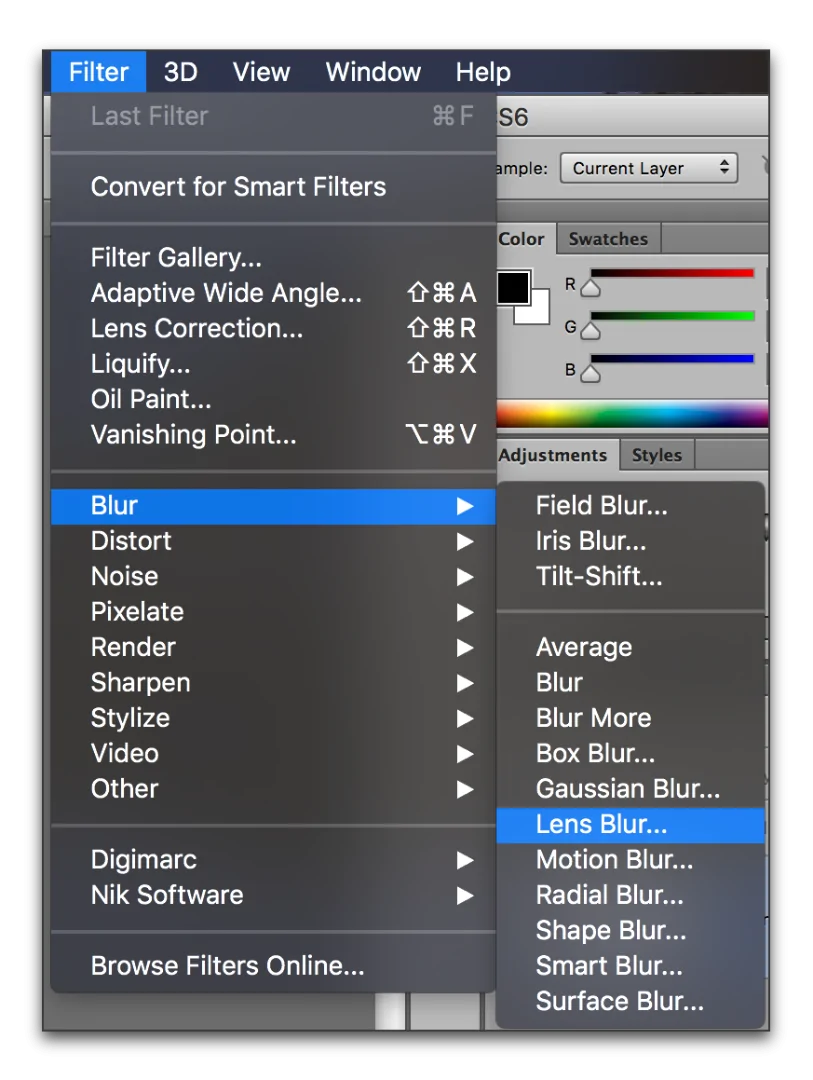
Step 3: Applying The Border Effect
Press on the cropped overlay layer pr the centred portion you extracted. Be sure that it is active before you apply any border effects.
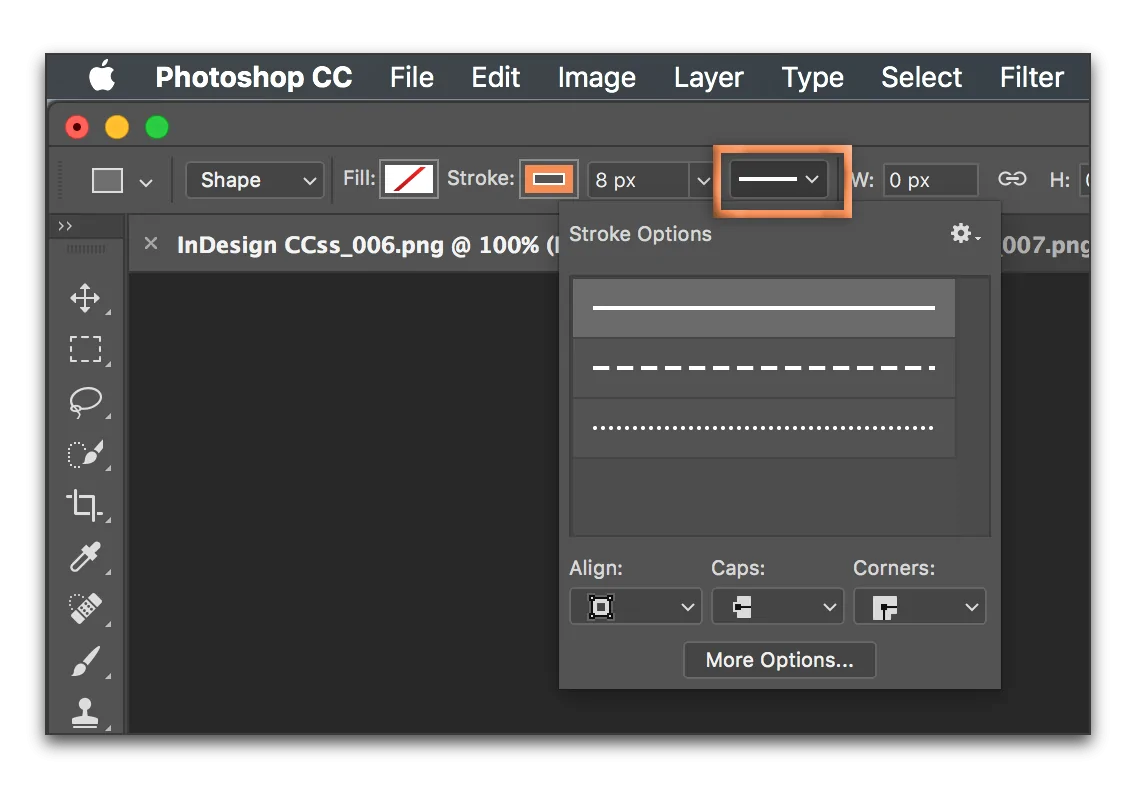
Utilize the Stroke or border tools, depending on your software, to apply a white or light-colored border around the cropped picture. It will frame it like a printed photograph or snapshot.
Put the stroke thickness to around 8 to 15 pixels, per your picture size. Select the Outside option as the stroke position to make the border clean and not cut into the photo.
If your software supports this setting, you can proceed with rounding the corners slightly to allow the overlay a milder, more Polaroid-style formation, which will include a wistful or aesthetic aspect.
Use a soft drop shadow to separate the border from the backdrop. Keep it light, as undue shadow can overwhelm the fineness of the effect.
Make sure that the border style conforms to the rest of the image’s style. Avoid excessively stylized or flashy impacts unless they accommodate your general theme.
Step 4: Repositioning The Overlay
Be sure that the cropped and bordered overlay is active. That is the version you will presently resize and put over the initial picture.
Decrease the size of the overlay while keeping up its aspect ratio. Press Shift and resize to avoid distortion. Opt for a size that stands out but does not cover too much of the foundation.
Typical positions for the overlay incorporate the bottom-right, top-left, or off-centre ranges of the base photograph. Choose a spot that upgrades the composition without distracting from it.
Do not put the overlay over critical parts of the initial picture. You need the viewer to catch the setting while centring on the highlighted portion.
Moderately rotate the overlay if you need a calm, candid feel. A minor tilt can reproduce a hand-placed snapshot appearance.
Ensure that the layout feels proportional. Utilize visual guides or the rule of thirds to position the overlay naturally inside the image’s general frame.
Step 5: Blurring The Background
Press on the initial picture layer. That will be the layer where the blur effect is connected.
Spread a Gaussian Blur or Lens Blur per the program you are utilizing. Gaussian Blur is most common and presents a smooth, even, delicate quality.
Begin with a moderate blur radius of 5-10 pixels. The objective is to soften the foundation just enough to redirect focus to the snapshot overlay, without losing all the detail.
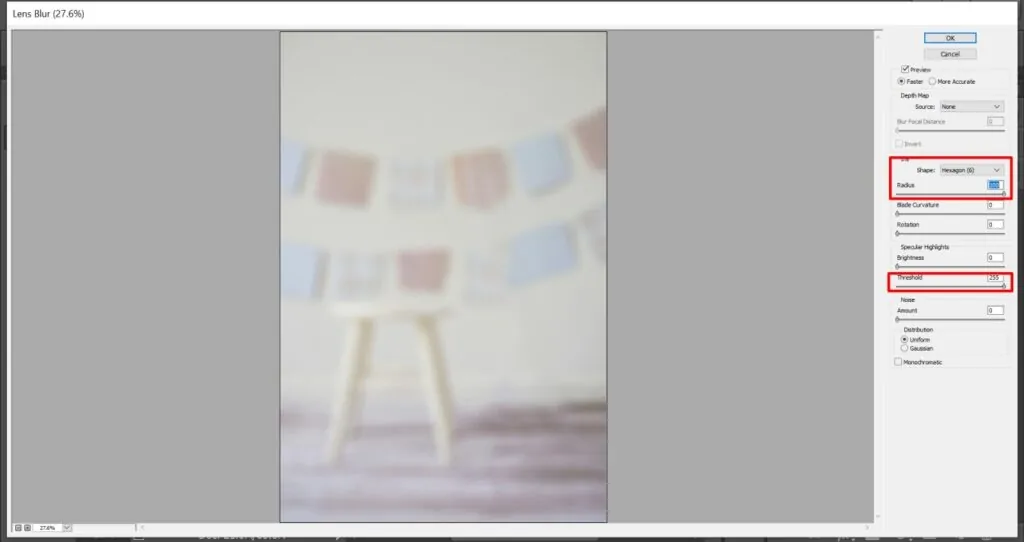
In case the overlay spreads on a specific subject that also exists within the background, look into masking the blur around that area to bypass ghosting or multiplying effects.
Rather than blurring the whole layer straightforwardly, utilize a layer mask and paint within the blur effect specifically. It will provide you with more control and prevent destructive editing.
The blur ought to feel like a characteristic depth-of-field effect, so don’t overblur to avoid making the image seem fake or excessively altered. Place some texture within the background to keep up authenticity.
Step 6: Applying Shadow And Glow
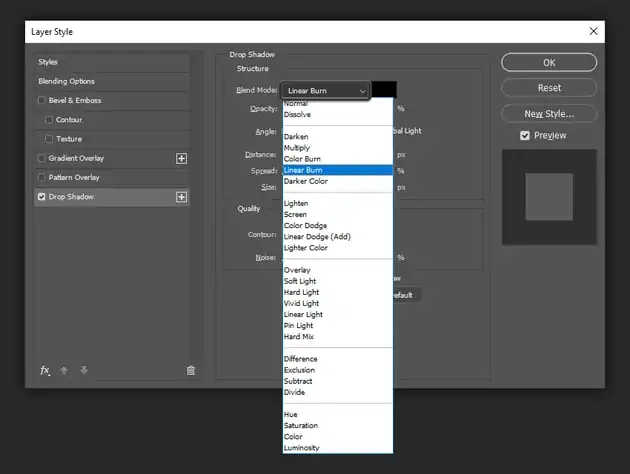
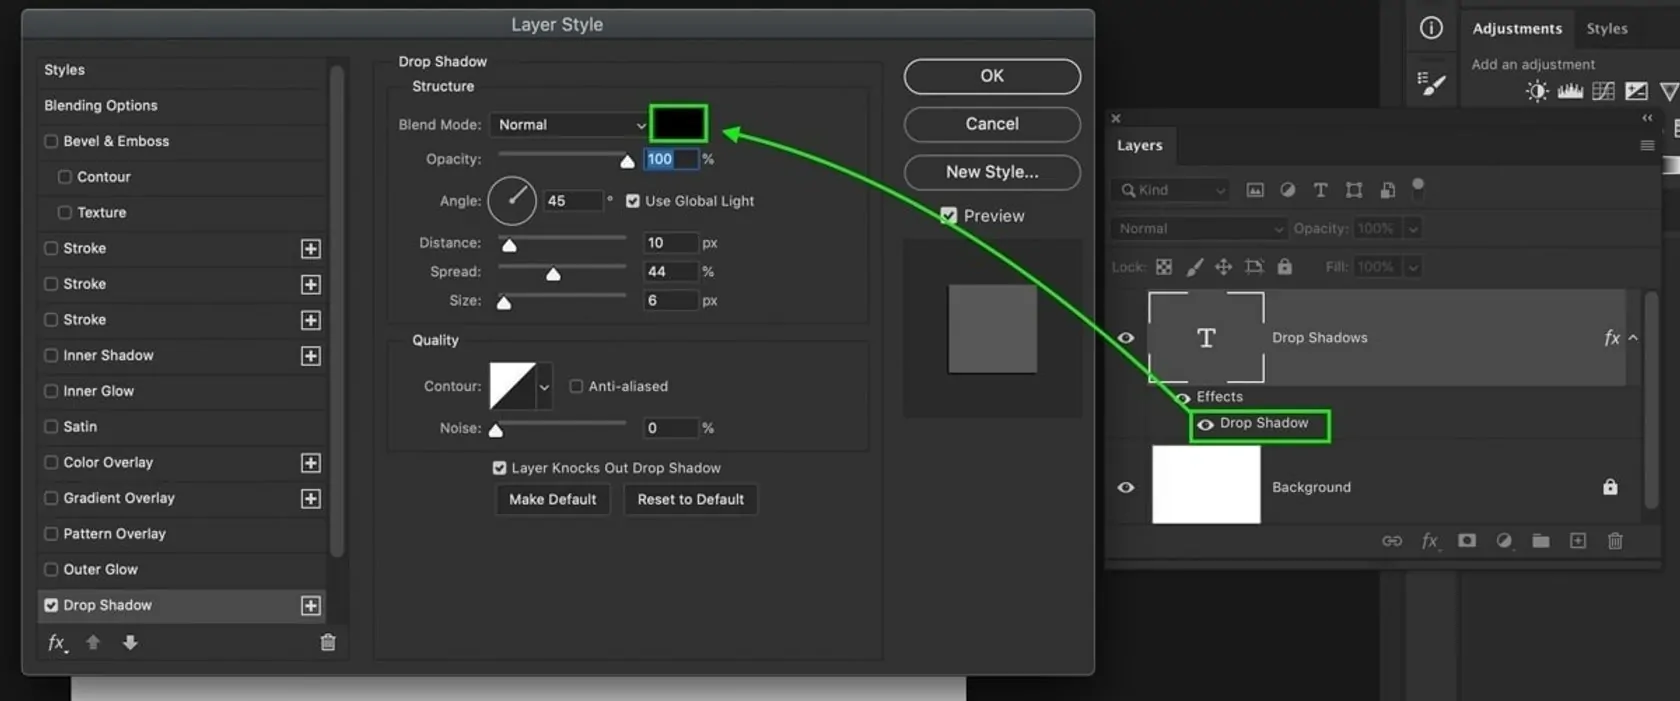
Press on the overlay layer to proceed to apply the shadow or glow onto it.
Within your editing software, head to the layer styles and use a drop shadow. Alter the shadow settings to a soft, subtle development that contains low opacity. Generally, you can specify the shadow’s angle to correspond to the light direction in your picture.
Adjust the distance to a small value like 5 to 10 pixels, and expand the size to make a smooth, delicate shadow. The objective is to allow depth to the overlay, making it show up slightly raised off the background.
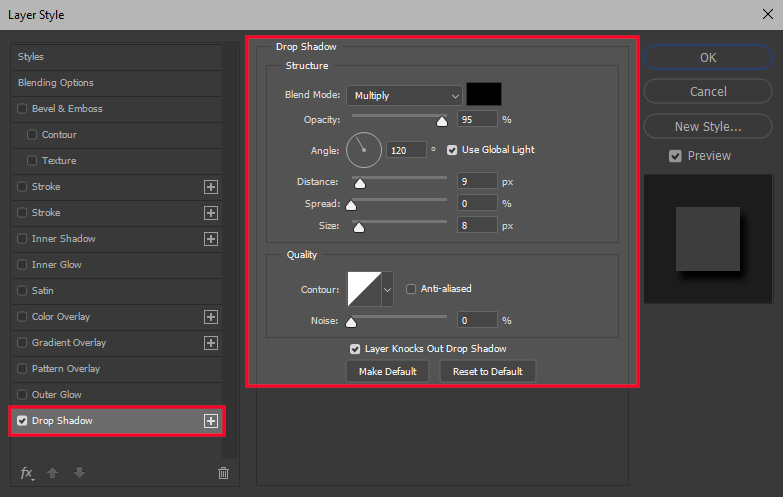
In the event that you need a more brilliant appearance, look into adding a delicate outer glow rather than or in addition to a shadow. Utilize a natural glow that goes with the photo’s colour tone, making sure that it does not overwhelm the centre of the image.
Alter the opacity and spread of the shadow or glow to avoid it from becoming too strong or distracting. A low opacity of 30 to 50 per cent can guarantee the effect upgrades without overpowering the composition.
After including the shadow or glow, zoom out and be sure that the overlay is looking striking but still integrates naturally with the general atmosphere of the image.
Step 7: Fine-Tuning The Effect

If you need to enhance the snapshot effect, think about including a timestamp or caption in the overlay. Utilize a handwritten or typewriter-style text style to make the impression of an authentic, individual photo. Put it in a corner or along the border for delicacy.
Select a font that corresponds to the disposition of your picture, like a retro or casual one. Put the size small enough not to dominate the picture, but large enough to be understandable. A little rotation or opacity alteration can make it look more naturalistic.
Before you finalize, the composition audit all the layers to confirm that they correspond to each other well. Make any conclusive changes to alignment, sizing, or effects.
Get rid of any undesirable layers or stray components. As needed, alter the layer opacity somewhat for the ideal harmony between the overlay and foundation.
Preserve your project in your software’s native format to facilitate future edits. It will guarantee that you can continuously come back and alter the effect as required.
After you are satisfied with the snapshot effect, proceed to export the image in a desired format while selecting the suitable resolution for the intended platform.
Conclusion
In conclusion, by applying a snapshot effect to your common photographs, you can highlight the randomness found in our lives. This way, though opposing the traditional aesthetics that emphasize clarity, sharpness and a polished appearance, you can bring the attention of the viewers towards the outspoken elegance found within imperfect objects. Although everyone loves an exquisite and flawless image, spontaneous moments often produce very impressive shots. Likewise, the snapshots, whether you capture them or manipulate your photographs with this approach, will always result in a dazzling and more appealing visual story.
