How To Build An Automated Data Pipeline Using Apache Airflow
Enterprises must develop an automated pipeline for the management and processing of immense data volumes. It makes sure that an immaculate version of data is flowing from numerous sources to the target systems. Apache Airflow is an open-source workflow automation tool that has a big stake in automating these pipelines. This tool helps ease the scheduling, monitoring, and maintenance of complex data frameworks. Its web-based interface makes workflow management and scrutinization easier, and its Python-based architecture effortlessly interfaces with other Python applications. Airflow simplifies workflow administration to increase productivity for teams of any size with attributes like task dependency management and retries. Likewise, with the ability to automate activities, track progress, and collaborate with teams from a single platform, Apache Airflow has revolutionized workflow surveillance and data engineering processes. This blog will continue with steps to employ while building an automated data pipeline using Apache Airflow.
Step 1: Installing Apache Airflow
To put up an Apache Airflow environment, initially, you need to guarantee that your system fulfills the fundamental prerequisites, containing Python and pip for package management. Begin by installing Apache Airflow utilizing pip, which permits you to oversee dependencies viably. Consider utilizing the following command:
pip install apache-airflow
After that, configure the Airflow environment by initiating the database. You can use the following command:
airflow db init
It creates the specified Tables within the default SQLite database. After you have initited, arrange the Airflow setup file (airflow.cfg), where you’ll alter settings like the executor type, database connection, and logging choices.
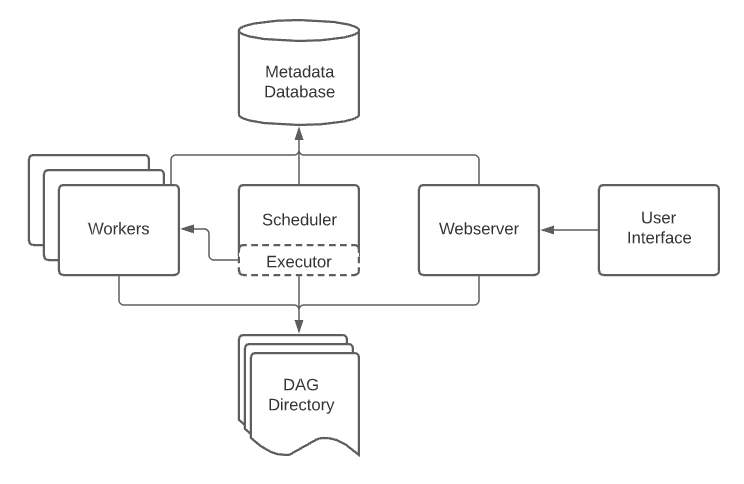
To operate Airflow, initiate the web server and scheduler utilizing the following commands as mentioned below in isolated terminal windows:
airflow webserver –port 8080
airflow scheduler
That will make the Airflow UI available at http://localhost:8080, from where you’ll supervise your DAGs and survey tasks. Frequently review for updates and audit the official documentation to remain informed of the finest practices and new highlights.
Step 2: Data Sources And Targets Definition
Characterizing data sources and targets is significant for constructing an automated data pipeline in Apache Airflow. Begin by recognizing the different information sources your pipeline will associated with, like databases, APIs, or file systems. Select the sort of data you will be performing with, including organized, semi-structured, or unstructured information, and look into the recurrence of data extraction, no matter if it’s real-time, batch, or on a schedule.
Afterward, indicate the target frameworks where the data will be stacked after processing. These targets may contain data warehouses, databases, or cloud storage solutions like Amazon S3 or Google Cloud Storage. Make sure that your chosen target framework can oblige the data format and volume you anticipate to regulate.
Build a clear mapping of data flows within sources and targets, outlining how the data will be modified at each phase. Documenting these particulars not only aids in preparing the pipeline but also helps in debugging and keeping up the system in the future. At long last, confirm that you have the essential access permissions and connectivity settings for both data sources and targets to stimulate manageable data flow.
Step 3: Assembling Directed Acyclic Graphs (DAGs)
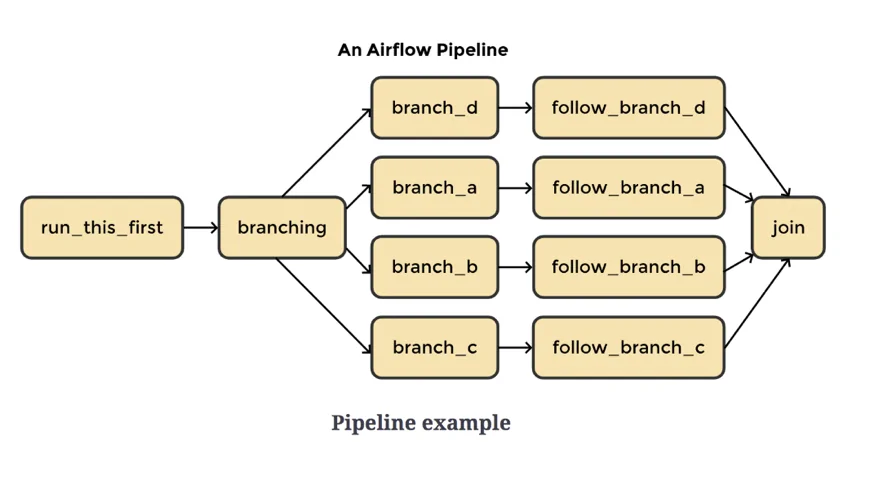
Assembling Directed Acyclic Graphs (DAGs) helps you to specify the workflow of your automated data pipeline. Each DAG conveys a particular information-handling task and outlines the sequence in which tasks ought to be performed.
To start, make a Python file within the Airflow dags directory, which is typically located at ~/airflow/dags. In this file, import the essential Airflow modules using the command given below:
from airflow import DAG
from airflow.operators.dummy_operator import DummyOperator
from datetime import datetime
After that, define your DAG utilizing the DAG class, indicating imperative parameters just like the DAG’s title, the schedule interval such as daily or hourly, and the start date as presented below:
default_args = {
‘owner’: ‘your_name’,
‘start_date’: datetime(2024, 1, 1),
}
dag = DAG(
‘my_data_pipeline’,
default_args=default_args,
schedule_interval=’@daily’,
)
Include tasks to your DAG utilizing operators, like DummyOperator for placeholders or more complex operators for particular tasks like extracting some data, transforming it, or loading. Build up task dependencies to supervise the execution order; look into the following command:
start_task = DummyOperator(task_id=’start’, dag=dag)
end_task = DummyOperator(task_id=’end’, dag=dag)
start_task >> end_task
Save the file, and the DAG will show up within the Airflow web UI, permitting you to visually screen and oversee your data pipeline.
Step 4: Utilizing Operators To Develop Tasks
Creating tasks utilizing operators is fundamental in Apache Airflow, as operators specify the particular actions to be performed in your automated data pipeline. Apache Airflow gives a variety of built-in operators for various chores, including extraction, transformation, and loading of data.
Begin by getting the essential operators in your DAG file. For example, in case you have employed a Python function to handle data, you can use the following command to import the PythonOperator:
from airflow.operators.python_operator import PythonOperator
After that, assemble Python functions that include the logic for your errands. For instance, you might have a function to extract data from a database:
def extract_data():
# Logic to extract data from the source
pass
At that point, make tasks in your DAG by instantiating the suitable operator. Utilize the PythonOperator to connect the function you defined previously:
extract_task = PythonOperator(
task_id=’extract_data’,
python_callable=extract_data,
dag=dag,
)
Additionally, you’ll utilize other operators including BashOperator to run shell commands, PostgresOperator to run SQL queries, or S3ToRedshiftOperator for transferring information to a data warehouse.
Make sure that you arrange dependencies between tasks to characterize the order of implementation. For instance, on the off chance that your information extraction must happen before data loading, put the task dependencies as presented below:
extract_task >> load_task
That structure will confirm that tasks execute within the correct sequence, empowering a streamlined data pipeline procedure.
Step 5: Scheduling And Triggering Your Pipeline
In addressing data workflows in Apache Airflow, scheduling and triggering your pipeline could be a key step that permits you to automate the enactment of your DAGs at specified intervals or according to particular events.
Initially, you have to configure the schedule interval in your DAG definition. Airflow sustains various scheduling choices, including the following:
Cron expressions, which are for complex schedules, like 12 * * * to run day by day at noon.
Predefined schedules which contain @daily, @hourly, or @once.
Assign the schedule_interval parameter while defining your DAG using the following command:
dag = DAG(
‘my_data_pipeline’,
default_args=default_args,
schedule_interval=’@daily’,
)
For fast implementation, you can manually trigger your DAG utilizing the Airflow UI. Move to the “DAGs” page, discover your DAG, and tap the “Trigger DAG” option. That can be valuable for testing changes or rerunning failed tasks.
You’ll moreover establish external triggers utilizing the REST API or through sensors, which are exceptional operators that hold up for particular conditions to be met before continuing. For instance, a FileSensor can trigger an errand when a particular file shows up in a directory:
from airflow.sensors.filesystem import FileSensor
file_sensor_task = FileSensor(
task_id=’wait_for_file’,
filepath=’/path/to/file.txt’,
dag=dag,
)
After done with the configuration, Airflow’s scheduler will oversee the implementation of your tasks per the defined intervals or triggers, permitting for effective information processing without manual intercession.
Step 6: Monitoring And Debugging
The final phase is to monitor, debug, and maintain your Apache Wind stream pipeline, which guarantees smooth operation and rapidly fixes any issues that emerge. Airflow provides a user-friendly web interface that permits you to screen DAG execution, check task situations, and audit logs.
Monitor:
Get to the Airflow web UI at http://localhost:8080, where you’ll see the standing of your DAGs. The dashboard presents which errands are presently operating, completed, or failed. You can tap on person DAGs to see task particulars, execution history, and dependencies.
Debug:
In the event that a task comes up short, check the logs to analyze the issue. Each task’s logs can be gotten directly from the web UI by clicking on the task instance. These logs give insights into what was amiss, whether it was a code blunder, information issue, or environmental issue.
To improve debugging, consider executing error handling in your errands, like utilizing try-except blocks in Python functions or arranging retries and alerts for failed chores. You’ll be able to set the number of retries and the delay between attempts within the task definition using the following:
extract_task = PythonOperator(
task_id=’extract_data’,
python_callable=extract_data,
retries=3,
retry_delay=timedelta(minutes=5),
dag=dag,
)
Maintain:
Frequently survey your DAGs and tasks to guarantee they stay productive and significant to your data processing requirements. Upgrade dependencies, clean up old DAGs, and regulate tasks to enhance performance. Furthermore, keep your Airflow installation updated to use the most recent highlights and security advancements.
Executing a monitoring and maintenance technique helps keep up the reliability of your automated information pipeline, making sure that it satisfies your evolving data processing prerequisites.
Conclusion
In conclusion, the Apache Airflow platform enables programmatic workflow authoring, scheduling, and monitoring. As programmability facilitates collaboration, testing, and workflow maintenance, this platform allows you to define workflows as code. While scheduling would organize and regulate the order of the tasks and optimize when a specific activity should be completed, authoring a workflow would establish a sequence of tasks. On the other hand, writing scripts for each of these features might make the process extremely time-consuming. Eventually, the use of Airflow ensures that your data pipeline runs smoothly with maximum productivity.


