How to Automate UV Validation and Texel Density in Blender
Blender is time-consuming and error-prone when it comes to the manual validation of UVs and managing the level of textile density. Lap laps in UVs, varying texel density, and extended textures can be usually quite unnoticed until texturing or rendering, a costly waste of time with less than optimal outcomes. On complex models, or larger asset libraries, these problems compound, and the production pipelines become sluggish as well as impacting the overall quality.
Automated UV validation and texel density checks provide a way of ensuring the same level of texture resolutions, finding UV errors immediately and normalising assets to any project. This tutorial is a step-by-step format that explains how to use the tools and add-ons to Blender to automatize the process, be consistent in the density of the texels and how to easily validate the UV layouts not by guessing.
Step 1: Preparing Your Blender Scene
Good scene setup in Blender is the keystone to an efficient UV validation and an automatic texel density pipeline. Without it you’re going to get false readings from automated tools, or your textures are going to stretch, or maybe nobody’s even going to notice those UVs had overlapped. This step mixes getting the tech to work with an explanation of why you’re doing it.
Sub steps:
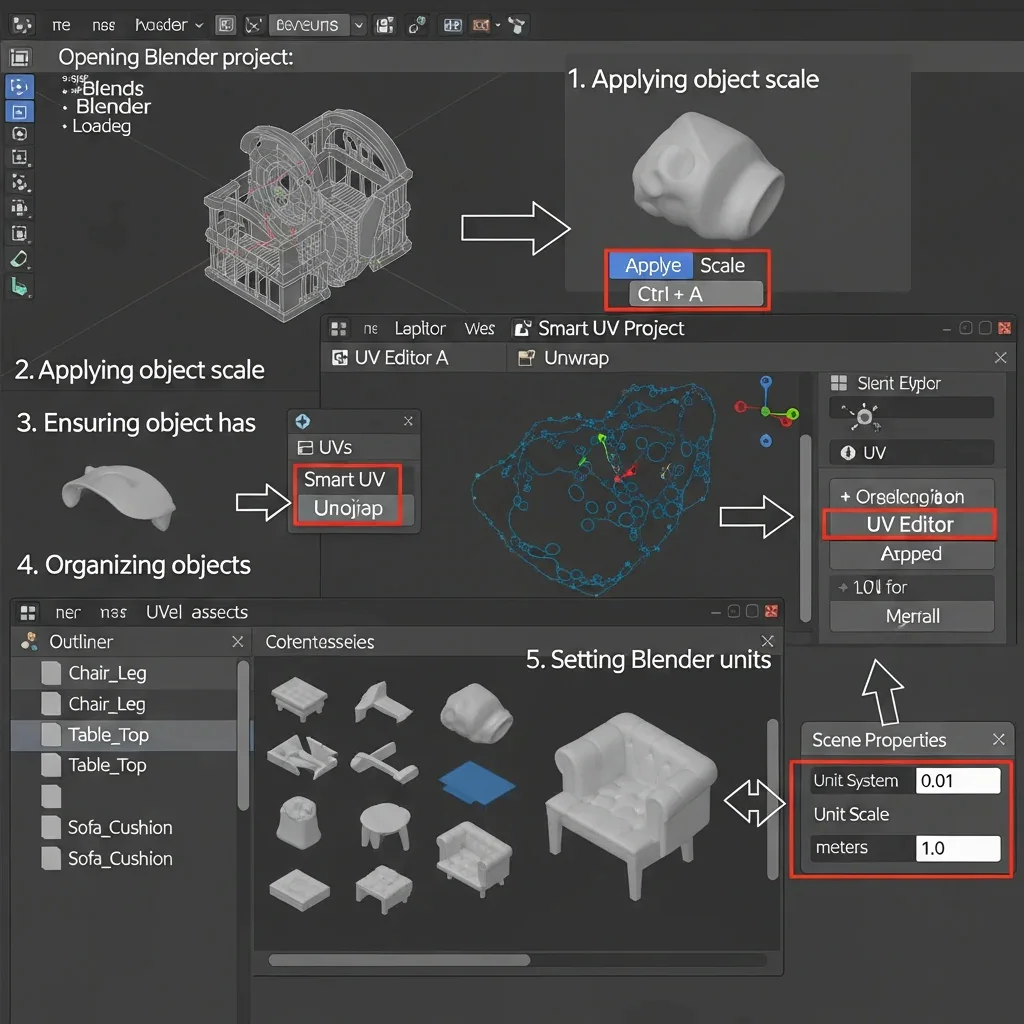
Start by opening your Blender project. Launch Blender and load your 3D model or project by going to File → Open or using the shortcut Ctrl + O. Make sure the model is visible in the entire view of your 3D Viewport. Tip: If the model was imported from another software (like 3ds Max), remember to adjust the scale accordingly to match Blender’s unit system.
Next, apply the object scale. In the 3D Viewport, select your object and press Ctrl + A, then choose Scale from the menu. This step is important because scaling tells Blender how to calculate UVs and texel density. Why? If the scale is not applied, Blender’s automatic texel density calculations could give inaccurate results.
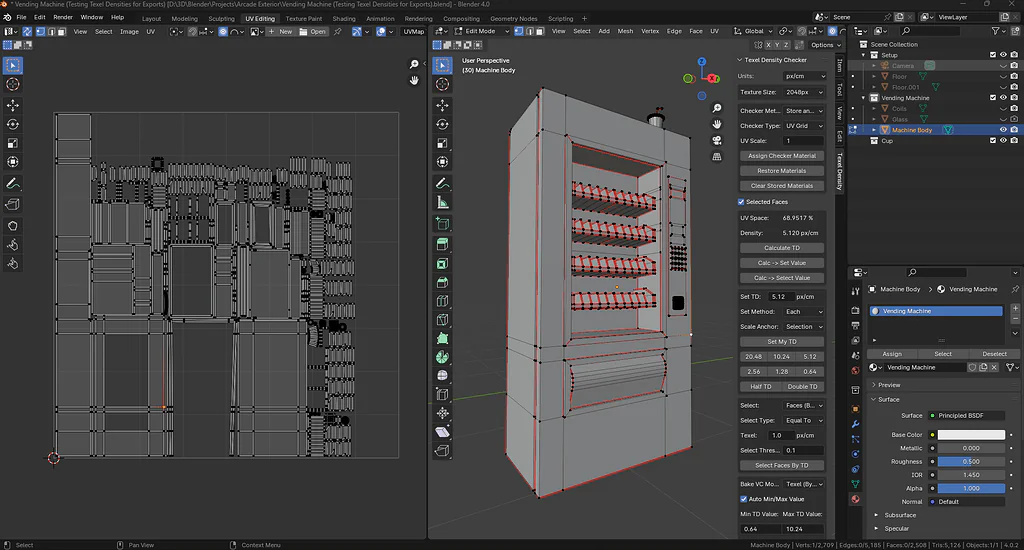
Ensure that your object has UVs. Select the object, then switch to the UV Editing workspace by clicking on it in the top bar. In the UV Editor window, check if UV islands are visible. If UVs are already present, they will appear in the editor. If no UVs exist, you will need to create them. Press Tab to enter Edit Mode, select all faces by pressing A, then hit U and choose either Smart UV Project or Unwrap, depending on your model’s complexity. In the UV Editor, ensure that no UV islands are overlapping. For general automation, a Smart UV Project is fine, but for more accurate results, I recommend doing a manual unwrap.
Organize your objects in Blender. If you have several assets, group them into Collections by right-clicking and choosing New Collection, or press M and select a collection. Name your objects properly (e.g., Chair_Leg, Table_Top) to make it easier for later batch automation. If you have many objects, grouping them into collections will also help prevent issues with tools like TexTools or other addons that may struggle with a large number of objects.
Finally, set Blender units for consistency. Go to the Scene Properties tab and open the Units section. Set the Unit System to either Metric or None, depending on your project needs. Make sure the Unit Scale is set to 1.000 for accurate measurements and consistency throughout your project.
Step 2: Installing & Activating Necessary Add-ons
So, after you have made sure your Blender scene is set up and objects are made UV-ready (Step 1), it’s time to get those weapons ready that enable Blender to automatize the check of good UVs and correct texel density: Without proper add-ons, you can’t automate, and it would mean placing time-consuming manual checks.
This action makes sure your workflow is in place and fully prepared for an automated run.
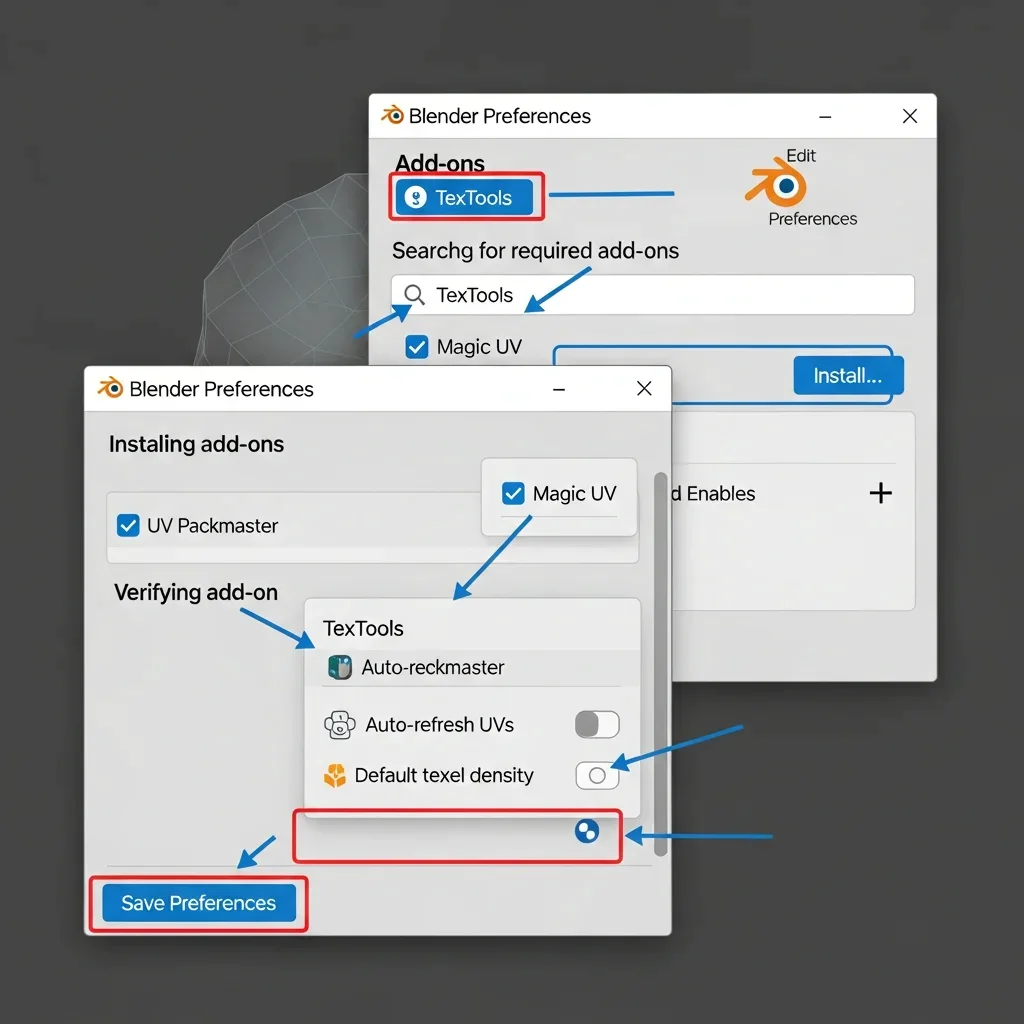
To get started, open the Blender Preferences by going to the main menu and selecting Edit → Preferences…. This will open the Preferences window where you can manage your add-ons and settings.
Next, search for the required add-ons. In the Preferences window, go to the Add-ons tab and use the search bar to type in TexTools. If it’s not already installed, tick the checkbox to enable it. If you can’t find it, press the Install… button, select the downloaded .zip file for TexTools, click Install Add-on, and then enable the checkbox to turn it on.
For an enhanced workflow, consider enabling optional add-ons. In the Preferences → Add-ons tab, use the search box to look for additional tools such as UV Packmaster (for automatic UV packing and density control) or Magic UV (for more complex UV tasks like alignment, scaling, and visual checks). Install and enable them just as you did with TexTools by pressing the Install button and enabling the checkboxes.
Once you’ve enabled your add-ons, verify their settings. In the Add-ons tab, find TexTools, click the small arrow on the left to reveal its settings, and ensure that the Default options are set correctly. Check that the Auto-refresh UVs option is enabled, and confirm that the default texel density is set to your desired unit (either pixels per meter or another project unit).
Finally, save your preferences. At the bottom left of the Preferences window, click on Save Preferences to ensure all your add-ons and settings are saved, so they will be automatically loaded the next time you open Blender.
Step 3: Checking UV Layout Automatically
Now that you’ve set up your scene (Step 1) and installed and configured TexTools (Step 2), let’s move on to automatically verifying the UVs. This check is to avoid a problem in case the user don’t have an external editor and overwrite with stretched or overlapping UVs which break textures even if texel density was correctly set. So far so good; you have prepared your objects for error free automation in the texel density adjustment process.
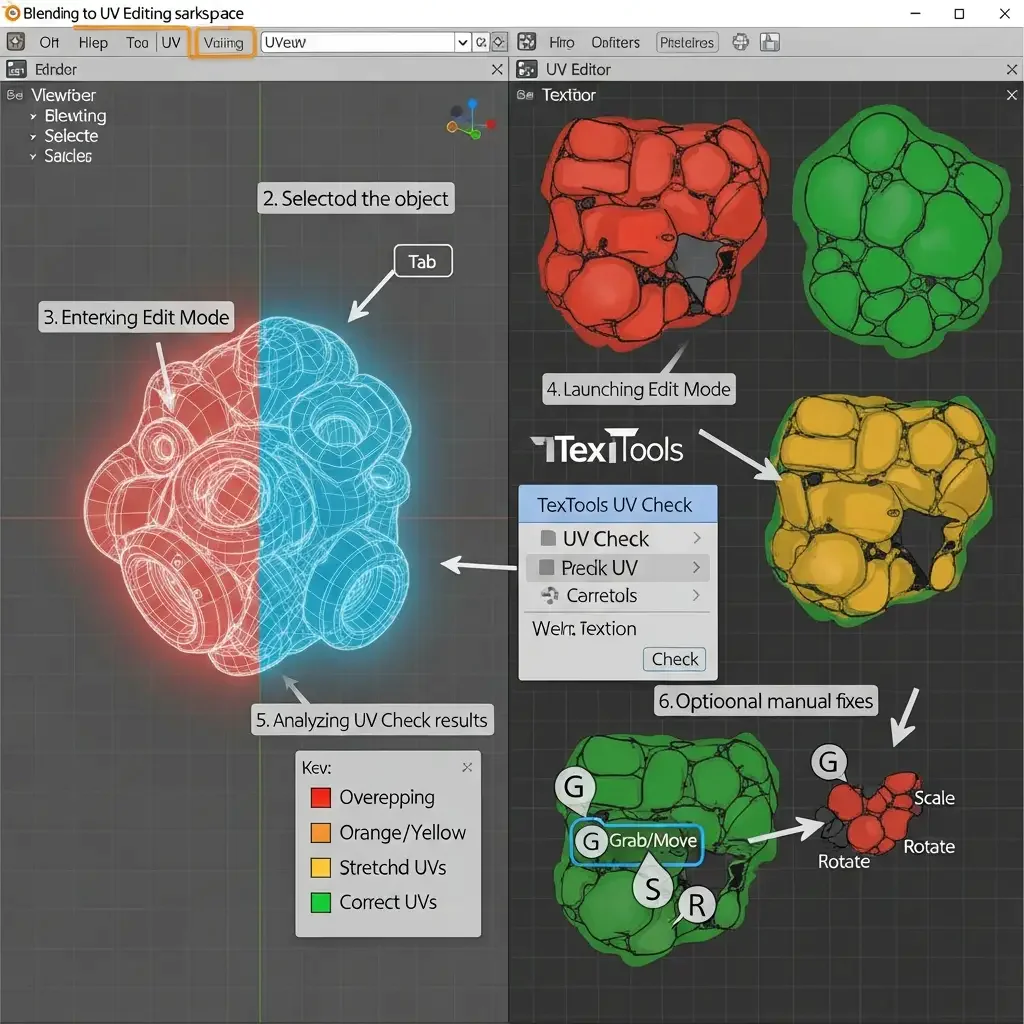
To start, switch to the UV Editing workspace by going to the top menu and selecting UV Editing. In this workspace, Blender is divided between the 3D Viewport on the left and the UV Editor on the right. Next, select the object you prepared in Step 1 by left-clicking on it in the 3D Viewport, making sure it is the active object. Then, enter Edit Mode by pressing Tab in the 3D Viewport, which changes from Object Mode to Edit Mode and makes all faces selectable. After that, launch TexTools UV Check from the top bar in the UV Editor by clicking on TexTools → UV Check, which will open a panel allowing you to detect overlapping and stretched UVs. Analyze the results by observing the highlighted UV islands: red indicates overlapping UVs, orange or yellow indicates stretched UVs, and green shows correct UVs. Highlight any potential problem areas that may need fixing. Finally, you can optionally perform manual fixes by selecting the problematic faces in the UV Editor and using G, S, or R to adjust the UV islands, ensuring that your UVs remain correct after applying auto texel density in Step 4.
Step 4: Automating Texel Density in Blender
Once your objects are ready (1), add-ons set up(2) and UVs checked (3), the next step is to automate texel density. Texel density governs the amount of texture detail assigned per unit area, and ensures a uniform texture resolution for your objects.
We’re just going to be using TexTools for this, an editor within Blender itself.
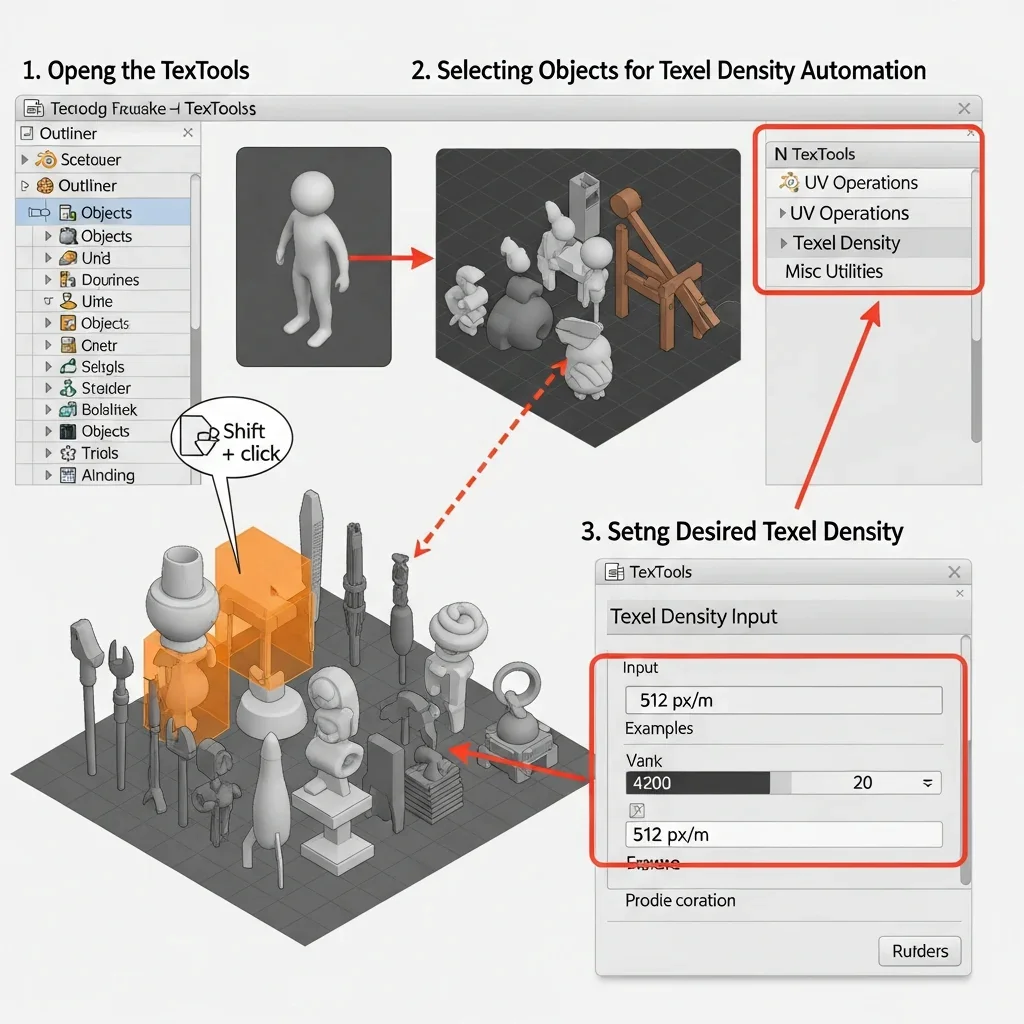
First, open the TexTools panel by going to the 3D Viewport, selecting the object(s) you want to work with, and opening the N Sidebar to click the TexTools tab. Pressing T will reveal the TexTools panel on the right side of your viewport, which is divided into several sections: UV Operations, Texel Density, and Misc Utilities. Next, select the objects for texel density automation by clicking on them with the left mouse button, or using Shift + LMB to select multiple objects. If you have more than one object in a folder or collection, expand the collection in the Outliner, then Shift + left-click all objects to select them in the 3D Viewport. After that, set the desired texel density in the TexTools panel under Texel Density by entering a value (for example, 512px/m) and clicking Apply, which automatically scales the UV islands to the target texel density, with a preview in Edit Mode showing whether the scaling is correct.
Then, check the texel density visualization by going to TexTools → Visualize Texel Density → Click Check, where UV islands are marked with colors or graphic grids: green indicates correct texel density, while red or orange show deviations. For batch processing multiple objects, go to TexTools → Batch → Set Texel Density for Selected Objects, click the collection or folder in the Outliner, then click Set Texel Density → Apply to All Selected, and Blender will automatically correct the UVs for all objects. Finally, save and organize the results by optionally placing processed objects into a “Texel_Density_Ready” collection, keeping the original assets for backup, and exporting the processed assets via File → Export → FBX/OBJ to your game engine or rendering pipeline.
Step 5: Optional Python Automation & Batch Scripting
If you are working with multiple objects, scenes or a whole library of models manual texel density setting gets boring after a while, even using TexTools. Blender Python scripting lets you do it automatically for all selected objects (or even collections), saving hours while assuring accuracy.
This step assumes you have performed the previous steps 1 for and your objects are scaled, UV-validated, as well as that you have add-ons installed.
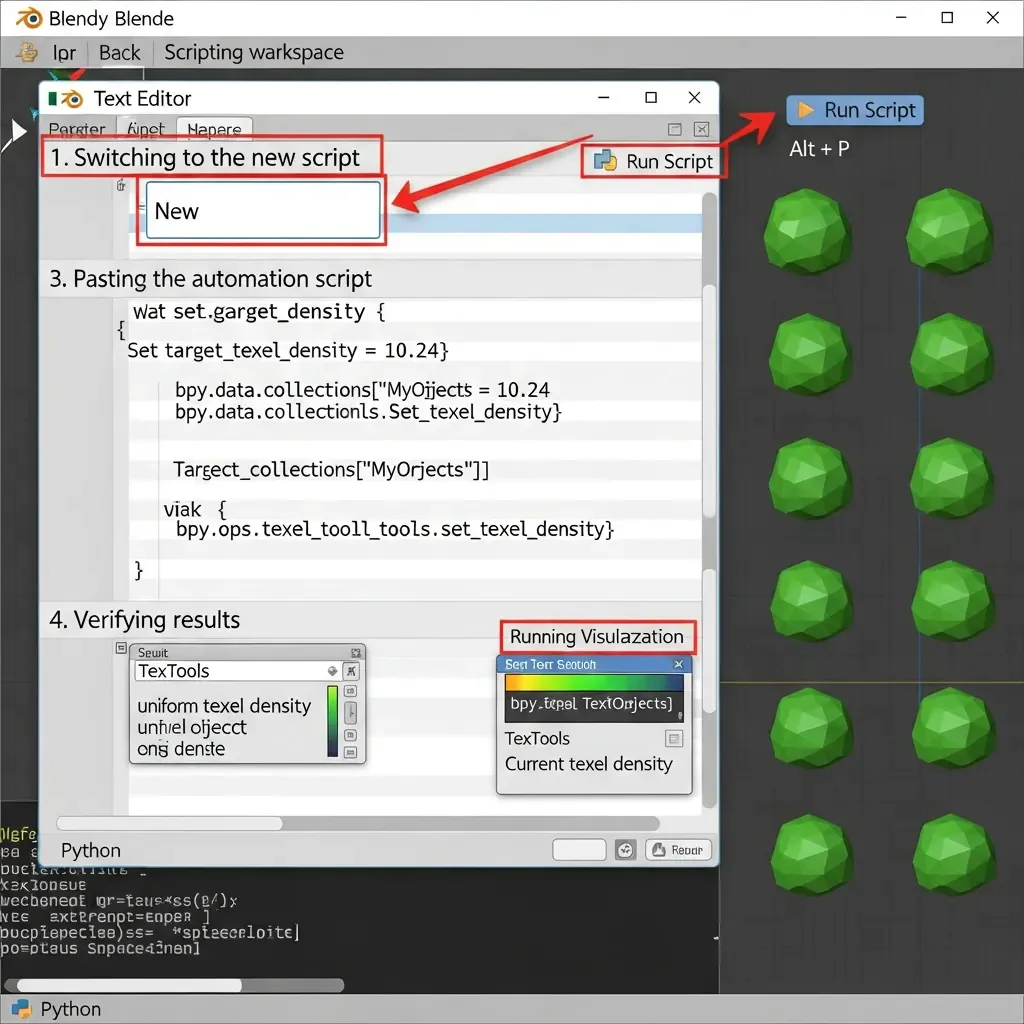
First, switch to the Scripting workspace by clicking Scripting in the top bar. This workspace displays the Text Editor in the center, the Python Console at the bottom, and optionally the 3D Viewport on the right. Next, create a new script by going to the Text Editor and clicking New, which opens a blank text file that you can rename to something like texel_density_automation.py. After that, paste the automation script into this new file.
import bpy
# Set desired texel density in pixels per meter
target_texel_density = 512
# Select the collection or objects you want to process
collection_name = “Your_Collection_Name”
collection = bpy.data.collections[collection_name]
for obj in collection.objects:
if obj.type == ‘MESH’:
bpy.context.view_layer.objects.active = obj
obj.select_set(True)
# Apply texel density using TexTools API if installed
bpy.ops.tex_tools.set_texel_density(value=target_texel_density, mode=’ALL’)
# Optional: visualize texel density
bpy.ops.tex_tools.visualize_texel_density()
obj.select_set(False)
First, open a blank text file in the Text Editor and name it, for example, texel_density_automation.py. Make sure to replace “Your_Collection_Name” with the actual name of your collection. Then, run the script by going to the Text Editor and clicking the Run Script button at the top-right of the editor, or by pressing Alt + P. Blender will execute the script, automatically adjusting all objects in the collection, applying texel density uniformly, with visual feedback visible in the viewport if visualization lines are enabled. Next, verify the results by visually checking the objects in the 3D Viewport or using TexTools → Visualize Texel Density, ensuring that all UV islands are scaled appropriately, indicated by a green overlay for correct density. Finally, save the script for future use by going to Text Editor → File → Save As in your project folder, allowing you to reuse it in other projects and maintain a consistent workflow.
Step 6: Exporting & Final Verification
So after setting up your scene (Step 1), adding add-ons (Step 2), validating UVs (Step 3) setting up texel density automation (Step 4) and maybe scripting some parts of the workflow( Step 5), the last step is just to export everything with correct textures and uv’s. This ensures your assets are game engine, render engine or pipeline ready.
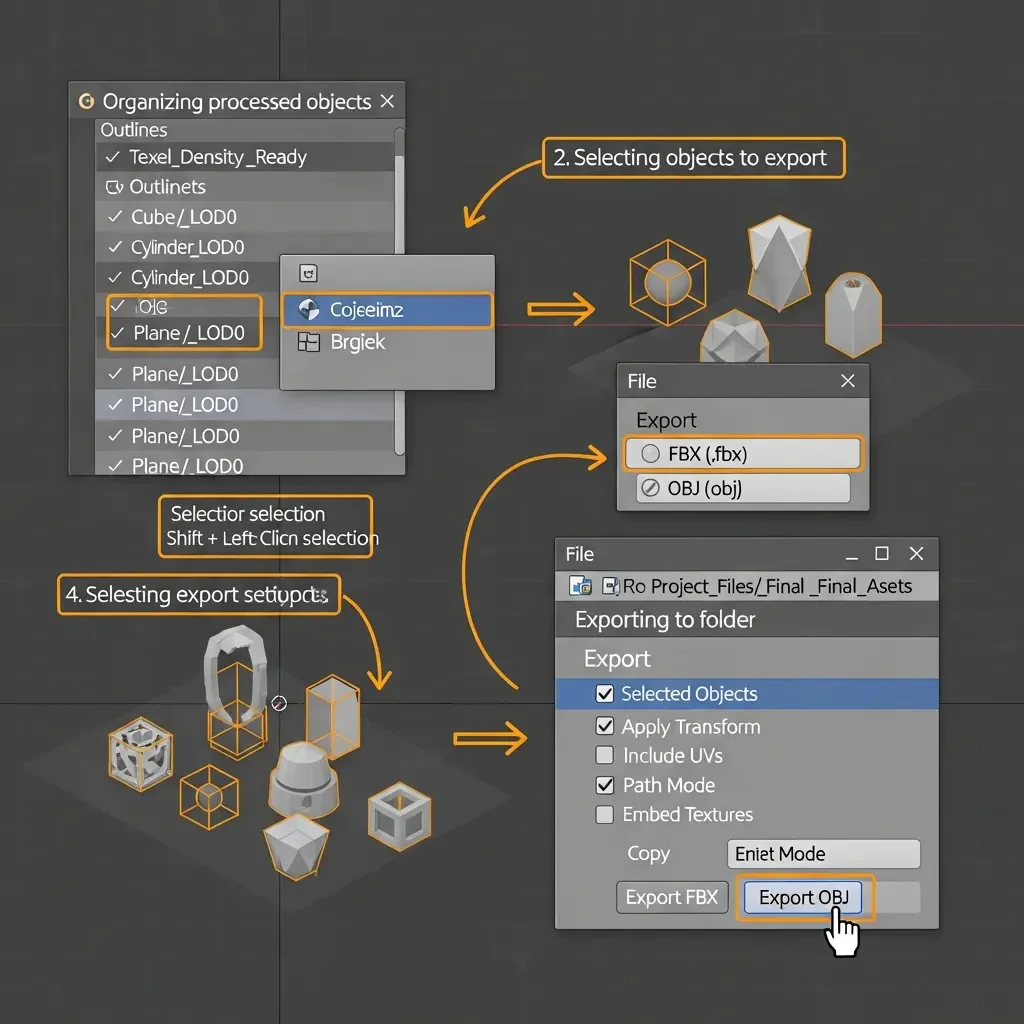
First, organize the processed objects by going to the Outliner, right-clicking, selecting New Collection, and naming it Texel_Density_Ready. Move all objects with confirmed UVs and applied texel density into this collection. Next, select the objects you want to export either by Shift + Left-Click on each in the 3D Viewport or by right-clicking the Texel_Density_Ready collection in the Outliner and choosing Select Objects, so all output objects are ready for export. Then, choose the export format by going to the top menu File → Export and selecting FBX or OBJ. For game engines like Unity or Unreal, use FBX; for render engines or generic pipelines, OBJ works fine. Configure the export settings in the export panel: enable Selected Objects Only, tick Apply Transform to preserve scale and rotation, tick Include UVs to ensure texel density is exported correctly, and enable Path Mode → Copy with Embed Textures if you want textures included. Export the objects to a folder within your “final assets” directory (e.g., Project_Files/Final_Assets) by clicking Export FBX/OBJ.
Finally, perform a final verification by opening the exported model in Blender or your target game engine, checking that UVs are intact, texel density is correct using viewport grids or engine tools, and textures are applied properly.
Common Mistakes & Troubleshooting
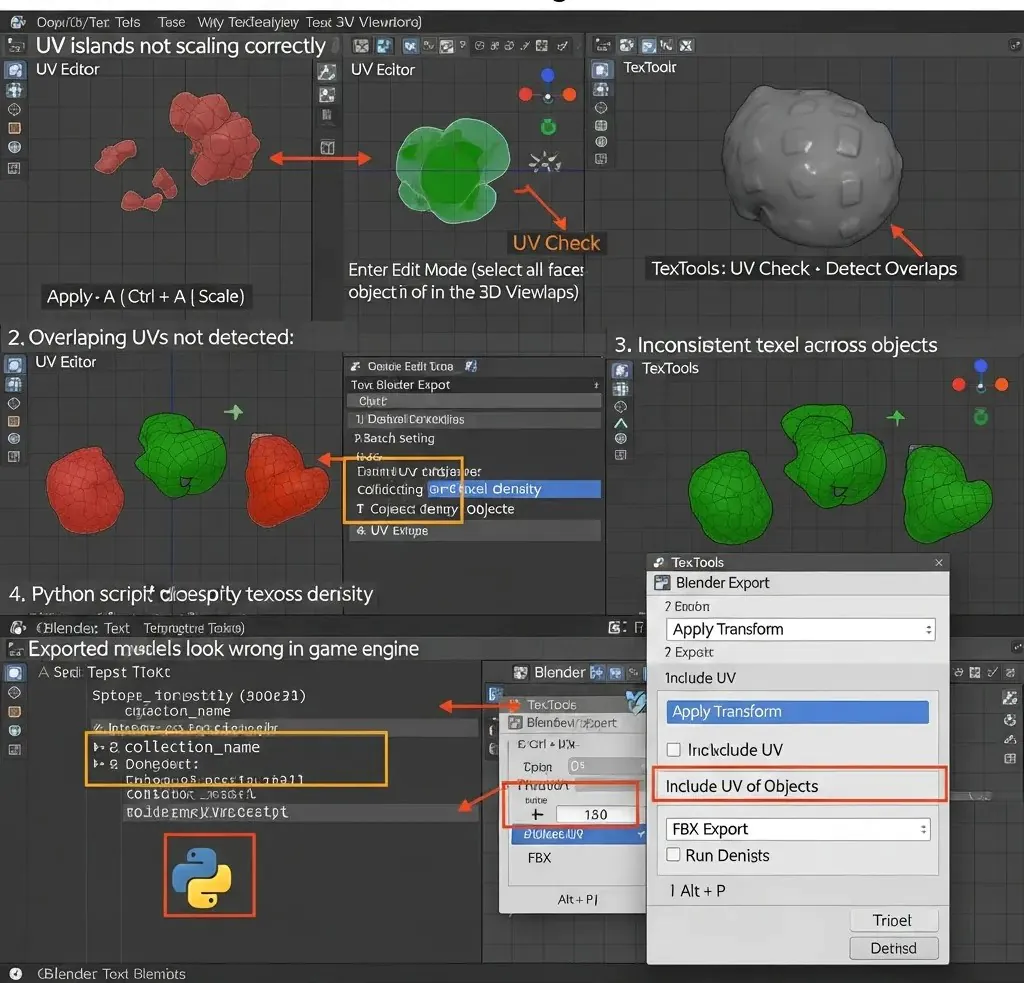
One common problem is UV islands not scaling correctly, where after using a flat packer and converting UV islands, they become too small or too large. This usually happens because the distance between objects was not scaled in Step 1. To fix this, choose the object in the 3D Viewport, press Ctrl + A → Scale to apply the scale, and then run the texel density automation again using Step 4 or Step 5.
Another issue is overlapping UVs not being detected, where textures appear stretched or mirrored even though the TexTools UV Check tool was used. This occurs when faces were not selected or the UVs were not fully unwrapped. The fix is to press Tab to enter Edit Mode, press A to select all faces, then go to TexTools → UV Check → Detect Overlaps → Apply. After that, manually fix the highlighted UV islands using G, S, or R, or unwrap again with U → Smart UV Project.
Sometimes texel density appears inconsistent across objects, with some materials looking excessive or stretched compared to others. This is caused by varying object scales or texel density not being scaled along with the objects. Methods such as manual tiling or baking at 1024 resolution and then resampling or resizing textures can help achieve more identical texels. To fix this properly, plan operations in advance by using the Outliner to arrange object positioning in the collection as done in Step 1 and Step 4, then choose the collection and apply TexTools → Batch → Set Texel Density → Apply All, and visualize texel density in the viewport to ensure everything is uniform.
Another problem is when the Python script does not apply texel density, where the script in Step 5 runs but nothing actually happens. This is usually due to an incorrect collection name or issues identifying the target objects. To fix it, open the script in the Text Editor within the Scripting Workspace, make sure collection_name = “Your_Collection_Name” exactly matches your collection name, ensure all objects are of MESH type, and then run the script again using Alt + P.
Finally, exported models may look wrong in the game engine, with stretched UVs or textures after export. This happens when transforms are missing or export settings are incorrect. To fix this, in the original .blend file go to 3D View → Object Mode, select all objects with A, then apply Ctrl + A → All Transforms for Export. After that, go to File → Export → FBX, make sure Apply Transform, Include UVs, and Selected Objects are checked, and verify the result in the engine viewport.
Conclusion:
Automate UV validation and texel density in Blender Save time, avoid errors, and get paste consistent. With a well-arranged scene, strategically used add-ons such as TexTools and (optionally) Python scripts for batch editing, you will be able to normalize your assets creation process and never experience the pains from overlapped UVs or varying texel density.
Not only is this texture workflow quicker and more efficient, it’s an extremely portable method of readying assets for game engines, rendering pipelines or major projects. Once you have automation then more time can be spent on creativity and less time in manual work ensuring that every model is of high quality.
By following these steps you’ll not only get more precision and efficiency in your blender projects, but also confidence from working on either a single model or an entire asset library.
