
How to Automate Photorealistic 3D Model Generation from 2D Product Photos
Designers, marketers, and e-commerce business owners have long struggled to bring 2D product images to life as realistic 3D models. Native 3D design takes time and is expensive, and it requires technical expertise that can create inconsistent results and timelines for product launches.
And today, you can automate this process of creating photorealistic 3D models from 2D product photos by employing AI and photogrammetry tools. This technology enables you to generate real 3D models of your projects in no time without any 3D modeling skills. The result is rapid production, cost savings, and consistently high visual quality that enriches online shopping experiences, augmented reality/virtual reality applications, and marketing campaigns.
Whether you’re just starting with basic AI tools or are a pro that wants to optimize workflows for large projects, this guide will show you exactly how you can turn your 2D images into professional-quality 3D models in no time.
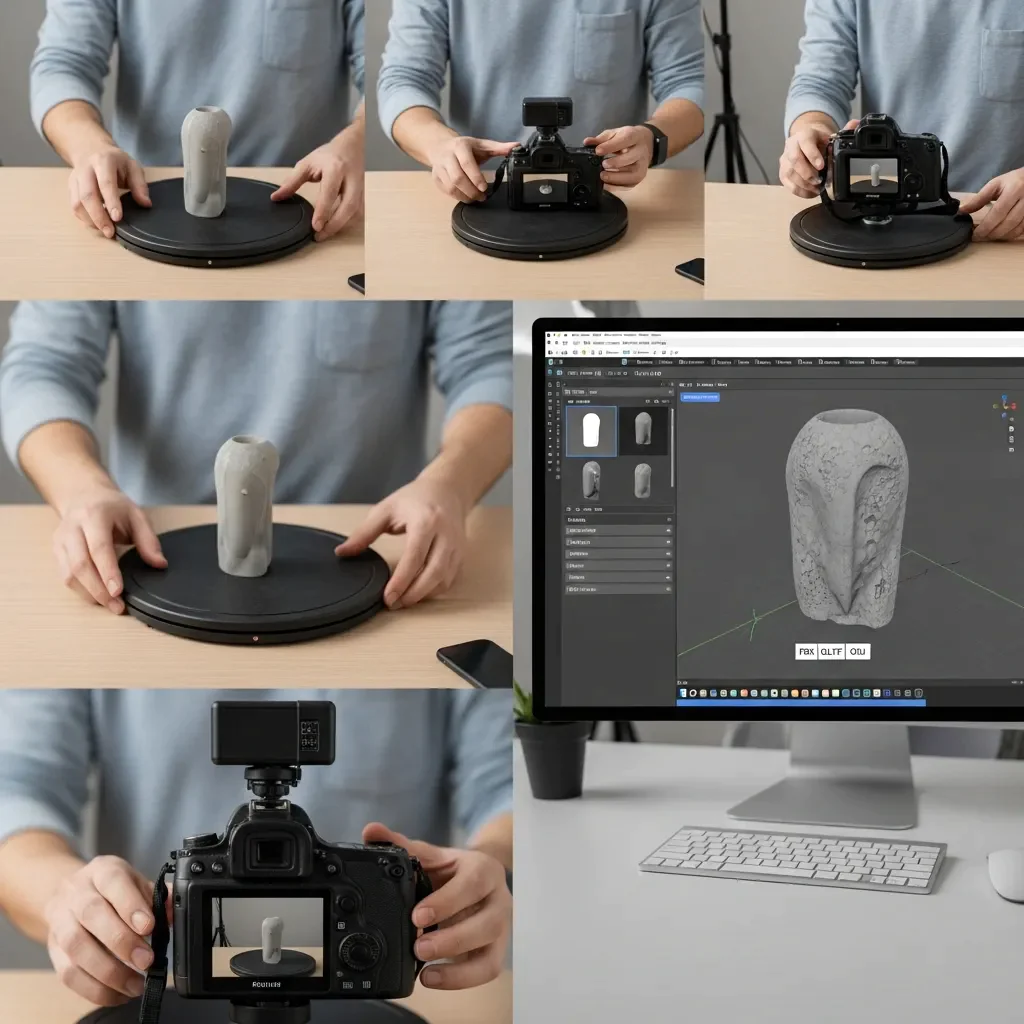
Step 1: Collect and organize 2-D product photos
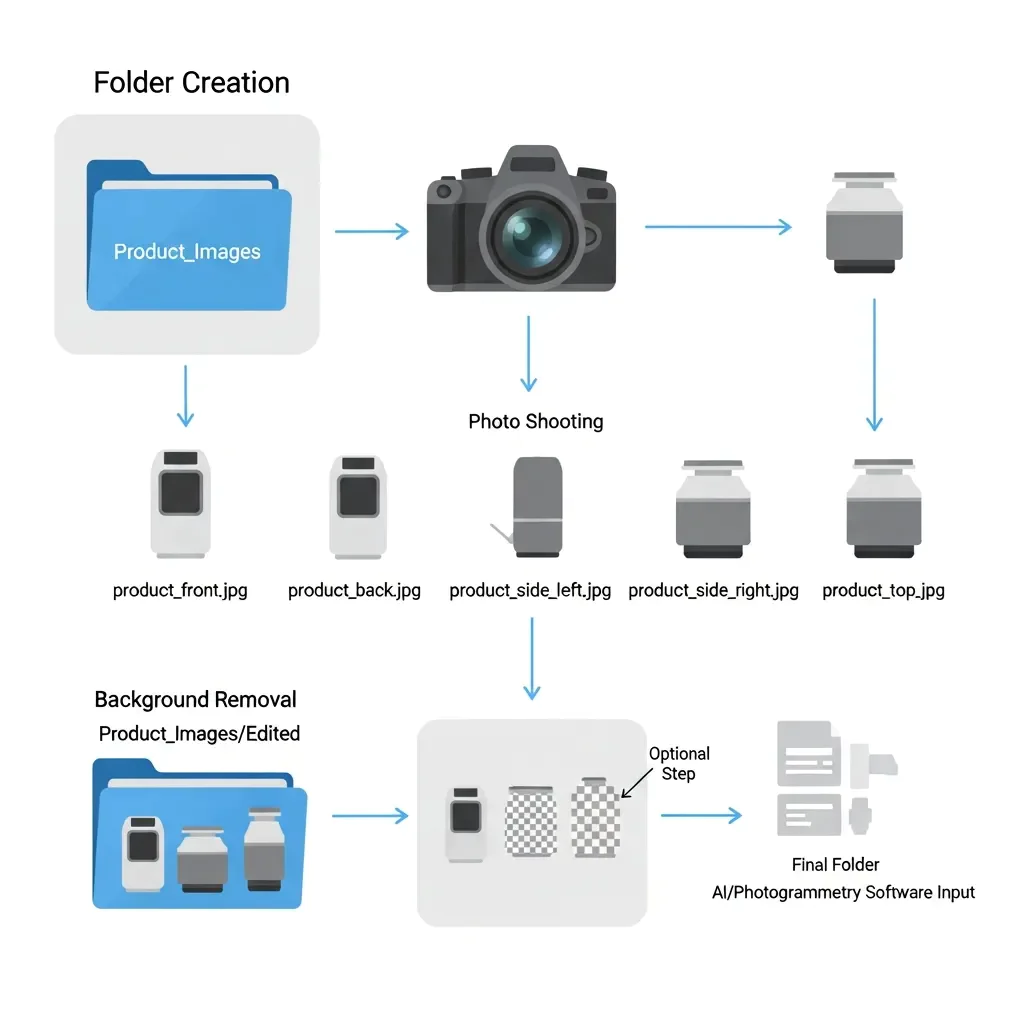
Arrange your 2D product shots. First, you’ll want to open a new folder where images will be saved. In Windows, navigate to Desktop or any other place, right-click > New > Folder, and name it Product_Images. On a Mac, right-click the folder and select New Folder, and name it Product_Images. Snap or take some pictures of your product from multiple angles and directions, such as frontal, backside, top, and close-up, with the same light source, which will have a good resolution effect. Save your two images into your folder, naming them clearly based on the angle you shot the image from—for example, product_front. jpg, product_back. jpg, product_side_left.jpg, product_side_right.jpg, and product_top.jpg for easy automation later. Or, if you prefer, use the free tool Remove to remove backgrounds. bg atau Adobe Photoshop dan simpanlah gambar tersebut di dalam subfolder Product_Images/Edited. Finally, make sure to have a look at your folder so that the images all appear under the correct name (that is, file names are as they should) and as a greatly simpler point for photogrammetry software or an AI-based tool to be uploaded in one batch.
Step 2: Upload 2D Product Photos to a 3D Generation Tool

Open your preferred 3D model-generating application—Kaedim, Adobe Firefly 3D, or Smoothie-3D—and start a new project for your product. Click on the Upload or Import images button, and browse to your Product_Images folder and choose all those that you prepared. Now, click upload. The tool automatically examines the photos and then creates a rough 3D shape of your face using multiple angles. Make sure all the images are loaded and, if the app allows, categorize them by perspective (front, back, sides, and top) to aid in AI’s better approximation of the model. Wait for the first passes to finish, as the tool will create your base mesh, which you then refine in follow-ups.
Step 3: Refine the Generated 3D Model

Open the resulting 3D model in your tool. Spin it around, zoom in, and take a close-up look at every angle. Use the mesh-edit or shaping tools to eliminate any distortion and/or uneven surfaces. Smoothen The surface of the file with your tool’s mesh repair or smoothing feature. If desired, balance and depth settings can be adjusted. Position back any helper points if out of place. Use simple materials or even color sections of your model to help texture at a later stage. Save the refined model in your project folder as Product_3D_Refined.obj or in the default format of the utility.
Step 4: Apply Textures and Materials
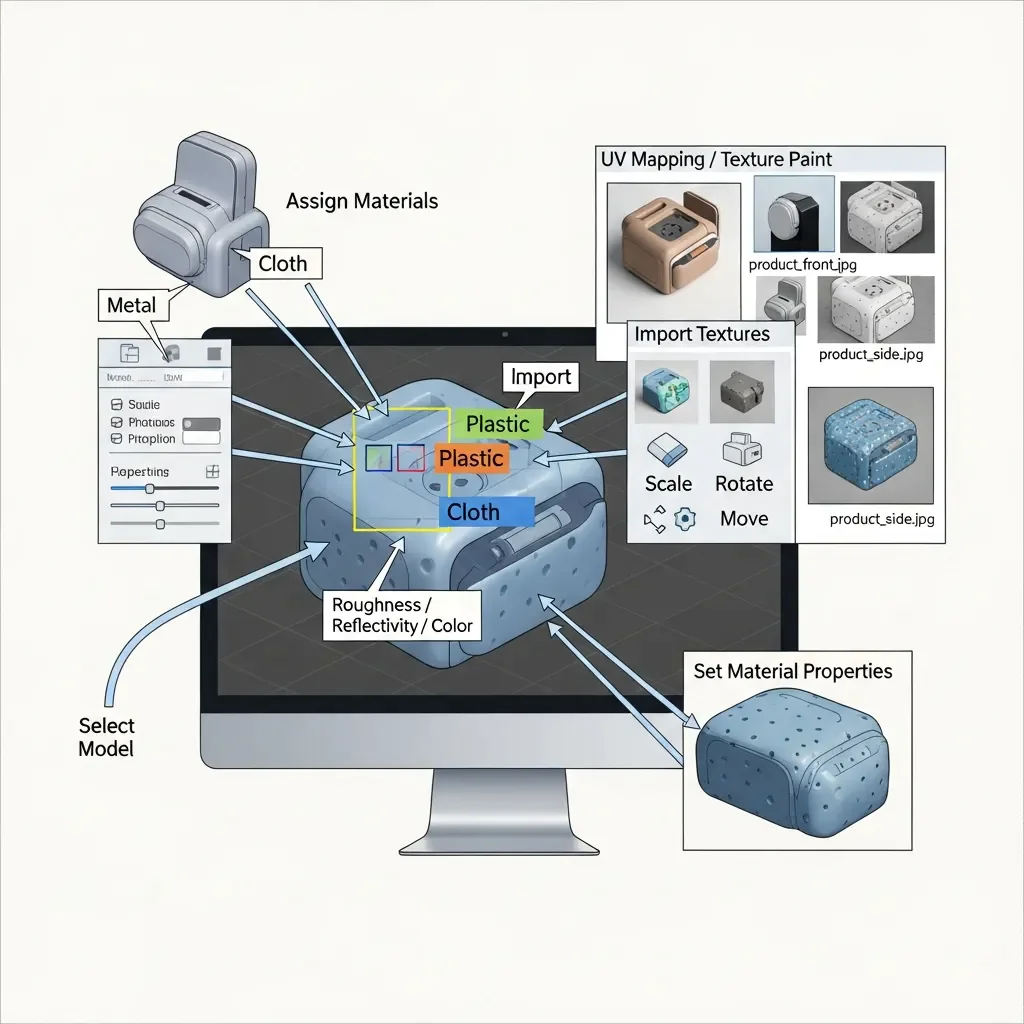
Open the polished model in your 3D software or Blender. \item Select each portion of the model and assign a specific material type, which could be metal, plastic, or cloth. Import your product images, and texturize them with UV mapping or texture paint. Scale, rotate, and position the texture to fit each surface correctly. Make the model match the real thing by adjusting its roughness, reflectivity, and color in material settings. Save the 3D textured model to your project folder as Product_3D_Textured.obj, or any standard file format supported by the tool.
Step 5: Render the 3D Model for Photorealistic Output
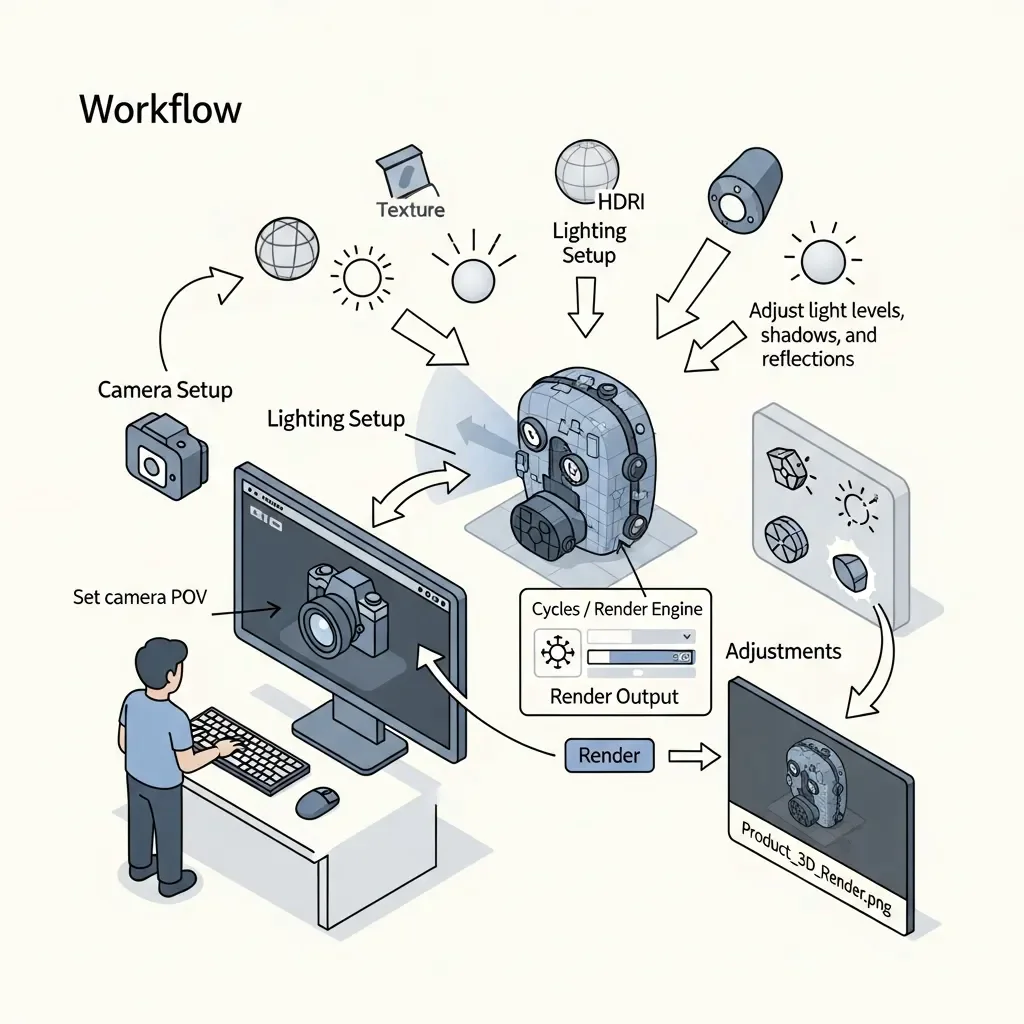
Open your 3D design with textures in the renderer or Blender. Set up your camera, and shoot the product from the desired POV. Apply lighting (HDRI environments, point lights) to establish a uniform rendering of the model. Edit light levels, shadows, and reflections as per the actual environment. Select the rendering engine (e.g., Cycles in Blender) and specify the output resolution. When ready, you click Render to get a photorealistic image. Examine the render and make adjustments to the materials, textures, or lighting if necessary. Save the resulting render in your project folder as Product_3D_Render.png or in the format of your choice, and you’re done.
Step 6: Export the 3D Model for Use
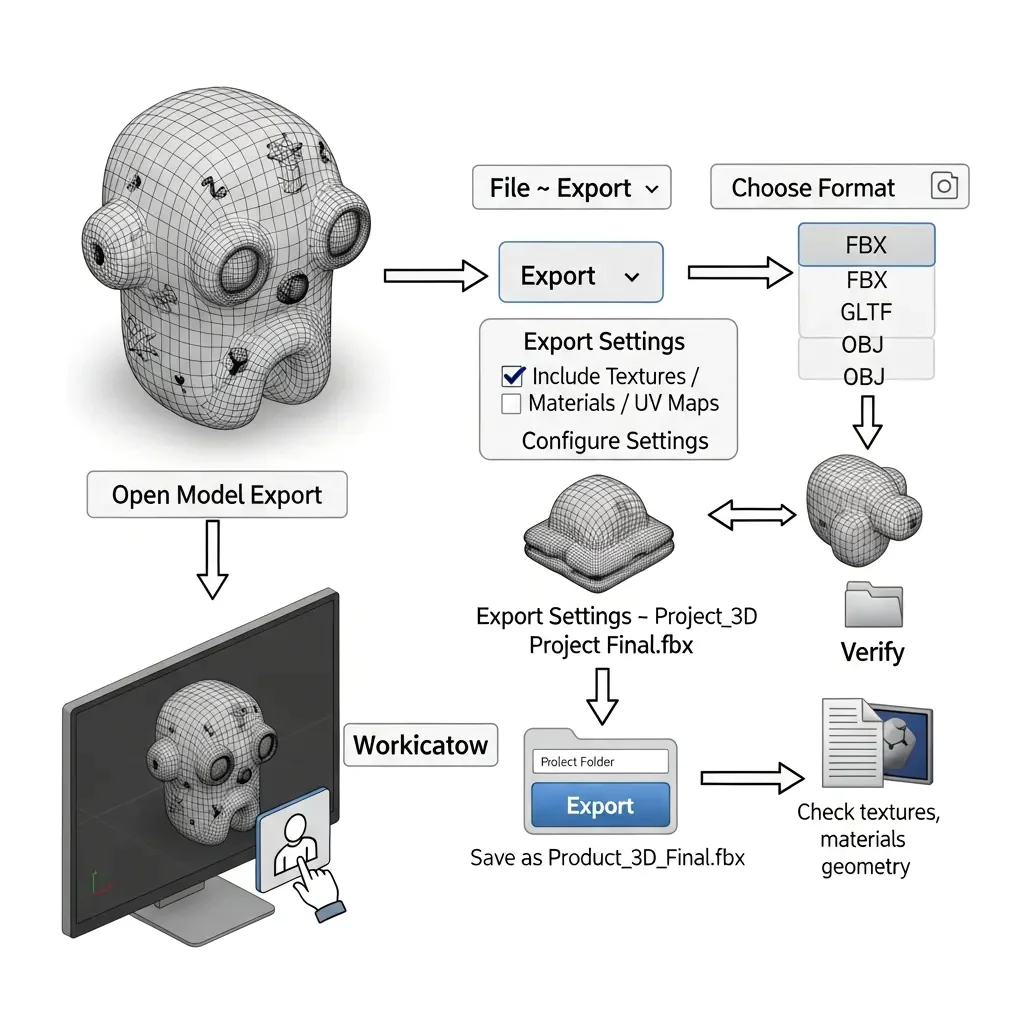
Open your untouched 3D model in a 3D tool or Blender. Navigate to the Export drop-down, and select the format that best fits your purpose. FBX for AR/VR apps. GLTF for web viewers, or OBJ for general purposes. Export settings—for example, whether to include textures, materials, and UV maps. Point to your project folder or wherever you want it, and save the file as Product_3D_Final.fbx or the chosen format. Click Export to export the model. Check the exported file by loading it back in a viewer or any other 3D application to make sure that textures, materials, and geometry look alright.
Step 7: Batch Process Multiple Products (Advanced)

Make a new folder for all products to be processed (e.g., All_Products). Inside, make subfolders for each product and give them a clear name, such as Product1, Product2, etc., where you save the 2D images of individual objects. Open your 3D tool for batch processing or script-based pipeline and enable the automation mode. Choose the top folder, All_Products, as the input directory and output folder for the produced 3D models. Set up the tool or script to apply uniform mesh generation, refinement, and texture mapping settings for each product. Simply start the batch process and periodically examine some random models to see if they look good before continuing. After finishing, all the products will have improved 3D models in the exported output folder for rendering or anything else.
Step 8: Integrate 3D Models into E-Commerce or AR/VR Platforms
Launch your e-commerce platform or 3D viewer tool like Shopify 3D Viewer, WooCommerce, Sketchfab, or an AR/VR app. Go to the 3D model upload section and pick out the ones you exported in your project folder, for example. FBX, GLTF, or OBJ. Verify the proper display of the texture, material, and light after uploading each file! Scale the model, tilt it, and move it into position as the platform allows. Save and share the product page or 3D scene. Play the 3D model in the live viewer or AR mode to verify interactivity, rendering, and responsiveness on different devices.
Step 9: Optimize 3D Models for Performance
Approach 1 – Manually, in Blender or your favorite 3D editor, open your model. Decimate or reduce polygons, but keep the details for reducing the mesh complexity. Remove any unused vertices, edges, or faces. Compressed textures either by size reduction or via optimized file formats (e.g., PNG or JPEG) without losing quality. Implement LOD (Level of Detail) settings if your platform does, simplifying distant versions. Save the optimized 3D model in your project folder as ‘Product_3D_Optimized.fbx’ or the chosen format. Open the optimized model in a viewer or application to check that your geometry, textures, and materials are all looking as you expected while experiencing faster load times and handling.
Additional Technical Tips and Workflows
If you would prefer to create 3D models without buying software, there are free alternatives, including Smoothie-3D, Meshroom, and Blender. Create a new project folder, upload your images, and follow the same steps for mesh generation, refinement, textures, and export. Smoothie-3D is free online software that allows you to create a 3D model from just one 2D photograph (the full version can further process additional images). Meshroom: The photogrammetry workflow supports the generation of fully detailed models.
Open-Source 3D Model Generation
If COLMAP or Meshroom are better for your needs: advanced. Start a new project folder and upload the product images here. Perform feature extraction and matching (COLMAP) or structure-from-motion (Meshroom) to obtain point clouds automatically. Convert the point cloud into a mesh with Blender, and refine it as described in Steps 2–6. Add textures and materials in steps. 3–6. Export the model. FBX format or another compatible format. AR/VR or web platforms > GLTF.
Python-Based 2D–3D Workflow
For automation in Python, you may download Open3D and the COLMAP Python wrapper or PyTorch3D. Add a folder with product photos, and process the mesh auto-generation and geometry cleaning, as well as 3D model saving, with Python code. Example workflow:
import open3d as o3d
# Load images or point cloud data
pcd = o3d.io.read_point_cloud(“product_pointcloud.ply”)
# Apply mesh reconstruction
mesh = o3d.geometry. TriangleMesh.create_from_point_cloud_ball_pivoting(pcd, o3d.utility. DoubleVector([0.005, 0.01, 0.02])
)
# Save final mesh
o3d.io.write_triangle_mesh(“Product_3D_Python.obj”, mesh)
Using SketchUp for 2D to 3D Conversion
Start up SketchUp, open a new project, and import your 2D image as a reference plane. Extract the shapes from the image manually by pushing/tugging (with the Push/Pull tool). Scale and alignment, also adding basic materials to see the product. Export the final model. OBJ or .DAE so you can use them in other 3D apps or software.
AI 3D Model Generators (Free Alternatives)
Some A.I. tools have free options to create 3-D models from 2-D photos. Other libraries, such as OpenAI 3D experiments, Kaedim free tier, or research platforms such as DeepMotion, can also be leveraged. Upload your reference images, send them to AI to reconstruct the model, and download the properly shaped 3D-ready file. Once downloaded, simply use steps 3 through 6 below to detail, texture, render, and export your model.
Conclusion
Following this process, you’ll find that it’s simple to convert 2D photos of your products into photorealistic 3D models. Begin by capturing clear, multi-angle photos and let AI or photogrammetry tools produce a base model for you. Refine the final mesh, add realistic textures and materials, and render for your finished product.
You can upsize this process with batch automation or Python scripts and still preserve accuracy and integrity. With consideration given to mesh quality, textures, and lighting, your 3D models are now ready for any e-commerce, AR/VR, or marketing needs. This workflow is for you if you are a beginner or an advanced designer, and it allows you to make professional 3D assets fast, save time, and give your audience more.
