How to Implement Physics-Accurate Soft Body & Fabric Simulation for AR Product Try-On
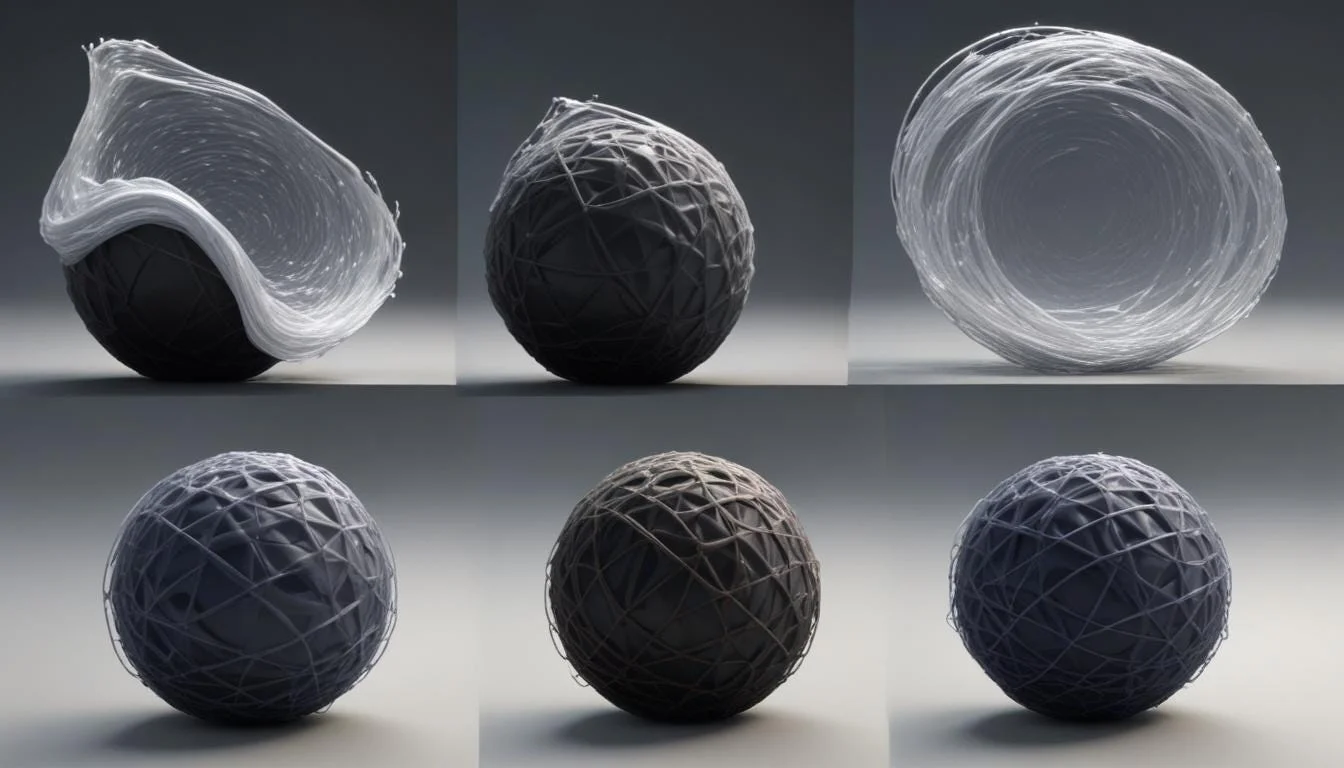
Implementing soft body and fabric simulation for AR product try-on creates a whole range of issues that rigid 3D assets never have. Fabric needs to bend, stretch, collide, and settle on the moving human body naturally – all while running in real time on mobile hardware. When the simulation fails, the users know immediately. Floating clothes, body clipping, jittery movement, or stiff fabric behaviour have broken immersion, weak modelling, and a lack of confidence in fit and reality.
Engineering teams have a difficult time achieving a balance between physical accuracy and performance. Body tracking data introduces noise, and mobile devices have tight frame budgets and cloth solvers are expected to solve clothes; moreover, cloth solvers have to act unpredictably against rapid pose change. Many systems either over-simplify the behaviour of the fabric to keep the system stable, or push the system past what is practical for real-time AR, resulting in dropped frames and inconsistent results.
This guide presents an organised and step-by-step method for renewable physics forbidden credible soft body and fabric simulation dedicated to AR try on. It is more concerned with stability, scalability, and believable motion as opposed to theoretical perfection. Each step is a technical constraint – from the body proxy building to choosing a solver to how the system is designed – each step enables a team to build a system that looks natural, performs well, and builds users’ trust in real-world interaction.
Step 1: Define the Try-On Scope and System Constraints
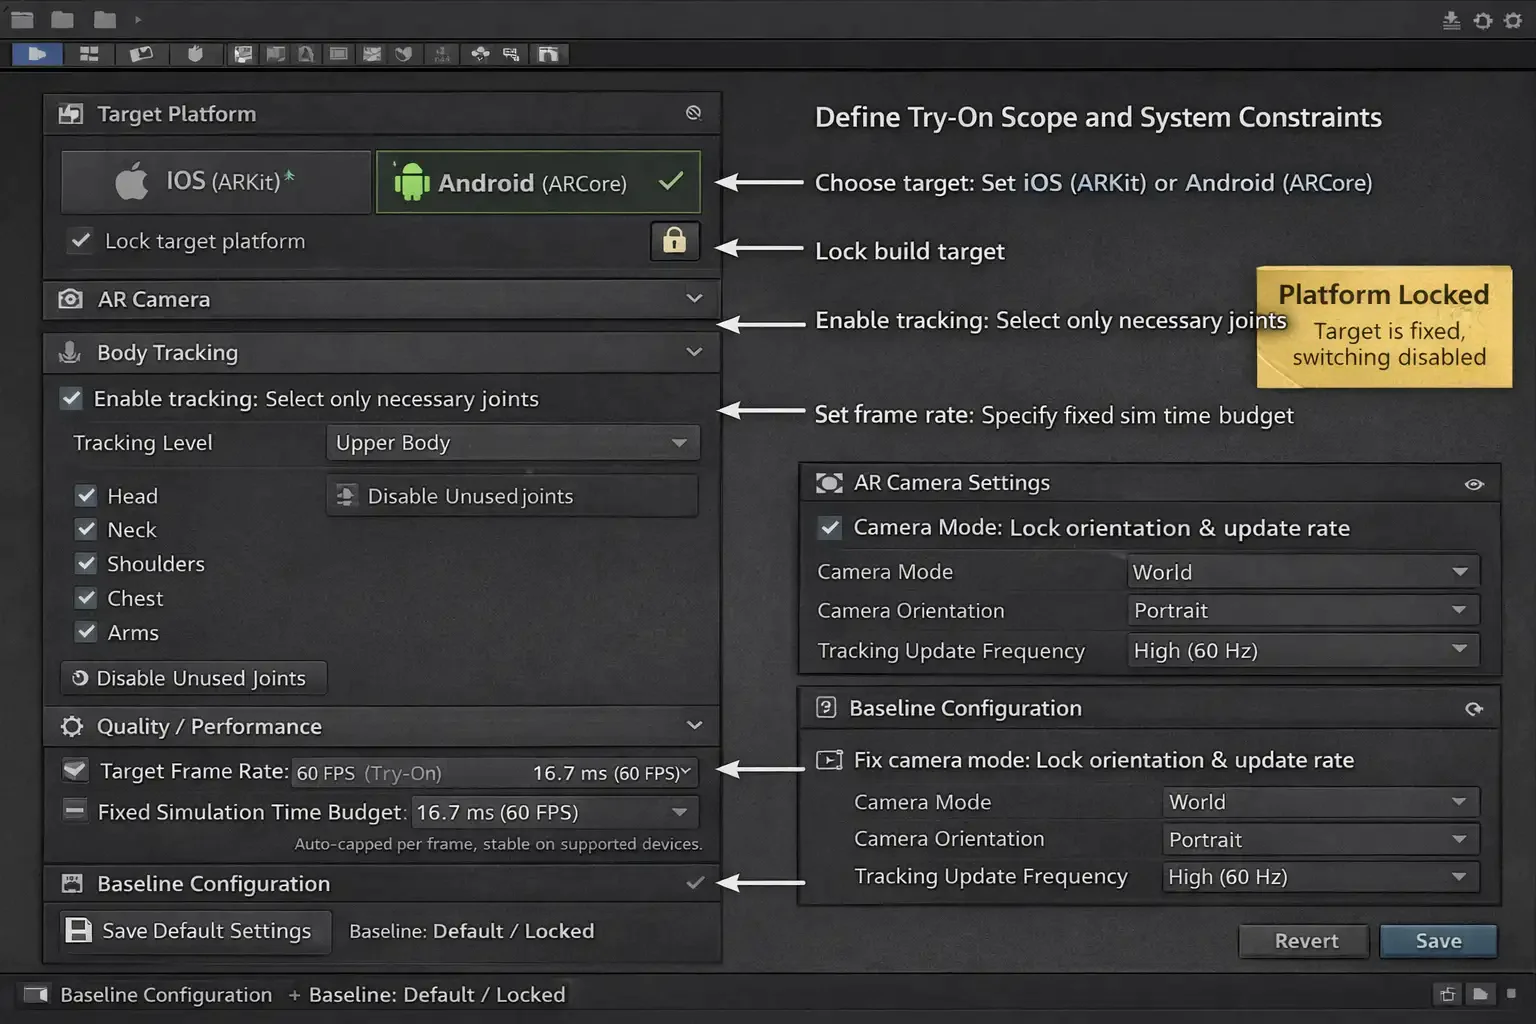
Start by opening your application with an AR project and setting up the system boundaries before we start adding the cloth or soft body-components. In your project settings, choose the target platform (iOS using the ARKit framework or Android using the ARCore framework) you wish to build your project for, and hopefully lock your target so that you cannot make changes to the platform later. Set the desired frame rate in the quality or performance settings, and set the simulation time budget to be fixed to make the system stable in all supported devices.
Then, set body tracking according to the type of product. Allow for only the set of joints that you need to track, e.g., upper body or full body tracking, and disable joints that you don’t use to decrease tracking noise and processing overhead. This step has a direct impact on the stability of the simulation and the accuracy of the collisions.
Then lastly, set the AR camera by fixing the camera mode, the camera orientation, and updates frequency. Save all of these as some sort of baseline configuration and do not change them for the rest of the development. Completing this step means that one is securing that all subsequent simulation work is used within known and controlled technical boundaries.
Step 2: Select and Configure the Cloth Simulation System
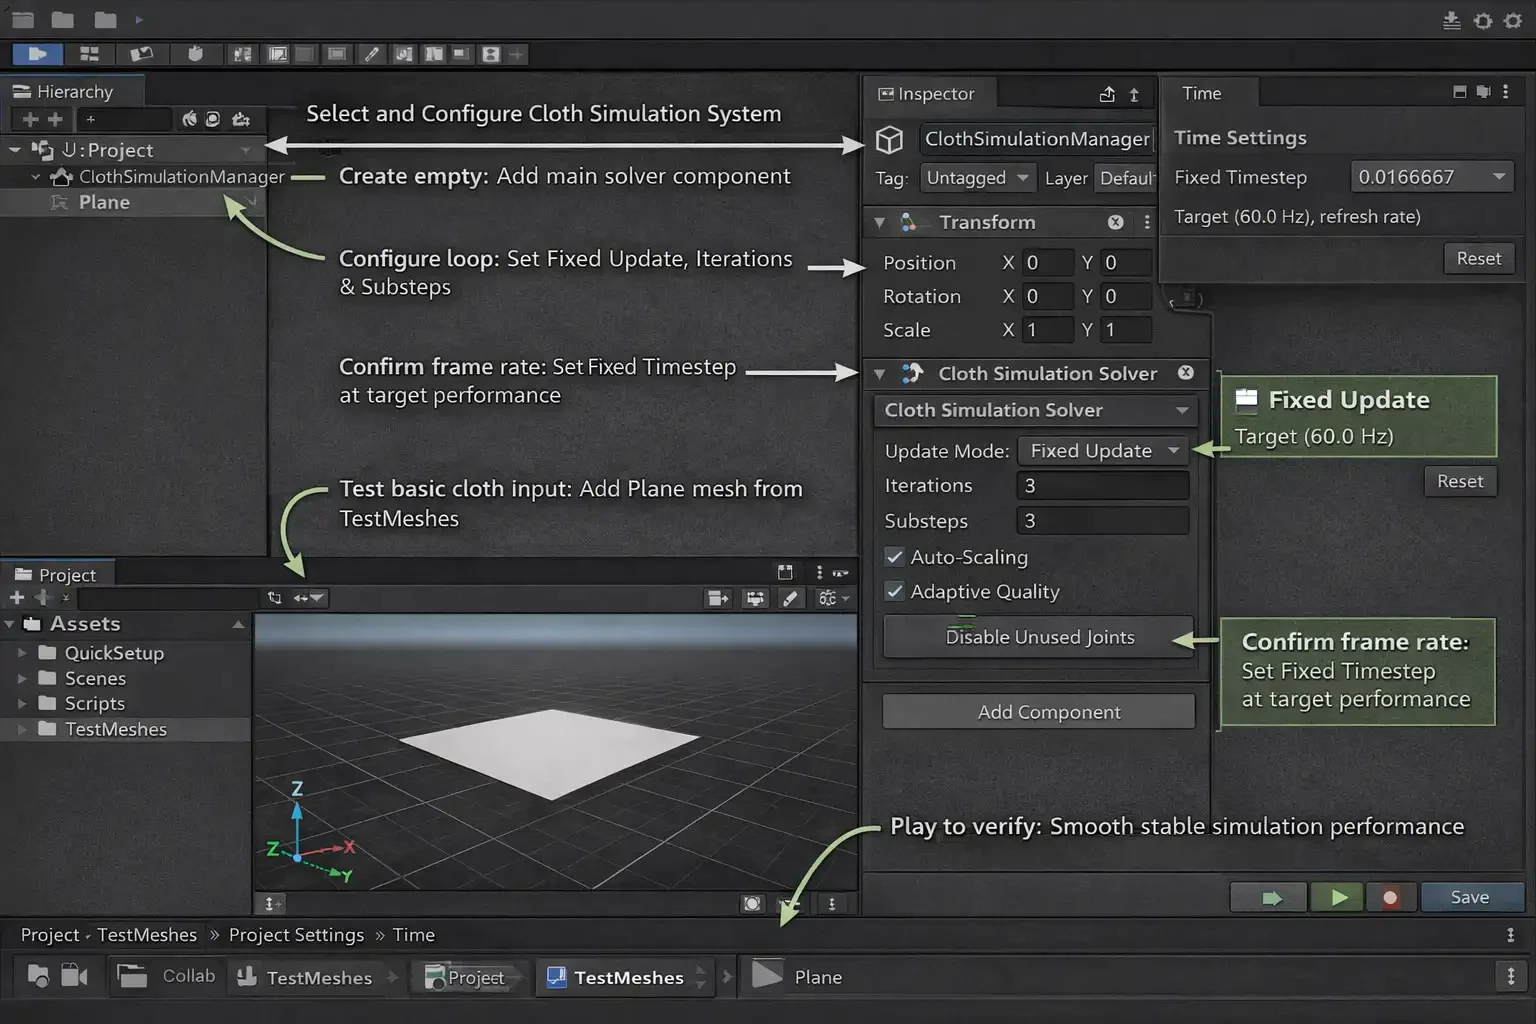
Open your project up in the engine, and the first step is to set up the cloth system. Now, you can add some garments. In Unity, in the Hierarchy panel, right click which a Create Empty on it. Name this object clothemsimulationmanager. Select it, then click on Add Component on the Inspector. If you are using Unity’s built-in system, then you have to add the cloth component. If you are using a custom or third-party solver, then include that solver’s main controller component here instead. Do not use more than one cloth system when enclosing the registration.
Next, we set up the simulation loop. Under the Inspector, place the update mode as Fixed Update, or Manual Update (if it appears). Edit Open Edit Project Settings Time Confirm Fixed Timestep is at your target performance. For the solver purposes, the number of iterations and substeps (fixed value), and the auto-scaling option or adaptive quality options are disabled
Now test the setup. In the panel of the Project (Assets -> TestMeshes), create the input folders (if they are not created already), drag inside (Hierarchy) a simple plane mesh, and add it as the cloth solver input. To make this possible, a user must fall. check add options in Benoit Presse Play, go confirm on the cloth and on a real to update smoothly without frame drops and no dropping. Once you have gotten the scene stable, move on to the next stage.
Step 3: Enable Body Tracking and Create the Collision Body Proxy
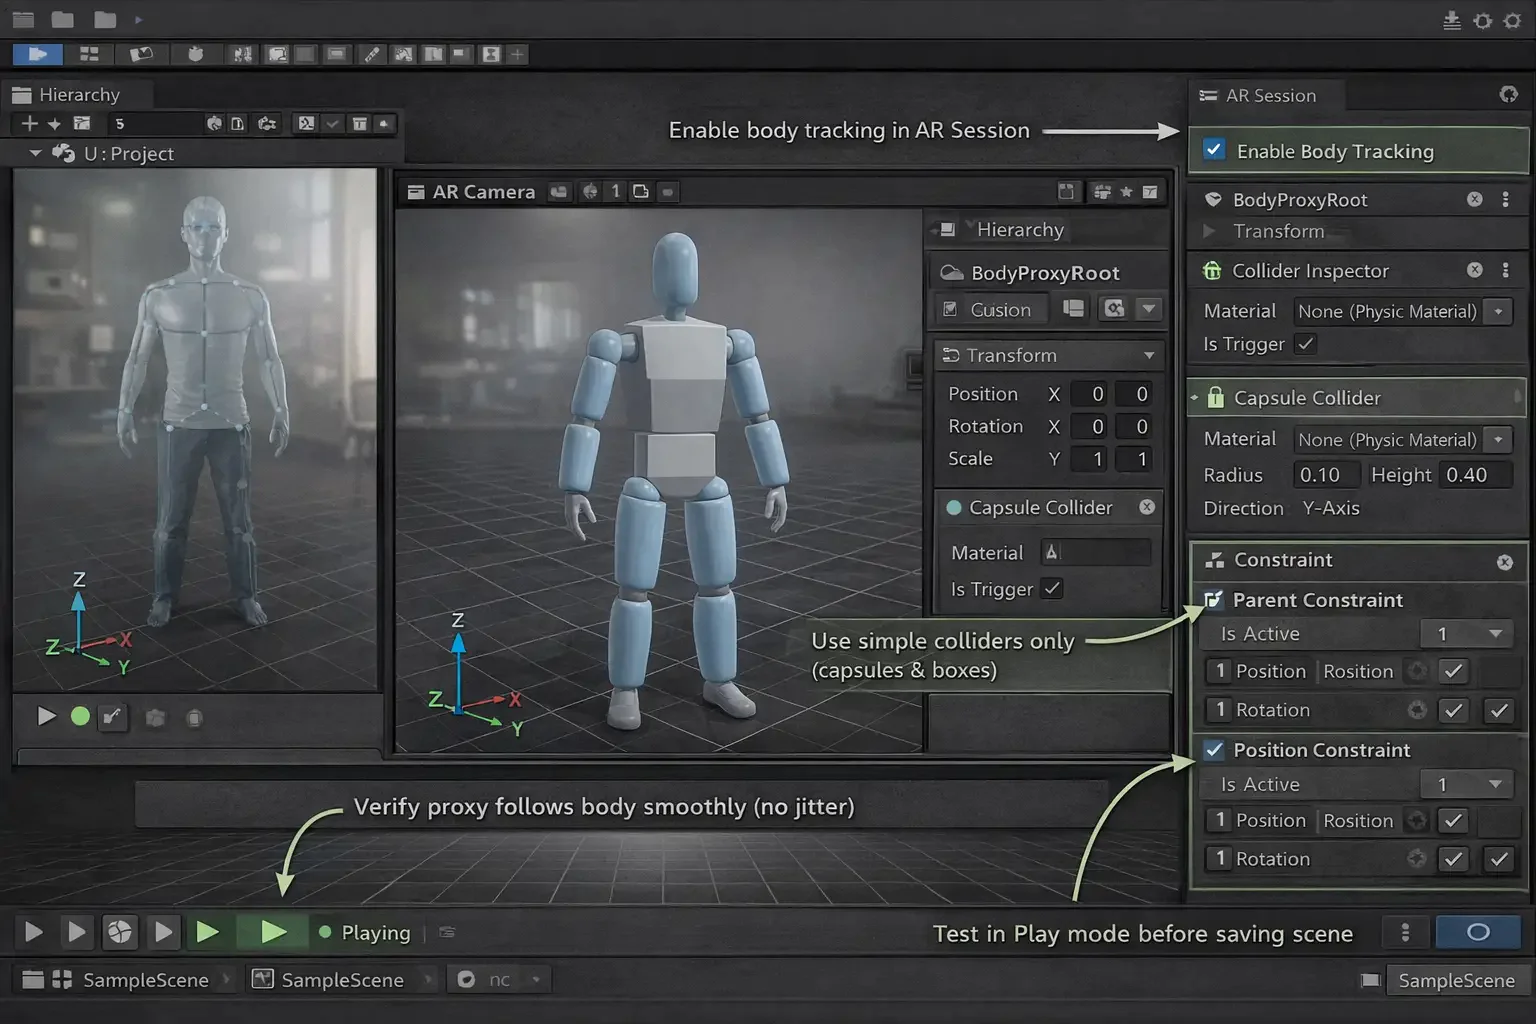
Once you open your AR scene and want to do body tracking, you need to turn on the first thing- body tracking. On the Hierarchy, select the AR Session object. In the Inspector, ensure that body tracking is on. In case you do not see body tracking, go to Window>Package Manager and install AR Foundation and the target platform plugin, and then go back to the scene.
Next, and the most important part, is to create a very simple body that is used to just collide. So in the Hierarchy, double right-click and select Create Empty, and call it BodyProxyRoot. Reset its position and its rotation. Under this object,t add basic objects for arms and legs (Capsules) and for torso (cap or box). Change the size of each of the shapes in the Inspector to a size that approximates the human being.
After that, hook the body proxy to the joints that it needs to track. Select a collider, add a Parent and Position Constraints, and assigna matching joint from the body tracking system. Repeat this for the shoulders and the elbows, hips, and spine. Press the Play button and press in front of the camera. Make sure that the proxy flows with the body without shaking. Upon finding that the movement looks stable, save the scene and continue.
Step 4: Prepare the Garment for Simulation
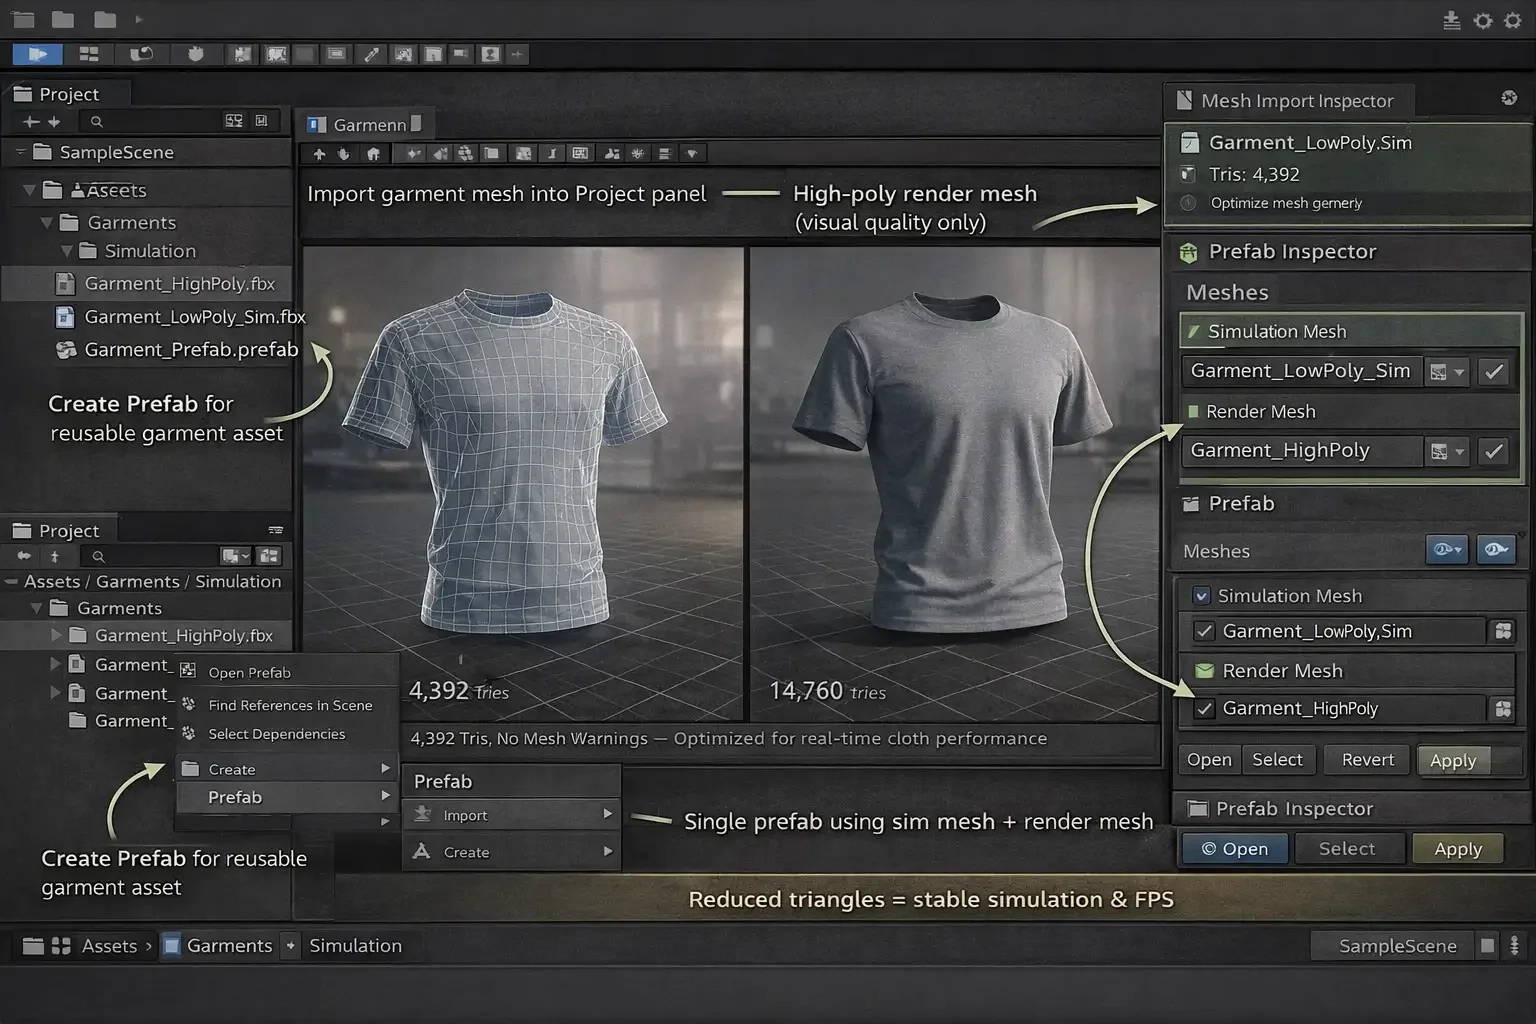
Import the garment mesh in unity Ok Drag the mesh to the Project panel. Create a Prefab from the mesh according to the mesh by using the following functions: create – prefab. You can reuse it in the scene regardless of where it is generated. ulkan number of mesh elements. Next, develop a low-poly simulation mesh by simplifying the garment in your 3D software while trying to keep around 2k-10k triangles so as to still have a good performance. Export this simplified mesh and import it into Unity.
Import clothing mesh into Unity by clicking on it in the Project panel. Create a Prefab out of the mesh by right-clicking on it and creating a Prefab by going to Createplica and then Prefab so you may be able to reuse it within the scene. Next step is creating your own low-poly simulation mesh by simply simplifying the garment in your 3D software by keeping ca 2k-10k triangles (to get rid of performance issues). Export this simplified mesh and import this file to Unity.
If you have a high-poly render mesh and need it for stunning details in the view, make another Renderer for the same. This mesh should be used for display purposes, and not for the simulation. Now, of course, you’ve set up the garment with both a low-poly simulation mesh and a high-poly render mesh to make the garment look good.
Step 4: Assign Fabric Properties

First of all, you must select the cloth component that is attached to your garment mesh in the Hierarchy. In the Inspector, which begins by defining the fabric properties. Set the gravity scale to some value that simulates that it is a heavy or light fabric. For example, lightweight fabrics such as silk may bend towards a lower gravity scale, whereas heavier-weight fabrics such as denim require a higher value. Next up is to adjust the stiffness of the stretching to control the degree to which the fabric resists the stretching. A higher value makes the fabric stiffer, and a lower value allows for greater flexibility.
After that, set the bending stiffness, which is how much the design fabric resists bending. For a natural drape, keep this value moderate. Set the damping values for helping to prevent the fabric from vibrating or “oscillating” unnaturally after making a movement. This will make the movement more uniform. Make sure to use collision damping that will avoid the fabric clipping through the fabric or body proxy.
Once you have set the properties, save the set values. Test the fabric response by running this simulation in the scene view and look out for any reports like unnatural stretching or jittering of the fabric, and adjust respective values accordingly.
Step 5: Attach the garment to the Body
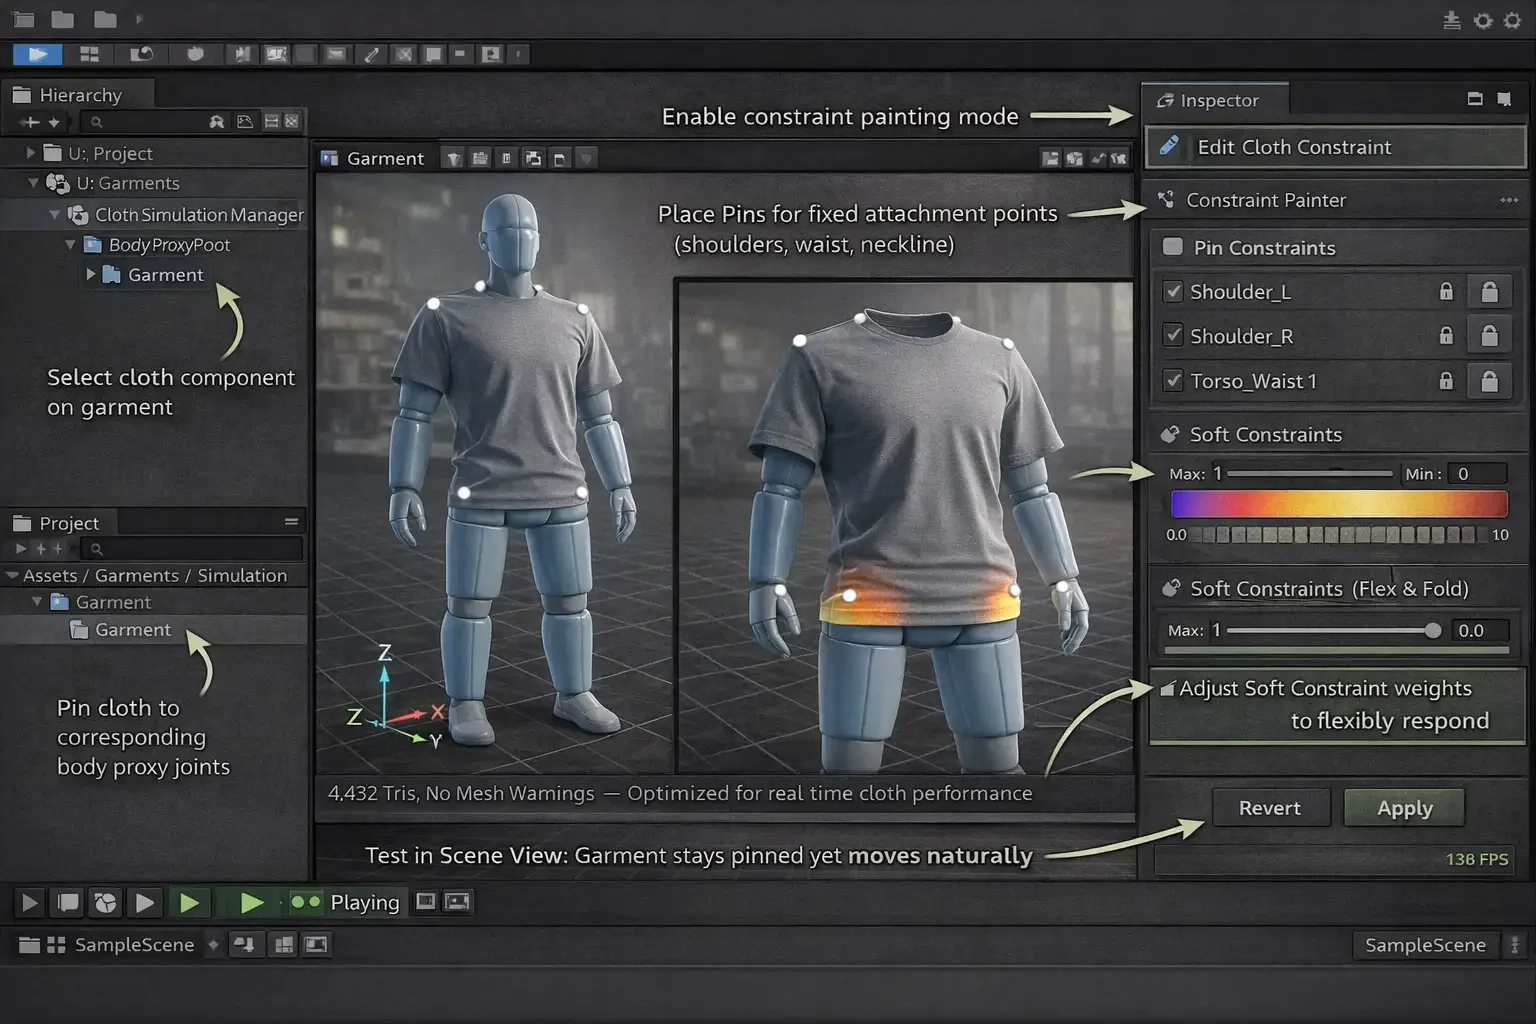
Start by picking on the garment in the Hierarchy and open the garment’s Cloth component of the Inspector. Identify areas where the garment must remain affixed to the user’s body, such as the shoulders, the waistline, or the neckline. For each of the attachment points, create Pin Constraints by selecting the mesh of the garment and creating a Cloth Pin in the Inspector. Pin the garment in place to the corresponding body proxy joint, such as the shoulder or waist, making sure that the garment does not shift out of place, yet can still move with the body movement.
Next, put Soft Constraints in areas that should move in a natural way, such as bunches or hemlines. In the Cloth component, turn on Stretch Constraints and Bending Constraints in order to control the behaviour of the garment as the user is moving. This means that the fabric will be able to flex and fold without feeling as rigid or unnatural.
After setting up the constraints, go to the Scene View and simulate the garment to see it attach to the body. Ensure that the garment remains in place in the fixed points whilst responding correctly to movement. If the need be, adjust the pin settings or soft constraint settings to better achieve the stability and flexibility. Once you’re satisfied with it, save the scene.
Step 6: Enable Body–Cloth Collision
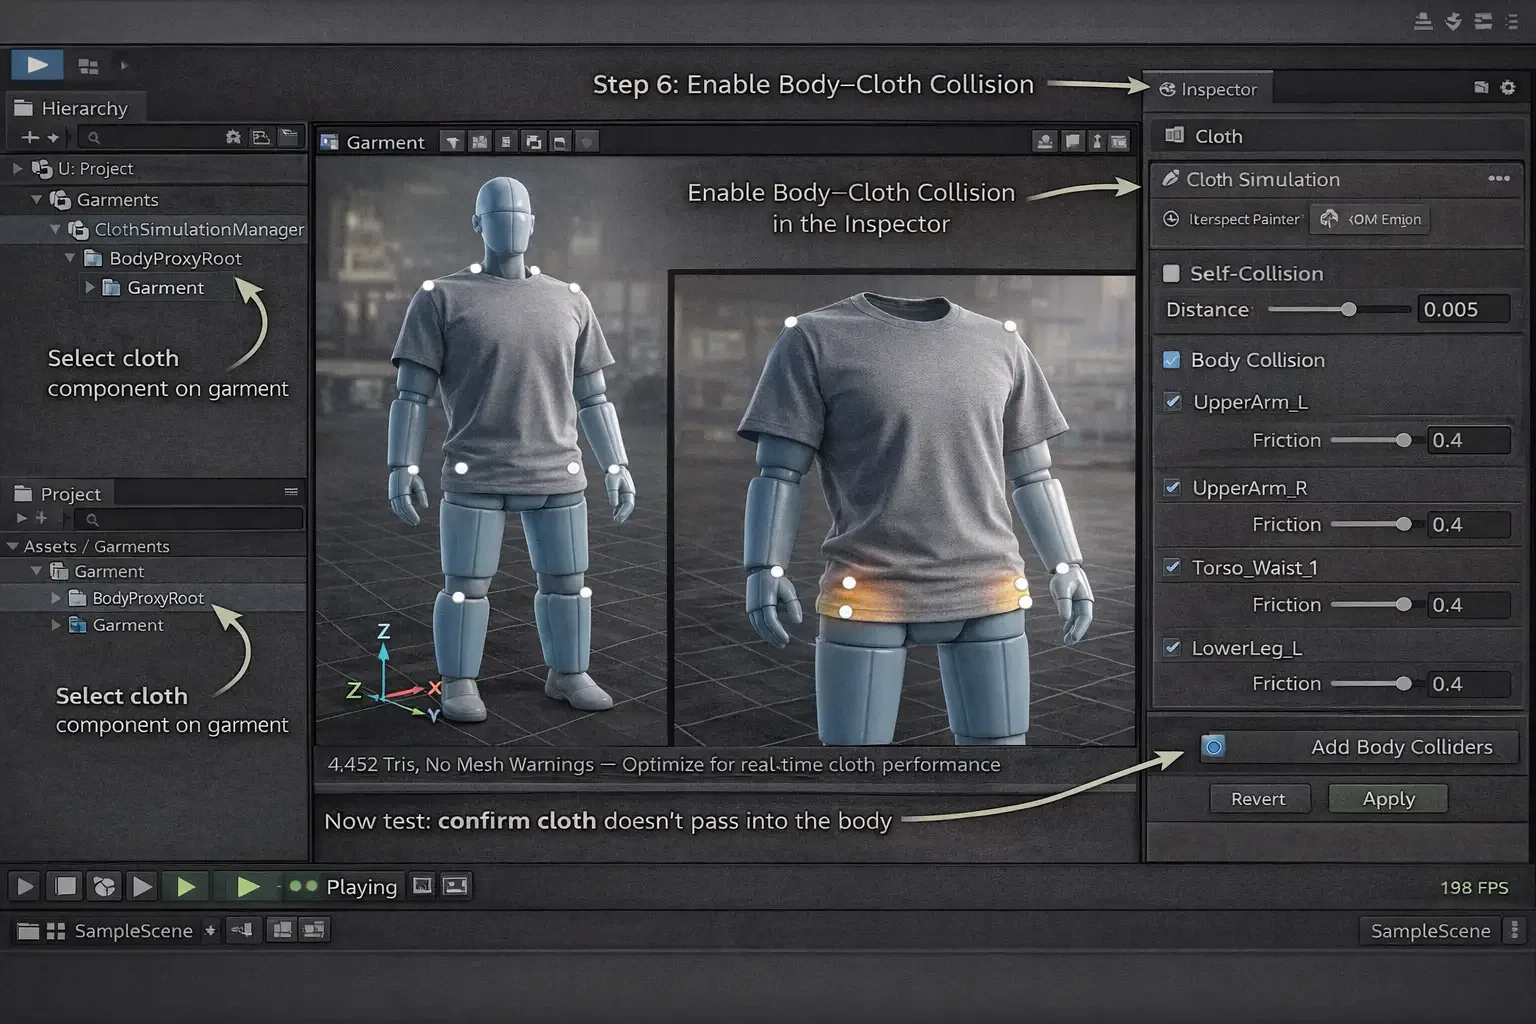
Select the Cloth component attached to the garment mesh (Hierarchy). In the Inspector, find the Collision section and tick Self-Collision and Body Collision. Under the Self-Collision, you can control the distance at which the cloth is allowed to be close towards other cloths without getting an intersection using the Distance setting. A smaller value will not allow fabrics to overlap with each other, but may add some computational overhead, hence balancing it as per the performance requirement.
Next, set the Body Proxy colliders (made in Step 3) in the cloth’s Collision list. In order to do this, you only need to expand the Collision section within the Cloth component and add each one of the body colliders (similar to capsules for arms, legs, and torso) to the list. Set the Friction value for each collider to control how the clothing will interact with the body (higher friction values will make the cloth stick to the body more, and higher values will set the cloth to be able to slide against the body more).
Once you have set up the collision, you can set up the simulation to see how the cloth relates to the body. Make sure the fabric does not pass through the body mesh or itself. If we face problems with clipping or an unnatural behaviour, then provide a slight alteration in the collision distance, friction, or adjust solver settings to get better results. Save the scene at which time all behaviour is working properly.
Step 7: Stabilise Cloth Simulation and Optimise Motion
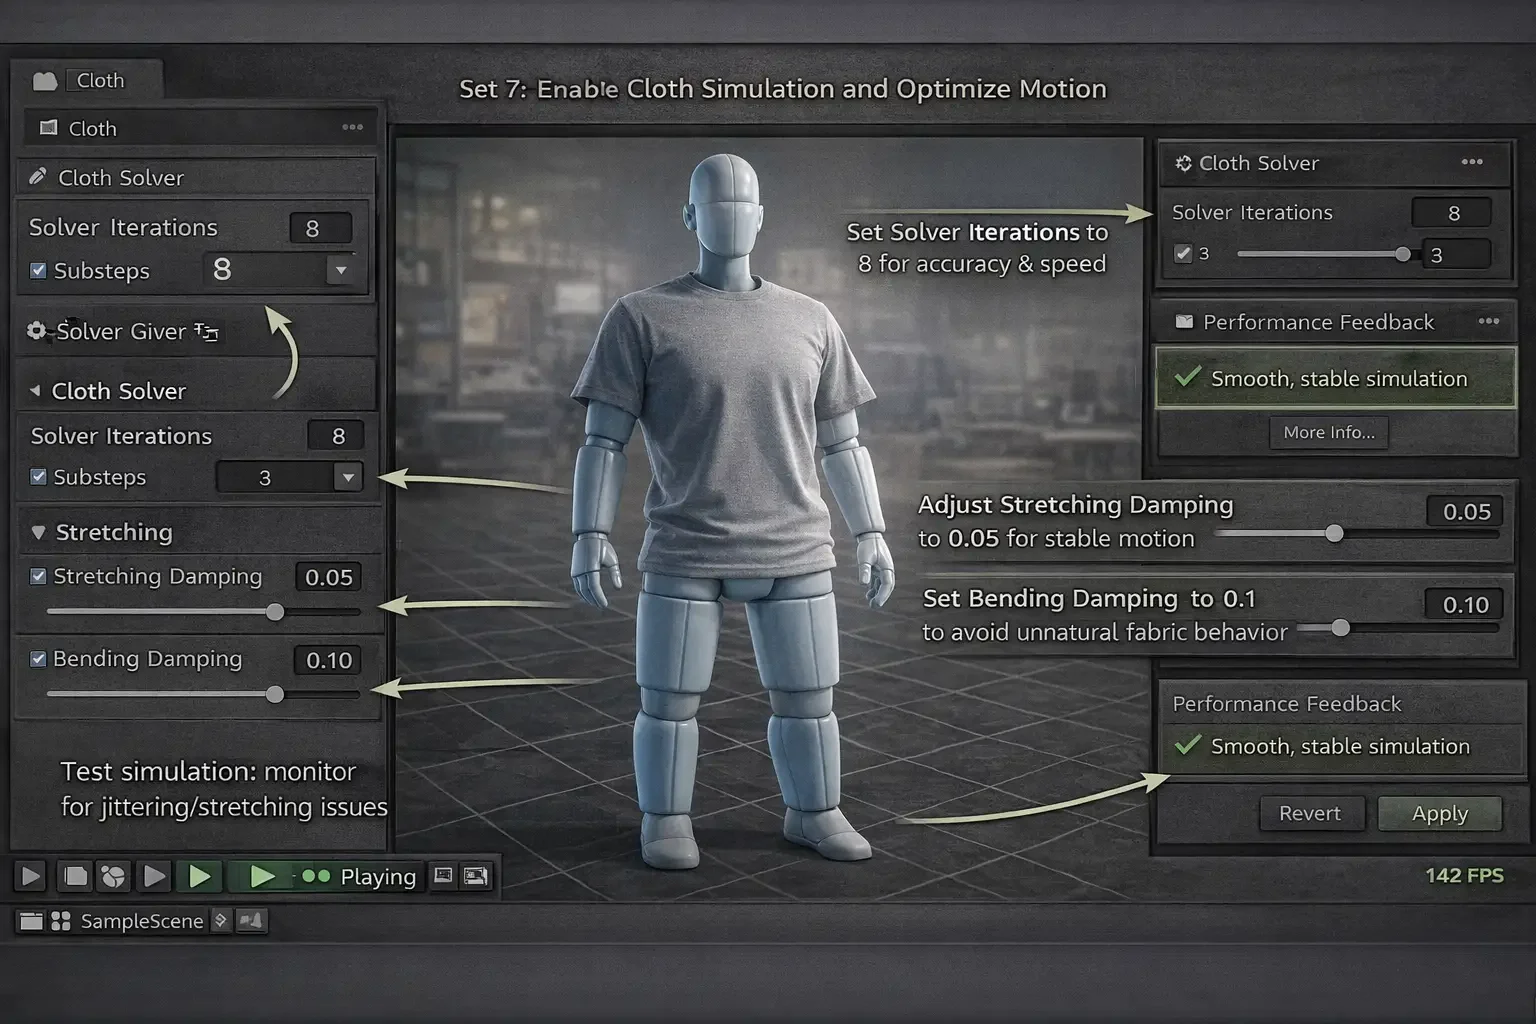
In order to make the cloth simulation more stable, select the Cloth component of the Cloth Raf will pop up in the inspector and set Solver Iterations to 8. This ensures this simulation is running with good accuracy, but continues to be fast. Next, turn on Substeps under the Cloth Solver section and choose 2 or 3 for them. This smoothes out the behaviour of the cloth, especially when made to move fast. Adjust the Stretching Damping to 0.05 and Bending Damping to 0.1 to ensure that you don’t make the fabric vibrate or move in a garment that is unnatural. Run the simulation and observe the behaviour of the cloth. If you have noticed a lack of stability (i.e. excessive stretching/jittering), then increase the Solver Iterations or Substeps slightly. After the cloth is simulating smoothly and without problems, save the scene and proceed to the following steps.
Step 8: Test and Adjust on Real Devices
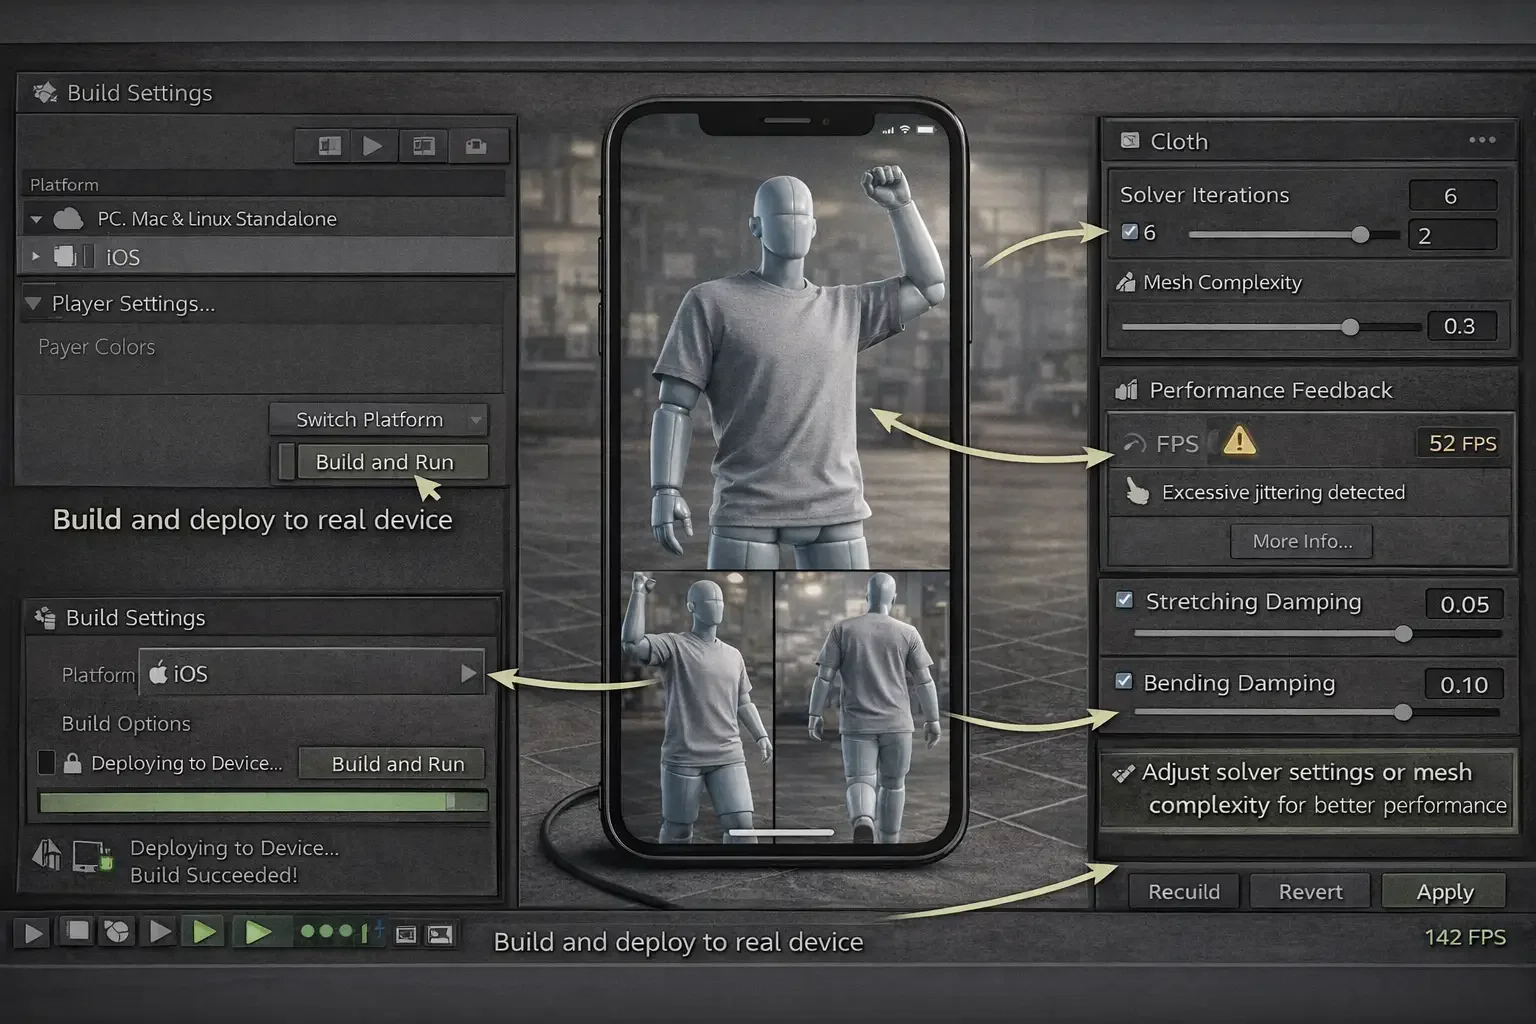
For having the simulation working as expected in an actual world situation, deploy your project to an actual device. First, connect your device and build the project directly to your device. In Unity, go to the File menu and select Build Settings, select your target platform (iOS or Android) and then click Build and Run. Once the app is running on the device, see how the cloth reacts in different movements: raises arm, rotates and walks. Look for such problems as clipping, jittering or unnatural stretching.
The next step is refinement of the simulation by making minor changes to either solver settings or cloth properties if required. If performance becomes poor or if there are glitches noticed, lower Solver Iterations or Substeps, or Mesh Complexity. more specifically, ensuring that the cloth interacts seamlessly with the user’s body proxy, and that the body tracking does not change over time
Step 9: Optimise for Performance

Optimise the performance by starting with simplifying the meshes. Select the simulation mesh of low poly garment and assign it to the cloth component. When working with paperwork under sunlight, be sure that you use only the mesh with a high polygon volume for just rendering and for further distances, there is an option called LOD (Level of Detail) that reduces the amount of polygons in the mesh. Next,t you need to lower Solver Iterations to 4-6 and Substeps to 2-3 in the Cloth component. Have a run at the simulation and see the frame rate – if too bad, you need to reduce these till you get a good balance (somewhat) between realism and frame rate.
Then, change the Fixed Timestep in Edit Probing Project Settings, update the Time to 0.02 for the smooth simulation without losing any performance. For upper-class devices, empower the cloth simulation in a GPU, if supported, / Metal for iOS, Vulkan for Android, so calculations will enter the GPU from reasonable machines, which will also enhance the entire Memory efficiency.
This will deploy the app to different devices using Build and Run to test the performance. Focus on low-end devices and look out for frame drops/lag. Use the Profiler in Unity to find any performance bottlenecks, for example, spikes in physics calculations. If required, reduce the meshes of the clothes, lower the resolution of the proxy for the body or fine-tune some settings for damping and friction to achieve better responsiveness. Once that moment is stable in each device, save the scene and finalise the settings.
Step 10: Final Testing and User Interaction Validation
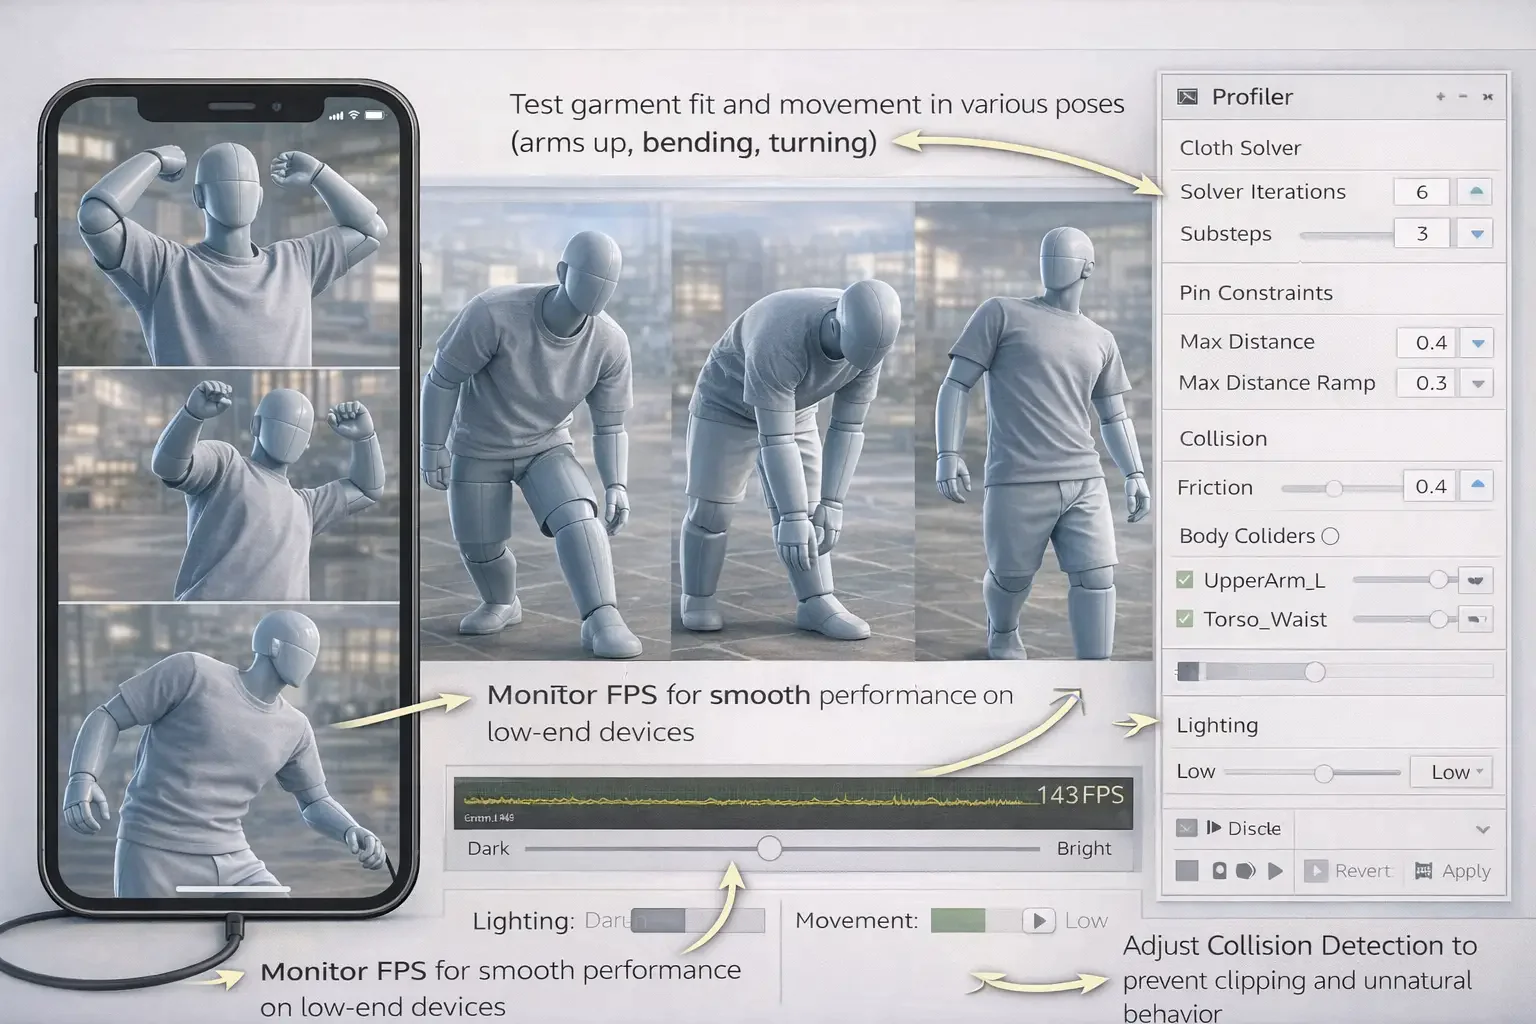
Install the application on your phone and practice with various poses of the body. Lift, bend and turn to check the fit of the garment around the shoulders, waist, and neck. Make sure that the garment flows with the body without clipping or pulling unnaturally. Exercise the garment under different lighting conditions as well as with motion of the background to ensure that the behaviour stays the same under varying conditions.
Test low-end machines and ensure that the frame rate does not change in fast motions or pose changes. Make sure that the simulation is not choppy and does not have drops in frame. Authentication of user interactions through alternate poses. Ensure that the clothing does not slip, attaches correctly to the body and is not snappy or snatchy. In case of problems, then select solver iterations, substeps or pin constraints to enhance cloth stability. Adjust collision detection to minimise clipping or unnatural collisions. As soon as the testing is complete and all the things are working as intended, you can save the scene and pack the project to be deployed with the last settings and optimisations.
Cocnlsuion
With these steps, you have managed to create a high-performance, high-fidelity cloth simulation of AR try-ons. Since body tracking configuration, cloth movement stabilization and mobile performance optimisation, every step is taken to make the garment act naturally and realistically on the body of the user, and can smoothly act on the and other devices. The testing in real-world conditions and interaction with the users ensures the final product will provide an immersive, reliable, and responsive experience. After the last tweaking and optimisation, your AR product try-on is finally complete, and it presents a smooth and realistic virtual try-on experience.
