How To Scrape Data From Websites Using WebRTC And Socket Connections
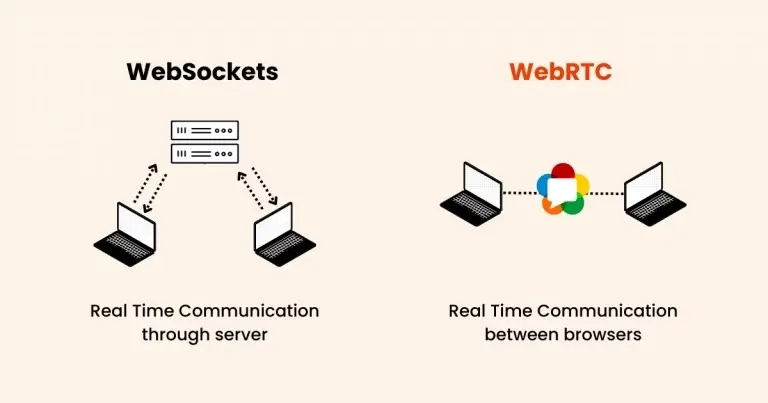
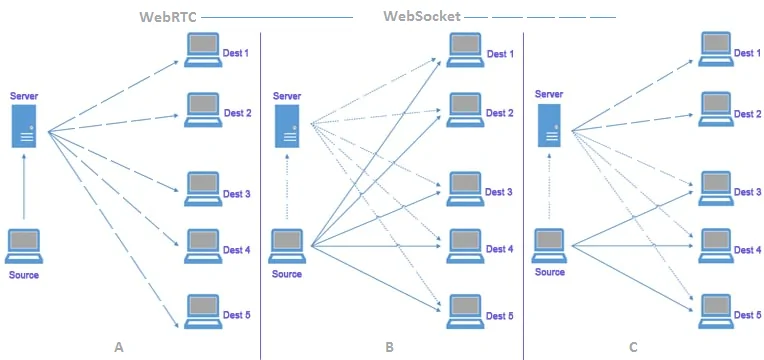
A number of strategies are employed by users in the web scraping arena, yet for the sites containing real-time data, the traditional HTTP requests-based methods are proven to be inadequate. Nevertheless, with the progress in website security measures, data extraction is more challenging now, requiring advanced and more efficient scraping tools to be developed simultaneously. WebRTC, or Web Real-Time Communication, is a group of open-source technologies that allow web browsers and mobile apps to communicate directly over the internet in real time. Peer-to-peer sharing of data, audio, and video is possible without the need for further software or plugins. Applications including phone calling, video conferencing, live streaming, online gaming, and more are frequently built with WebRTC. On the other hand, Socket is a full-duplex, bidirectional protocol used in the same client-server communication situation as HTTP, which begins with ws:// or wss://. Since it is a stateful protocol, the client-server connection will remain active until one side (client or server) ends it. The connection is ended on both ends when either the client or the server closes it. Data scraping from the websites incorporating WebRCT or Socket connections is almost impossible without following a more beyond basic and advanced approach, like the one highlighted in this blog.
Step 1: Identifying WebRTC Or WebSockets

The primary step in scraping information utilising WebRTC or socket connections is recognizing whether the site utilizes these technologies for data transfer. WebRTC could be a real-time communication protocol outlined for peer-to-peer associations, generally utilized in video calls or live streaming. Alternatively, WebSockets, on the other hand, could be a protocol that encourages two-way communication between a client and server, frequently utilized in real-time applications such as chat apps or live notifications.
To recognize WebRTC or socket utilization, start by reviewing the website’s behaviour. You’ll do this by opening the browser’s Developer Tools using F12 on most browsers and heading to the Network tab. Search for actions such as media trade or unusual associations that will demonstrate WebRTC or WebSocket utilization.
For WebRTC, observe any activity labelled with STUN, TURN, or SDP, which are basic in building up peer-to-peer connections. In the same way, the WebSocket communication can be identified under ws:// or wss:// connections, demonstrating active socket streams.
A second option is to inspect the page source for important JavaScript code that gathers WebRTC or WebSocket APIs. Seek for functions or libraries such as RTCPeerConnection for WebRTC or WebSocket for attachment communication.
By carefully examining these connections, you will be able to determine if the site is utilizing either of these technologies to manage real-time information, which can guide the second step within the scraping process.
Step 2: Examining The Network Traffic

After you have identified that the site employments WebRTC or socket connections, the following step is to examine the network traffic to understand the way data is being transmitted. This phase is pivotal for revealing any real-time information streams that you can scrape.
To start, load your browser’s Developer Tools once more with F12 and proceed to the Network tab. At this level, you can monitor all the network requests created by the webpage. For WebRTC traffic, seek signalling data such as SDP or ICE candidates, exchanged between peers. These associations are often represented within the WebSocket or XHR (XMLHttpRequest) sections.
In the case of WebSocket connections, filter the network traffic for ws:// (for unencrypted connections) or wss: // (for encrypted connections). In case you catch a WebSocket connection, right-click it and select View WebSocket Frames to observe the real-time information being transferred. That can incorporate JSON objects or other information formats that can be parsed and scraped.
In case of WebRTC, you will analyze WebSocket or HTTP traffic in relation to SDP messages and ICE candidates, which are for peer-to-peer connection. Furthermore, there is a possibility of witnessing WebRTC media protocols in case the website is operating media streams.
Step 3: Extracting The Essential Parameters
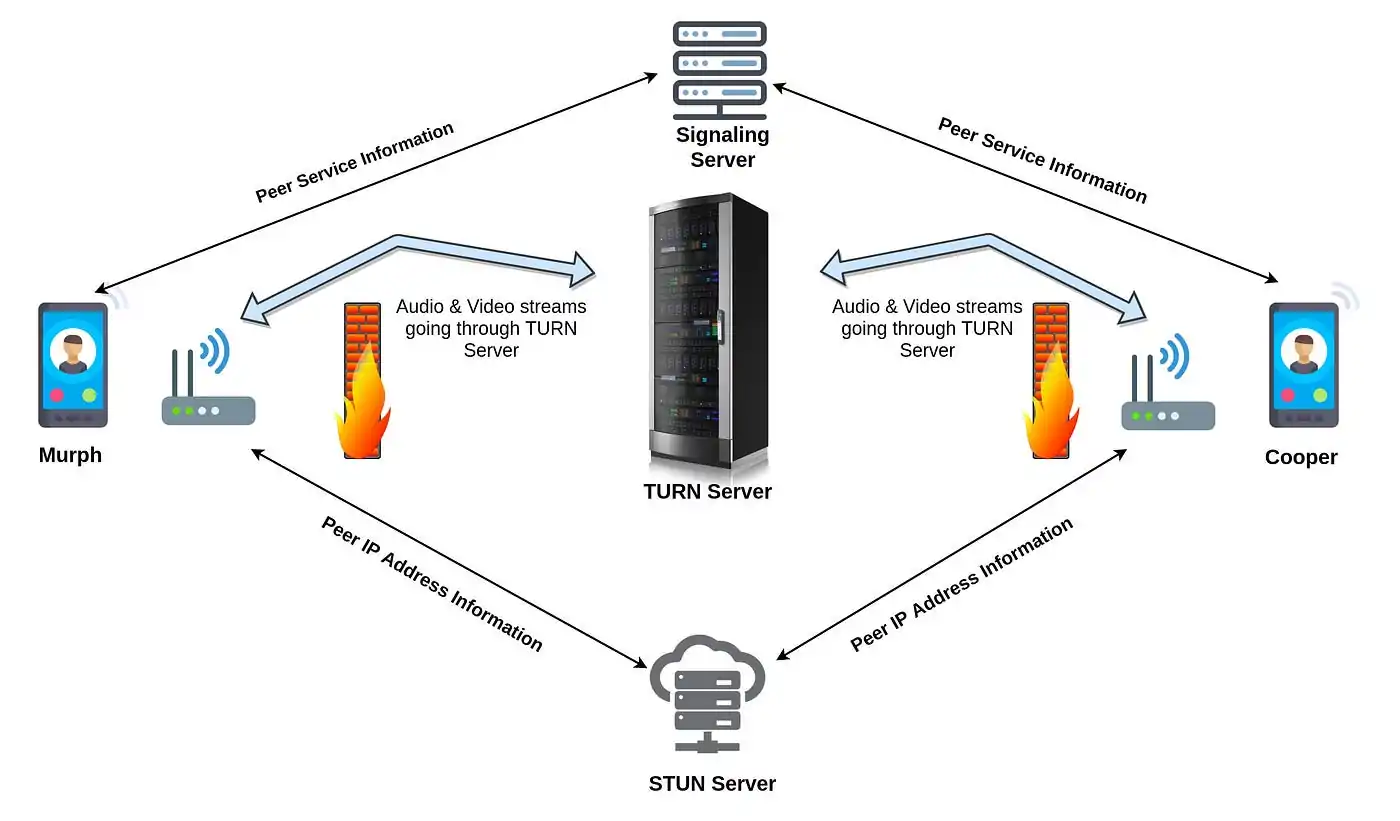
For WebRTC, these variables include extracting Stun (Session Traversal Utilities for NAT) and TURN (Traversal Using Relays around NAT) server details, which are pivotal for peer-to-peer communication. These servers help peers find each other and relay information when direct connections are not possible.
You’ll extract these parameters by reviewing the JavaScript code or network traffic. Seek for signalling messages that incorporate information just like the STUN/TURN servers or ICE candidates, which are exchanged during the WebRTC handshake methodology.
Here is an illustration of what the WebRTC code might look like:
let configuration = {
iceServers: [
{urls: ‘stun:stun.l.google.com:19302’},
{urls: ‘turn:turn.example.com’, username: ‘user’, credential: ‘pass’}
]
};
let peerConnection = new RTCPeerConnection(configuration);
On extricating these details, you’ll duplicate the connection in your possess scraping script, permitting you to access real-time information streams.
Step 4: Replicating The WebRTC Or WebSocket Connection
After you have gathered the connection parameters like STUN/TURN servers or WebSocket URLs, the following step is to replicate the WebRTC or WebSocket connection in your scraping script. It will allow you to set up a connection with the server, empowering you to listen for and capture the real-time data being transmitted.
For WebRTC, you’ll replicate the peer-to-peer connection utilizing the RTCPeerConnection API. Below is an essential example of creating a connection utilizing the gathered STUN/TURN server details:
const configuration = {
iceServers: [
{urls: ‘stun:stun.l.google.com:19302’},
{urls: ‘turn:turn.example.com’, username: ‘user’, credential: ‘password’}
]
};
// Create a new RTCPeerConnection with the configuration
let peerConnection = new RTCPeerConnection(configuration);
// Add event listeners for various WebRTC events
peerConnection.onicecandidate = function(event) {
if (event.candidate) {
console.log(‘ICE candidate:’, event.candidate);
}
};
// Optionally, you can add media streams or data channels here
In WebSockets, you’ll set up a connection like this:
let socket = new WebSocket(‘wss://example.com/socket’);
// Event listener for when the connection opens
a socket.onopen = function(event) {
console.log(‘WebSocket connection established’);
socket.send(JSON.stringify({action: ‘subscribe’, channel: ‘data’})); // Example subscription
};
// Event listener for receiving messages
socket.onmessage = function(event) {
console.log(‘Received data:’, event.data);
};
// Handling errors
socket.onerror = function(error) {
console.log(‘WebSocket Error:’, error);
};
By duplicating the connection using the proper protocols, your script will be able to connect the data channels, enabling you to grab and process the real-time data flow.
Step 5: Capturing And Parsing The Real-Time Data Streams

After you have effectively built up the WebRTC or WebSocket connection, the following phase is to capture and parse the real-time data streams coming from the server. This is often the core of your information scraping process because it permits you to gather the data you are interested in as it is being transmitted.
For WebRTC, the information is regularly received through information channels. These channels transmit messages between peers in the form of binary or text information. To catch and parse this information, you will tune in for the ondatachannel event and then process the incoming messages:
let peerConnection = new RTCPeerConnection(configuration);
// When a data channel is created
peerConnection.ondatachannel = function(event) {
let dataChannel = event.channel;
// Listen for incoming messages
dataChannel.onmessage = function(event) {
console.log(‘Received WebRTC message:’, event.data);
// Parse the message based on the expected format (JSON, plain text, etc.)
let data = JSON.parse(event.data);
processData(data);
};
};
function processData(data) {
// Example: Store or analyze the data
console.log(‘Processed Data:’, data);
}
For WebSocket connections, the onmessage event handler is utilized to capture incoming messages. These messages might be in different formats, like JSON or plain text, so you will have to parse them appropriately. Below is an example:
let socket = new WebSocket(‘wss://example.com/socket’);
// Event listener for receiving messages
socket.onmessage = function(event) {
console.log(‘Received data:’, event.data);
// If the data is JSON, parse it
try {
let parsedData = JSON.parse(event.data);
processData(parsedData);
} catch (error) {
console.error(‘Error parsing data:’, error);
}
};
function processData(data) {
// Example: Process or store the parsed data
console.log(‘Processed Data:’, data);
}
In both cases, you are required to listen for messages and parse them based on their structure. It will permit you to extract the information you opt for, whether it is real-time updates, messages, or any other content being transferred over the connection.
Step 6: Storing Or Processing The Extracted Information

The ultimate step in scraping information from WebRTC or WebSocket connections is to store or process the extracted information according to your particular requirements. It might include saving the data to a file, sending it to a database, or executing real-time examination.
If you will be storing the information, you can select from different formats, including JSON, CSV, or even directly in a database like SQL or NoSQL. The following are a few cases to store or process the information.
To store the data in a JSON form, look at this example:
const fs = require(‘fs’); // File system module in Node.js
function storeData(data) {
// Convert data to JSON format
const jsonData = JSON.stringify(data, null, 2);
// Save to a file
fs.writeFile(‘data.json’, jsonData, (err) => {
if (err) {
console.error(‘Error writing file:’, err);
} else {
console.log(‘Data saved successfully!’);
}
});
}
// Example usage
storeData({ key: ‘value’, data: [1, 2, 3] });
Similarly, if saving data in a database, here is what you need to do:
Suppose you are employing a database like MongoDB, you’ll insert the information just this way:
const { MongoClient } = require(‘mongodb’);
async function storeInDatabase(data) {
const uri = “mongodb://localhost:27017”;
const client = new MongoClient(uri);
try {
await client.connect();
const database = client.db(‘scrapedData’);
const collection = database.collection(‘realTimeData’);
// Insert the data into the collection
const result = await collection.insertOne(data);
console.log(‘Data inserted with ID:’, result.insertedId);
} finally {
await client.close();
}
}
// Example usage
storeInDatabase({ key: ‘value’, timestamp: Date.now() });
Real-Time Information Processing
In a few cases, you will not need to store the information but simply prepare it in real time. For instance, in case you are scraping live prices or events, you can trigger activities based on approaching information:
socket.onmessage = function(event) {
let data = JSON.parse(event.data);
// Example: Real-time processing (e.g., alert if price drops below a threshold)
if (data.price < 100) {
console.log(‘Price Alert! Below 100:’, data.price);
// Trigger other actions (e.g., send an email, update UI, etc.)
}
};
That last step guarantees that once you have captured the pertinent data, you’ll be able to handle it in a significant way, conforming to your scraping objectives. These objectives can include saving the information for later examination or triggering actions in real-time. Ultimately, whichever option you consider, the choice of storage or processing strategy always relies on the use case.
Conclusion
In summary, scraping the sites that use WebRTC and socket connections offers access to real-time and dynamic data, which is not attainable via traditional scraping. The real-time updates, including live scores, stock prices, or action bids, can be accessed without needing any server polling or page reloading. Additionally, it is observed that websites sometimes, to avoid scraping, wittingly hide or jumble information in the front end. In that case, if the data is transmitted over WebSockets or WebRTC, it can be smoothly acquired at the protocol level before it gets encrypted or rendered.
