How To Create A Data Entry Chatbot Using Dialogflow And Google Sheets
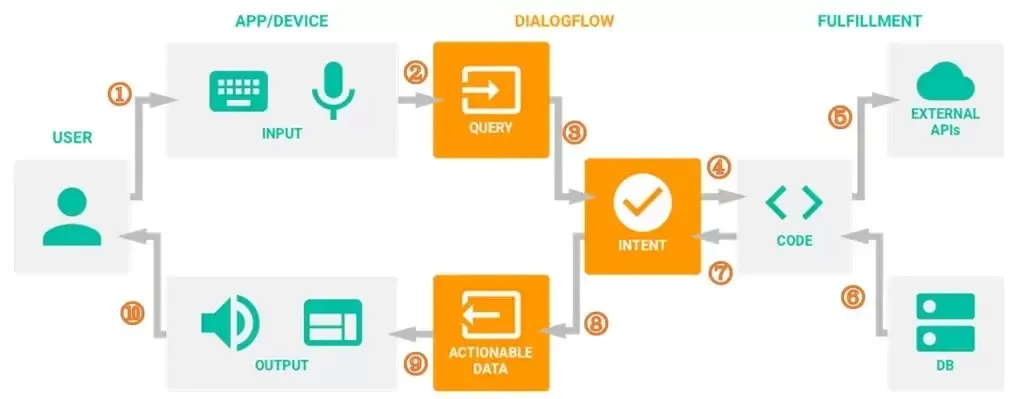
Google’s Dialogflow technology for natural language processing enables the development of voice apps and chatbots. It interprets user input and produces relevant responses, acting as your chatbot’s brain. Conversely, many of us are familiar with Google Sheets, a flexible spreadsheet program. It is ideal for organized data management, analysis, and storage. Dialogflow with Google Sheets integration can provide a potent combination for data entry in the creation of dynamic and interactive chatbots, thus making data processing better. Having such a chatbot can instantly access and update your data, delivering precise and timely information. These two tools can provide a more efficient and streamlined solution than manual data input methods, enabling you to complete the task more effectively while saving your time and effort. Nevertheless, while using Dialogflow and Google Sheets to create data entry chatbots you need to follow a proper process to get productive and anticipated outcomes. Here is a step-by-step process.
Step 1: Setting Up A Google Cloud Project
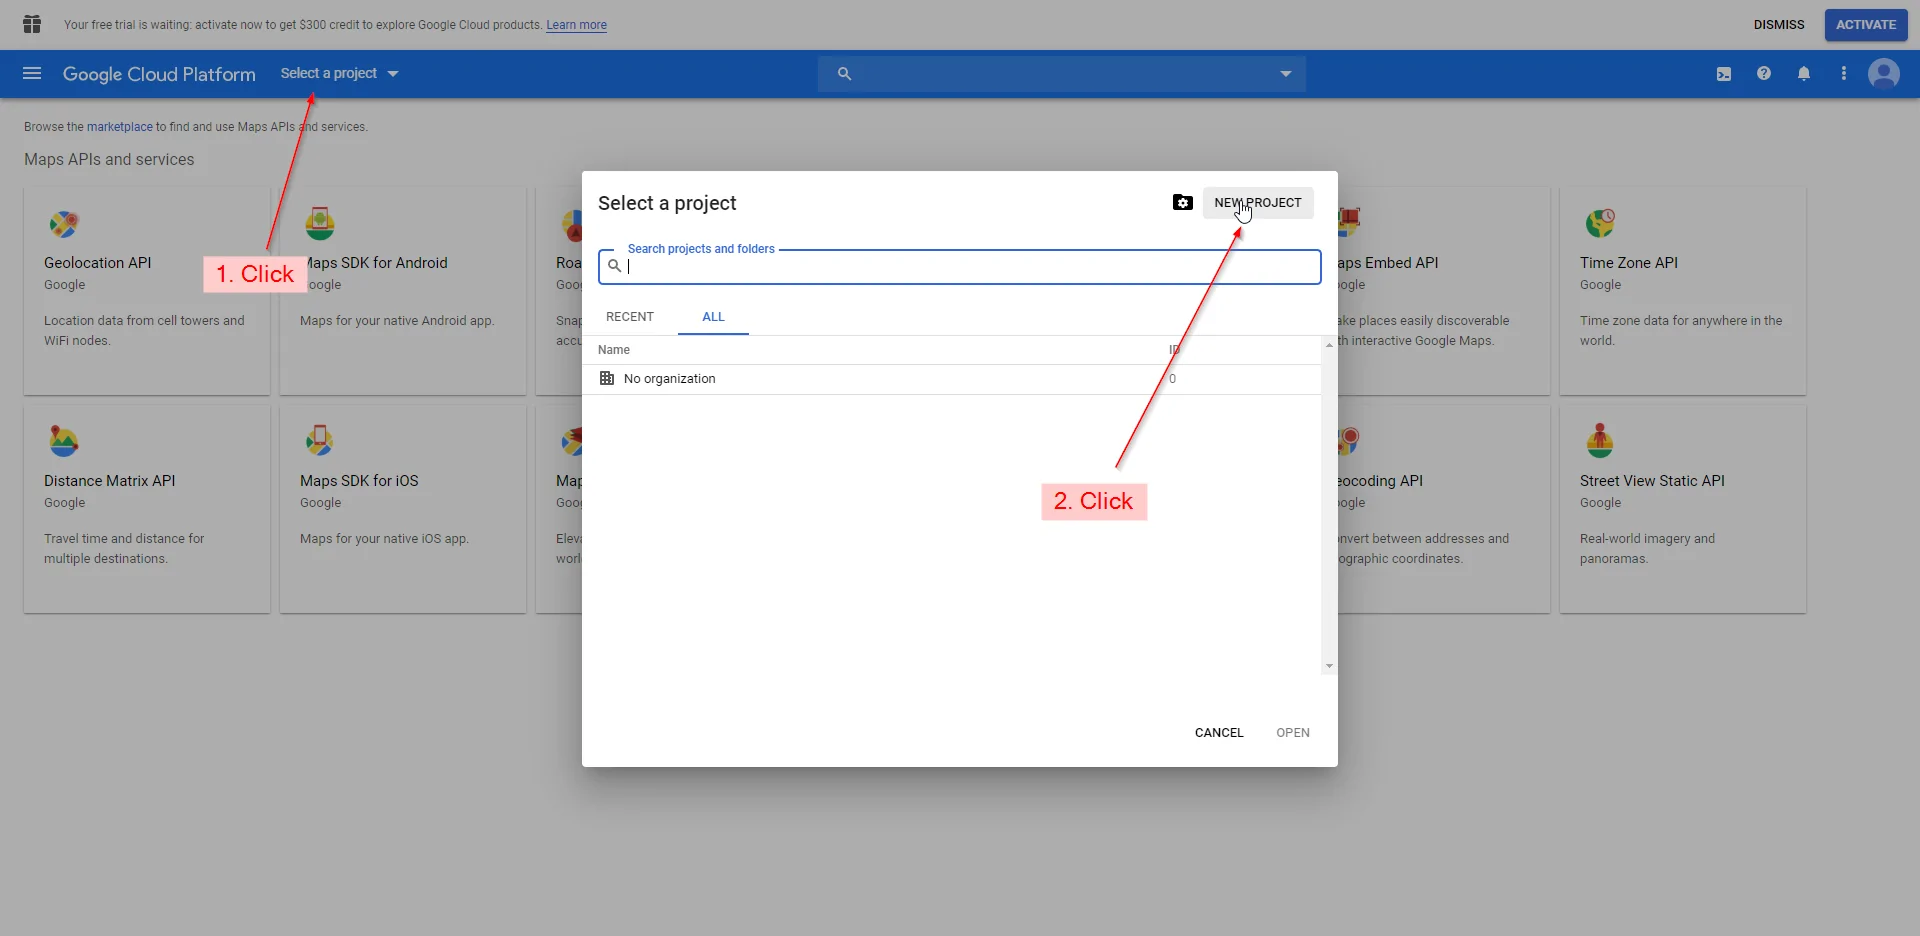
To construct a data entry chatbot utilizing Dialogflow and Google Sheets, the primary phase involves setting up a Google Cloud project. Begin by making a Google Cloud account in case you do not already own one. After you have logged in, proceed to the Google Cloud Console and make a new project. Assign a pertinent title to your project for simple identification.
Following, enable the fundamental APIs. head to the API & Services segment and empower both Dialogflow API and Google Sheets API. These APIs will permit the chatbot to communicate with Dialogflow and store information in Google Sheets.
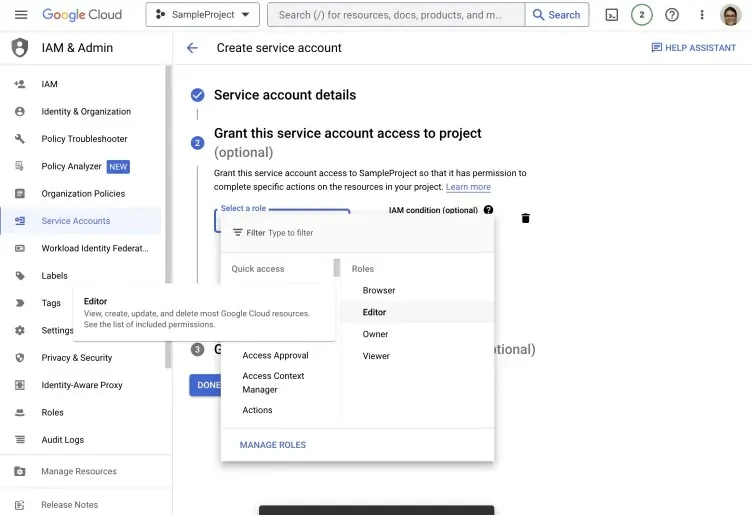
To confirm and connect the chatbot with Google Sheets, make a service account. Move to the IAM & Admin section, choose Service Accounts, and create a new one. Allot it the Editor role to give consents for adjusting Google Sheets. At that point, create and download the JSON key file, which is able be utilized afterward to verify the webhook.
Make sure that billing is set up, as a few cloud services mandate it. In any case, most functionalities stay free inside Google’s utilization limits. This phase will lay the foundation for joining Dialogflow with Google Sheets and guarantee smooth API interactions in the afterwards stages.
Step 2: Creating A Dialogflow Agent
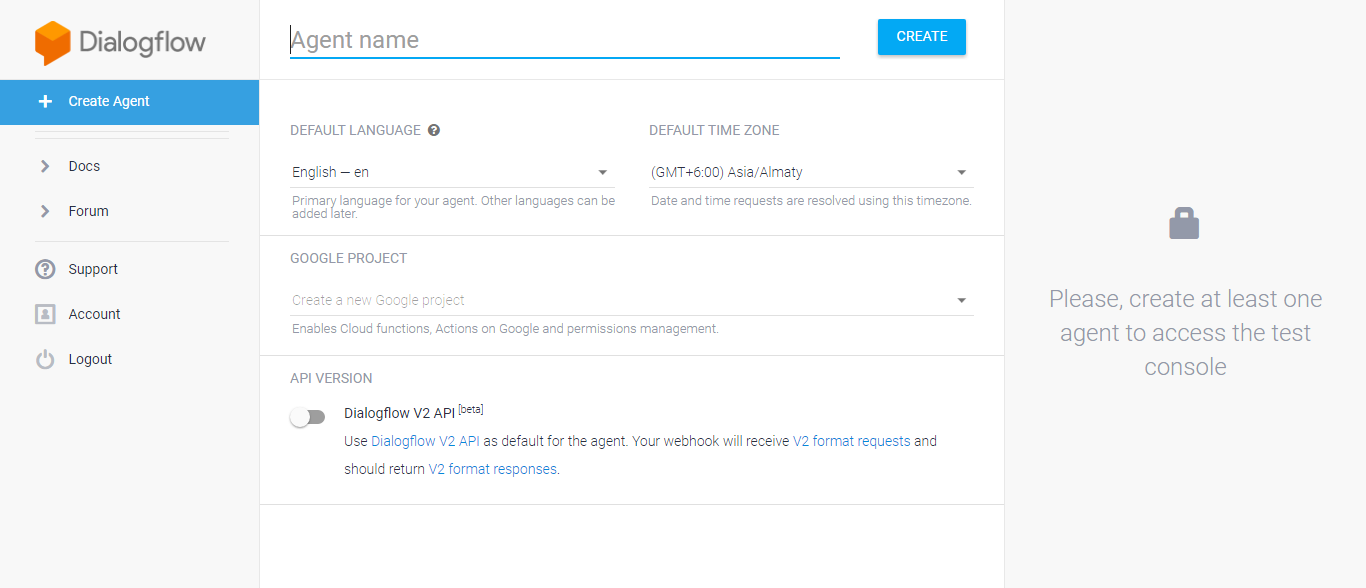
After setting up your Google Cloud project, the second phase is to create a Dialogflow agent that will address user interactions. Begin by going to Dialogflow CX or ES and signing in with your Google account. Choose your Google Cloud project and make a new agent. Allot a significant title to your agent, like Data Entry Bot, and select the suitable dialect and time zone.
Once you have created the agent, define intents, which depict user queries. For instance, make an intent called store_data to capture information such as names, emails, or order details. Include training phrases like sample user inputs to help Dialogflow recognize distinctive ways of information entry by users.
After that, configure entities to extract organized information. For instance, in case collecting names, emails, or contact numbers, make related entities for appropriate data extraction.
Put up fulfilment to facilitate webhook integration, which can afterwards send information to Google Sheets. Head to the Fulfillment section and empower Webhook, giving a brief URL to be replaced when the Webhook is prepared.
At last, test the agent utilizing the built-in simulator to make sure it accurately identifies user inputs and triggers the proper intent.
Step 3: Incorporating The Google Sheets API
To empower data storage in Google Sheets, you have to incorporate the Google Sheets API with your project. Begin by making a new Google Sheet that will store the chatbot’s collected information. Rename column headers according to the data you need to store including Name, Email, Phone, and Message. Get the Google Sheet ID copied from the URL, because it will be required subsequently.
Following, enable the Google Sheets API in Google Cloud. Head to the Google Cloud Console, proceed to API & Services and seek Google Sheets API. Tap Enable to trigger it for your project.
To permit programmatic access, put on a service account. Head to IAM & Admin > Service Accounts, make a new service account and give it the Editor role. Create a JSON key file and download it. That will confirm your webhook.
Presently, allow the service account access to your Google Sheet. Open the sheet, tap Share, and enter the service account mail from the JSON file, giving it Editor authorizations.
After you are done with these actions, your Google Sheets API is presently ready to get information from the chatbot.
Step 4: Making A Webhook
Presently Dialogflow and Google Sheets API are put in position the fourth step is to make a webhook that links them. The webhook will acquire user input from Dialogflow and store it in Google Sheets.
Begin by creating a Node.js or Python script to handle requests. The script ought to get a POST request from Dialogflow with extracted user information.
It also should confirm utilizing the service account JSON key, Open the target Google Sheet utilizing the Google Sheets API and add the received information to the next accessible row.
Here is an example in Node.js:
const express = require(“express”);
const { google } = require(“googleapis”);
const app = express();
app.use(express.json());
const credentials = require(“./service-account.json”);
const auth = new google.auth.GoogleAuth({
credentials,
scopes: [“https://www.googleapis.com/auth/spreadsheets”],
});
const SHEET_ID = “your_google_sheet_id”;
app.post(“/webhook”, async (req, res) => {
const { name, email } = req.body.queryResult.parameters;
const sheets = google.sheets({ version: “v4”, auth });
await sheets.spreadsheets.values.append({
spreadsheetId: SHEET_ID,
range: “Sheet1!A:B”,
valueInputOption: “RAW”,
requestBody: { values: [[name, email]] },
});
res.json({ fulfillmentText: “Data saved successfully!” });
});
app.listen(3000, () => console.log(“Webhook running on port 3000”));
The above script listens for requests, extracts information, and stores it in Google Sheets. It’ll be deployed within the following phase.
Step 5: Deploying On A Cloud Service
Once the webhook is developed, it must be deployed on a cloud service so that Dialogflow can get to it. A prevalent choice is Firebase Cloud Functions or Google Cloud Functions, but other stages such as Heroku or Vercel can also be utilized. To begin with, make sure Node.js and Firebase CLI are installed, then establish Firebase in your project by executing Firebase init functions. Select Node.js as the environment and include the webhook script inside the index.js file. Deploy it utilizing Firebase deploy, just functions and copy the developed URL.
Within Dialogflow, move to the Fulfillment area and enable Webhook, at that point paste the conveyed URL. Another, proceed to your intent (e.g., store_data) and activate Webhook Call for This Intent within the fulfilment settings. It will guarantee that whenever the intent is triggered, Dialogflow will pass user information to the webhook.
Test the setup by corresponding with the chatbot and confirming that the data shows up in Google Sheets. In case there are any problems, inspect the webhook logs and debug errors. After it is verified, the webhook is integrated, permitting automated data entry from the chatbot to Google Sheets.
Step 6: Testing And Optimizing

Once the webhook is deployed and integrated with Dialogflow, the ultimate phase is to test and optimize the chatbot for precise functionality. Begin by utilizing the Dialogflow Test Console to mimic conversations and confirm that the chatbot accurately acknowledges user inputs, triggers the proper intent, and sends information to Google Sheets. Inspect the sheet to guarantee that each section is recorded precisely.
In the event that issues arise, survey the Dialogflow Logs and Google Cloud Logs to debug errors. Typical problems incorporate incorrect webhook URLs, lost API permissions, or misconfigured request designs. Alter your webhook or intent settings as required.
Upgrade the chatbot by polishing training phrases to progress intent acknowledgement. Include rich responses such as confirmation messages and error addressing to improve the user encounter. Execute validation checks to guarantee correct information formats.
At last, convey the chatbot on platforms such as WhatsApp, Telegram, or a website utilizing Dialogflow’s integrations. Screen its execution and make changes based on user interactions. It will guarantee a completely functional, productive data entry chatbot that dependably stores data in Google Sheets.
Conclusion
In conclusion, integrating Dialogflow with Google Sheets might appear like a difficult assignment, but with the correct procedures, it becomes doable and fruitful. The possibilities for creating strong chatbots that can retrieve and supply data on demand are endless owing to this combination. The steps described in the above blog will help you build chatbots that can dynamically respond to queries from users and get certain data from a Google Sheet. Ultimately the users can create chatbots that can effortlessly gather pertinent data by integrating powerful tools like Dialogflow with Google Sheets.
